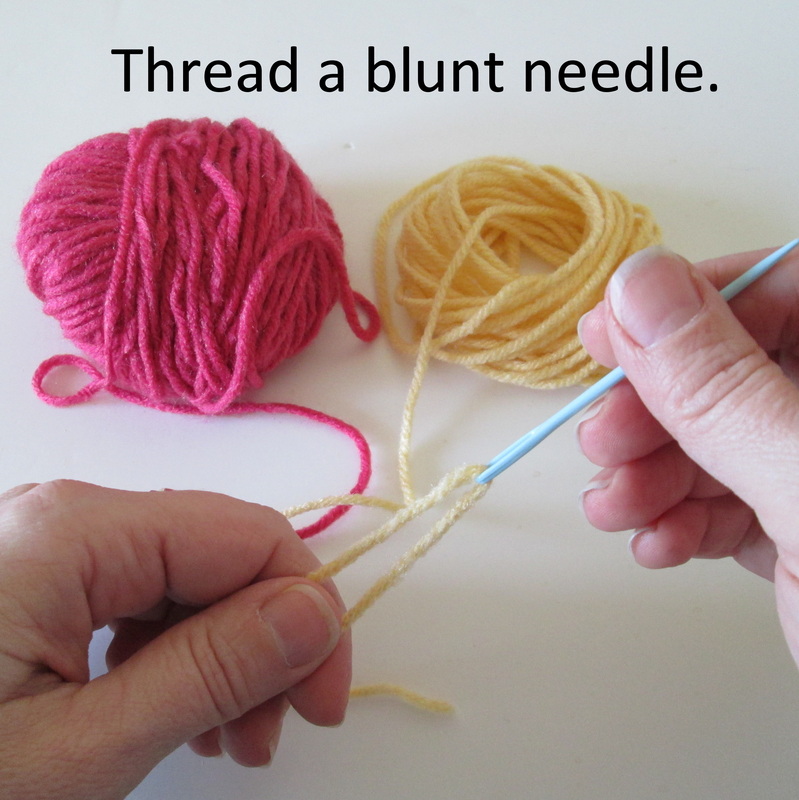
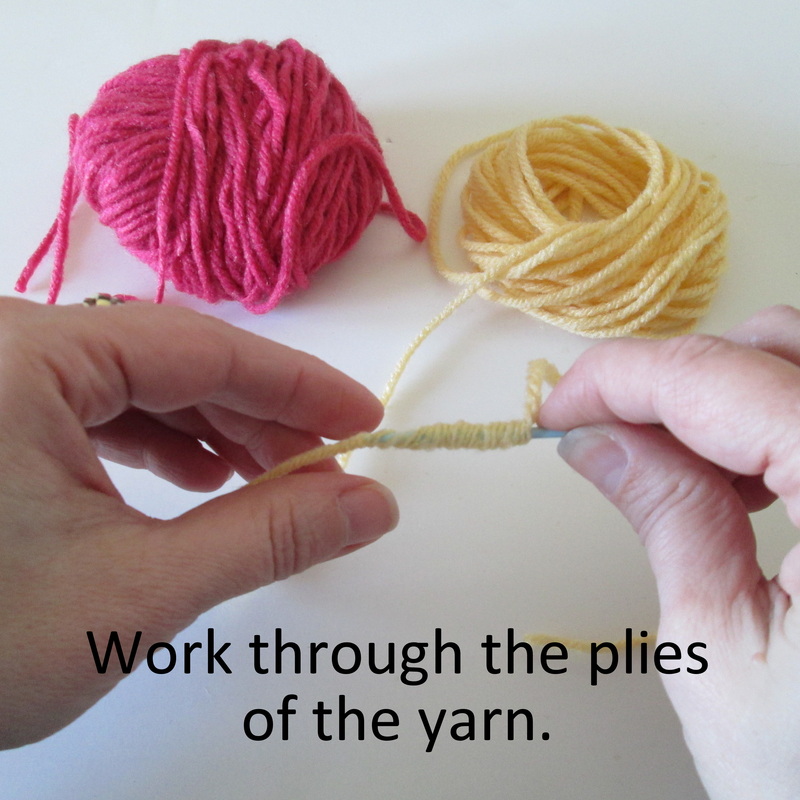
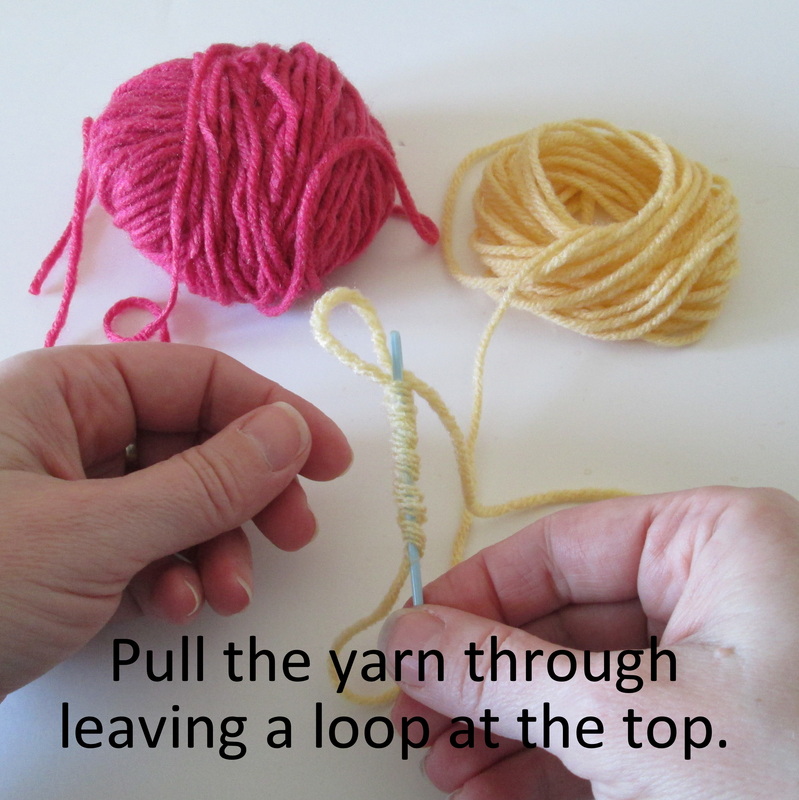
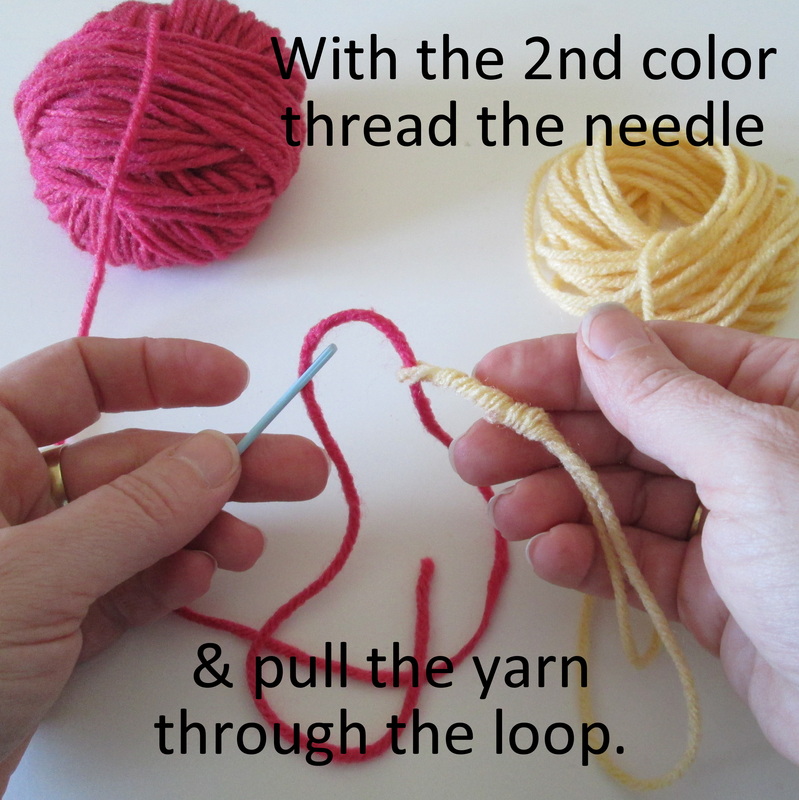
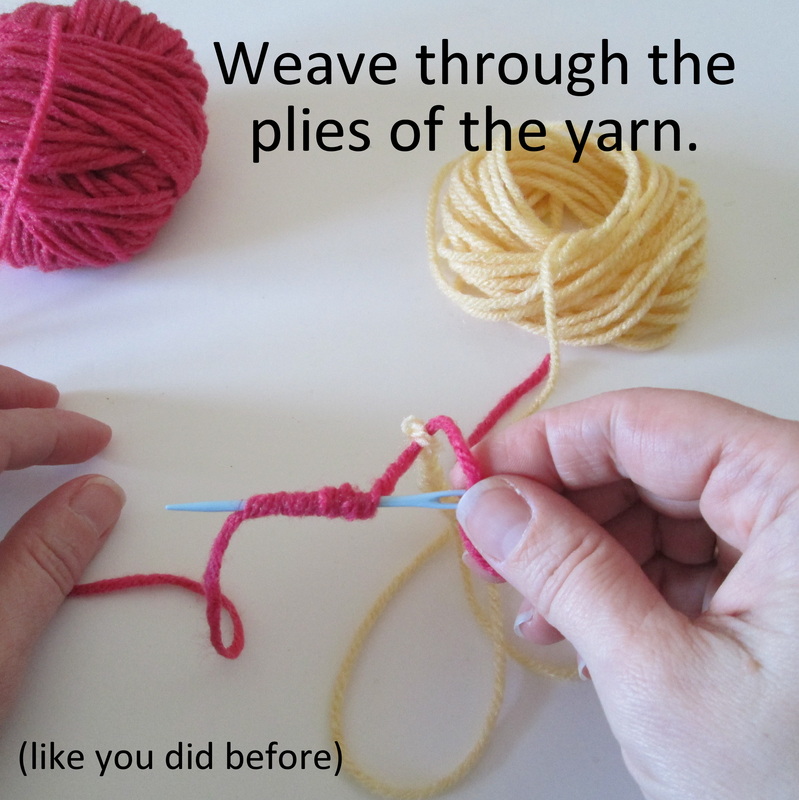
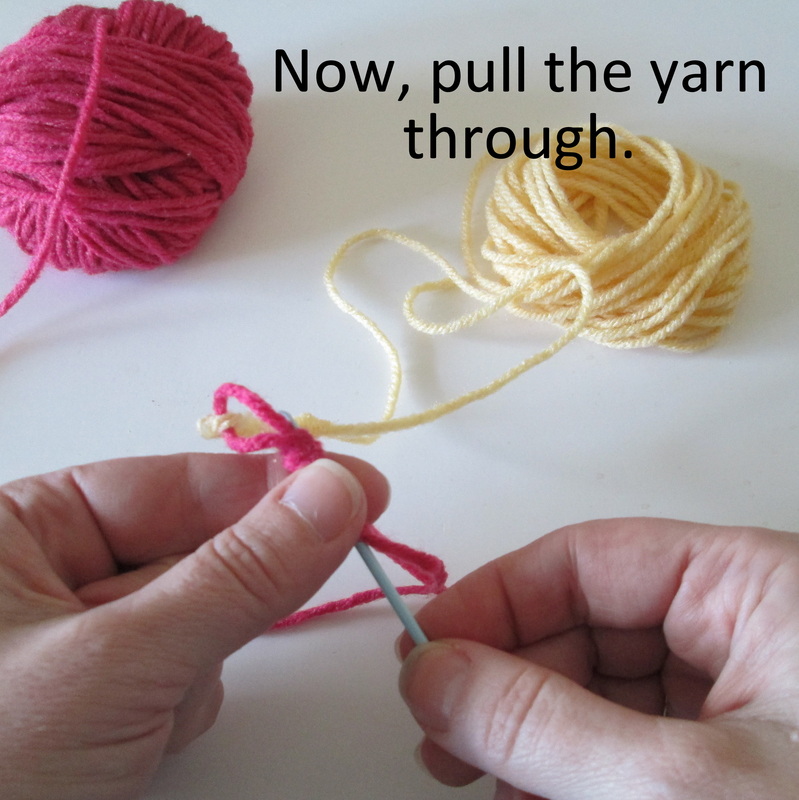
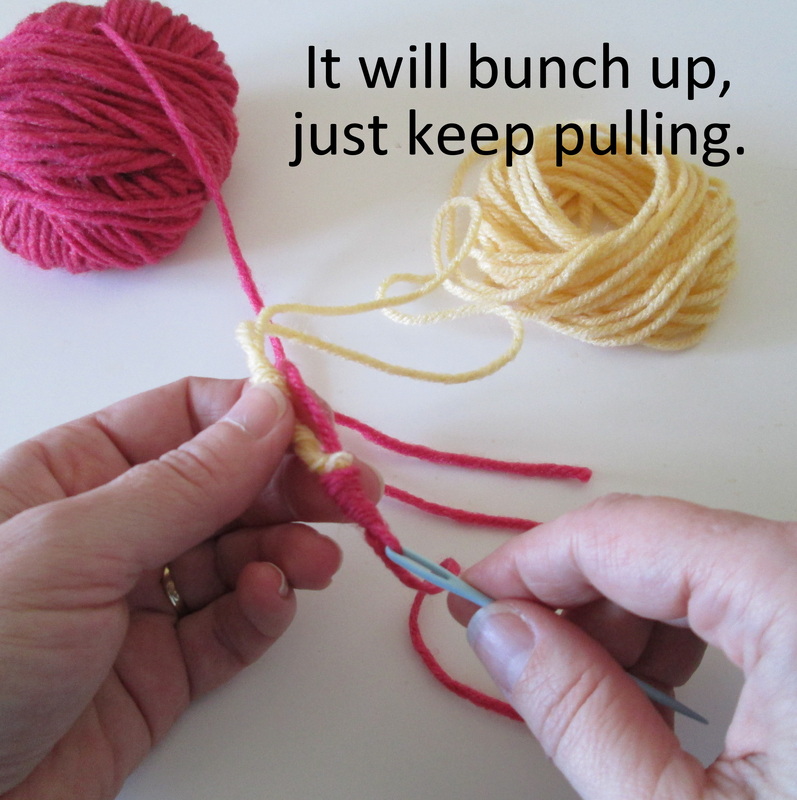
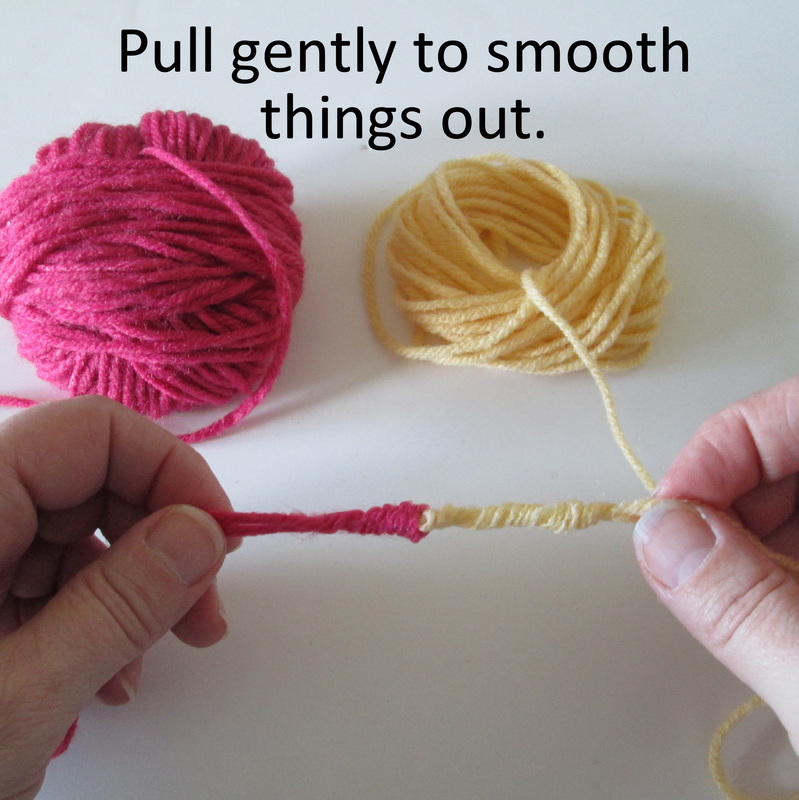
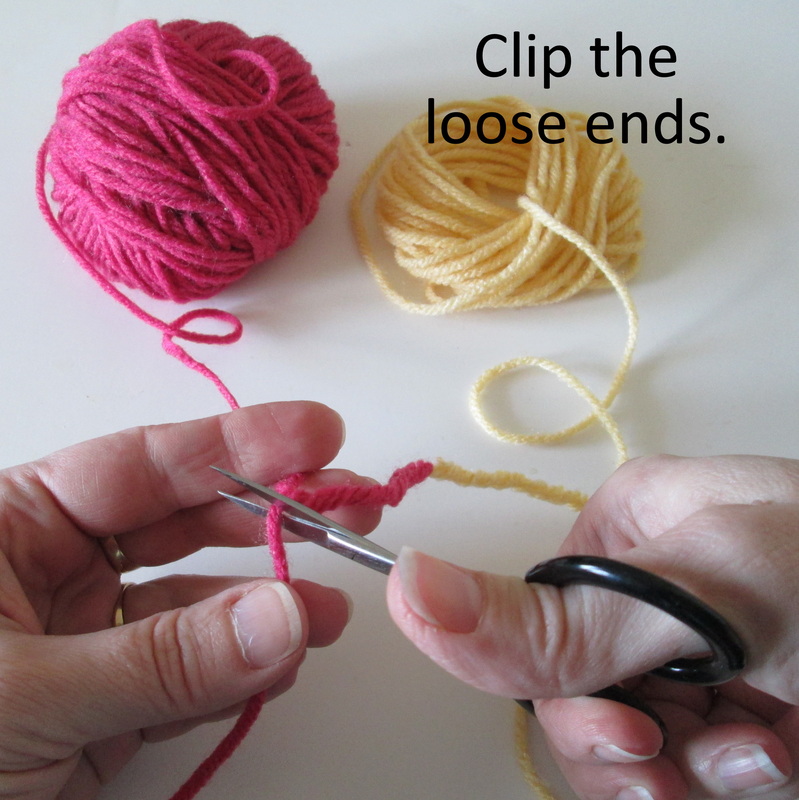
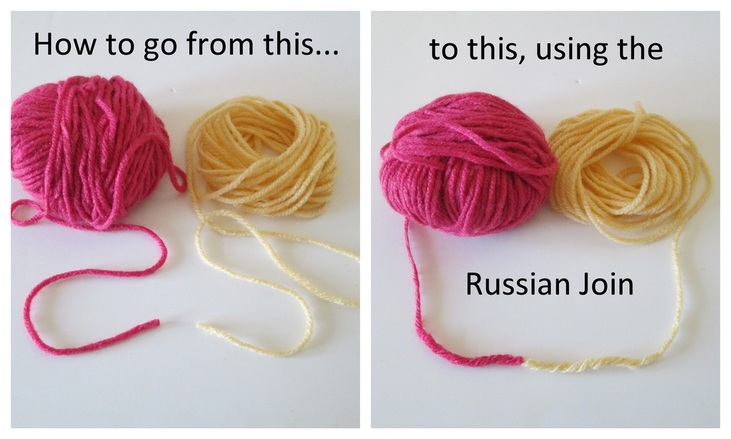
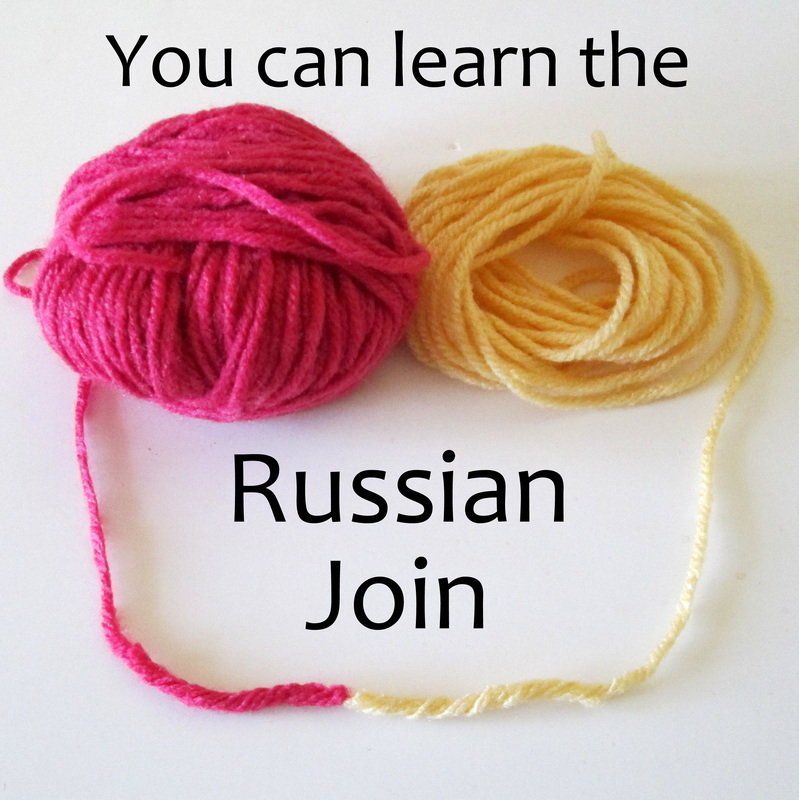
 It's Easy - Really!! Let's face it. Attaching new yarn is a pain. When I started crocheting I did my best to avoid it. Unfortunately that lead to some small, plain projects. Eventually I faced my fear and made a striped hat. It's not real pretty, but it helped me get the hang of adding color to my world. The hardest part was having faith that I didn't need to tie a knot. I worried that everything was too loose. I realized that after working a few rows the join tightened up on its own. Hooray! It took practice, but now I don't panic when I get to the end of a ball of yarn, or avoid patterns that have more than one color. Then I started knitting. Now I have to learn how to attach new yarn all over again! There are different techniques depending on what kind of needles you use. It's challenging because it's new, but I'm sure that with practice it will get easier. There is one thing that's the same - the loose ends. No matter what you do or how you do it there are going to be ends that need to be woven in. This is my least favorite part of knitting and crochet. I procrastinate and leave it until the end, and I always worry that it's going to come undone and my hard work will unravel right before my eyes. I don't think I'm alone in this - am I? Then I heard about the Russian Join. It sounded really difficult, like it involved weaving and grafting and maybe even a little magic. It also seemed too good to be true. A clean join with no ends to weave in? Nonsense! So for a long time I steered clear. Until a few months ago when I stumbled across this post and decided to give it a try. It was so easy, the results were beautiful and you know the best part - no ends to weave in!! It's not appropriate in every situation, but now whenever possible this is my go to method. Even if you don't think you'll like it, I encourage you to give this a try. Just once, and see if it doesn't become a favorite in your bag of tricks! Here's how you do it:
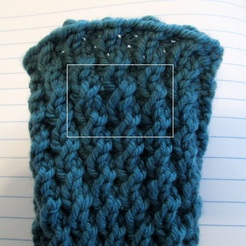
 Pretty nifty isn't it? Once your yarns are joined and stitched into the fabric it's nearly impossible to tell where the breaks are. Take a look at this fingerless mitt. I actually had to mark where the join was after I did it
to knit straight through. Now there are no lumps in the bottom of the sock and the only ends that need to be woven in are from when I cast on and after I bind off.
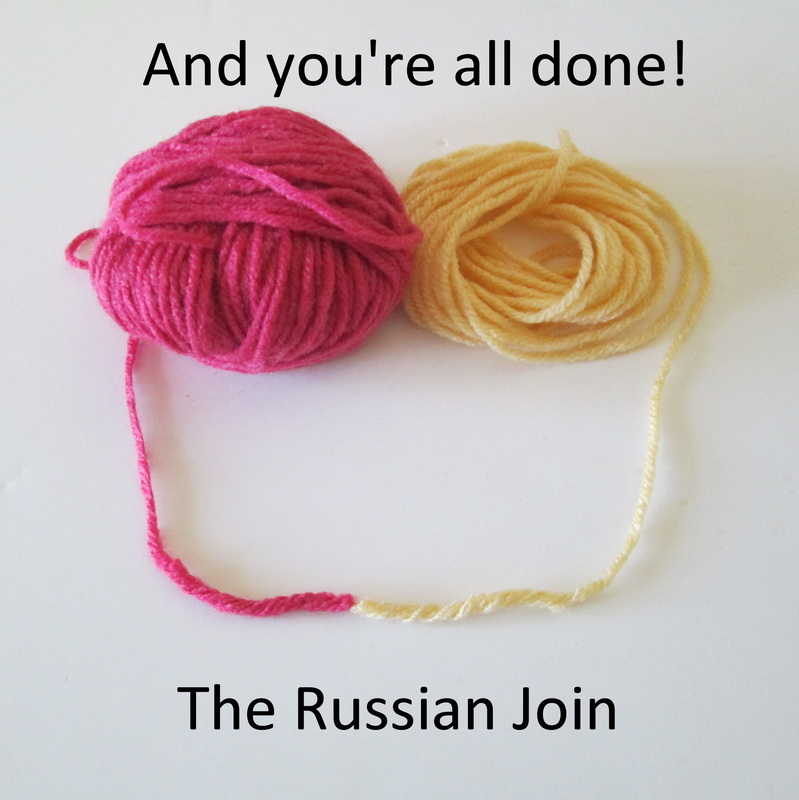
That's it friends! I sure hope you'll take a few minutes to give it a try. Please let me know if you have any questions about the instructions. My goal is to make them as clear as possible - so your feedback is important. I'd also love to hear from anyone who uses this type of join. Your tips and pointers are always welcome, so don't be shy! Thanks so much for stopping by and spending a bit of your day with me. Until next time, Be blessed and stitch & read with love!
35 Comments
You bet Sue! It was the same for me, but I thought it would be too hard. I'm so glad I decided to try it. It's always good to have more tools in the tool box!!
Sheela
10/12/2017 05:23:45 am
Thanks for sharing this usefule bit of knowledge/infomation much appreciated. 4/22/2013 02:48:49 pm
Wow, great tutorial! I've never seen this before. Totally pinning! Thanks for sharing at Hookin On Hump Day!
Mopsy
5/23/2013 07:03:42 am
How does it hold up to washing? I am making a series of cotton baby blankets and am looking for a solid and smooth washable join.
So here's the thing Mopsy, I really don't know!! I've only just started using it. I know (from others) that when it's done with wool it holds very well as it sort of felts with the washings. Before committing to it a test piece might be in order. Try making a swatch with a few joins and then wash as you will the blankets. That will give you the real answer. I'd hate to see you use it without testing and then have it come undone. I'd love to know how you make out.
Ava
6/21/2014 11:22:30 am
This is the BEST explanation of the Russian Join I have seen. NOW I am certain I can do this. Thanks Bunches! 7/28/2014 07:53:47 pm
thank you for sharing this information to us I hope I can find it again at a later time during a visit...!!!
Claudia
8/6/2014 08:30:49 am
I remember years ago working with a guy that spliced rope. He explained that as you pulled on the rope, the strands would tighten up, holding what was between them even harder. Yet, when you loosened the rope you could easily get something out of between the strands. I'm thinking this same principle is at work here.
Joy
11/10/2014 04:37:01 am
Brilliant. Just Brilliant! I'm new at this and have been hating the knots. Ok I've only been knitting wash cloths and the knots could add extra scrubbing power, but they are still ugly and I can see each one! I can't wait.
Crochet & Knit Help And Inspiration
1/13/2015 11:13:27 pm
This looks great! I think I had a similar idea because my dad would do it with ropes, but I haven't tried it yet. This is a really good idea for joining different colours.
Samantha
1/19/2015 05:56:21 am
Maybe I'm just dumb but I'm really confused by this. The pictures and explanation aren't very clear. Can someone elaborate for me?
Lorraibe
1/27/2015 03:26:47 am
I am a fairly new knitter and i hate making knots asnd having to weave in the ends. How does this work when changing colors when knitting an afghan at the end of a color section? At what point do you weave the ends together.
Hi Lorraibe!
Annie
6/10/2015 07:55:00 am
Must try this! Yarnlove posted this on FB.
Jodie Schossow
6/11/2015 03:46:48 am
Hi, I wanted to try this, but, I'm a crocheter. I was having a hard time figuring out how to do this when changing color at a new round. I went ahead and made the last stitch, pulled it out and weaved in the new color at the end of yarn that was used for the last stitch. Maybe this will work for others too.
Michelle
6/14/2015 08:08:29 am
I love this join, I've found its easier to use a metal needle instead of plastic
Jadelynne Marsden
6/21/2015 05:04:47 am
Can I use this in q graphafghan? I ask because I want to make one but don't want to weave all those ends in! It's a pain in the butt doing that every freaking time!!!!
Robin Brzozowski
7/2/2015 03:03:33 am
I hate weaving in ends too! This join is great for adding new yarn and random color changes. Personally I haven't figured out how to make a change at a specific location. It might be more work than a traditional start and stop where you can pick exactly where you want to start.
Nana Ali
10/25/2015 09:55:23 pm
Trae
10/28/2015 09:49:02 pm
I was pleasantly surprised at how easy this technique is. Thank you for sharing this.
Laureena
9/30/2016 03:22:03 pm
I am a crochet instructor, and would love permission to use your pictorial in my classes. Of course all credit would go to you.
Delores
1/29/2017 08:20:40 pm
Hi, I thoroughly enjoyed the time spent on your site. I am a senior and have been crocheting/knitting since my grandmother taught me as a child. One thing, no one is ever too old to learn new things.
Delores
1/29/2017 09:45:16 pm
Hi again, just wanted to add that if you are needing this change of color at a specific area, this will not work. For example, if you are making Spider-Man, for example, and you have to change colors from blue to red at a specific area, is this process going to work
Janice Faye Mcleish
3/27/2018 01:33:55 pm
II ha i
Wendy
11/30/2018 08:35:10 pm
Question - I am using a very loosly plied cooton yarn and I am wondering if this method will work, because it is so loose. The strands just fall apart.
Vicky
4/28/2019 09:17:23 am
Still 6 years later teaching old dogs new tricks great pictures
Kelly Marie Quesenberry
3/17/2020 06:35:59 pm
How can you get the money that is everything from a afghan Leave a Reply. |
I'm Robin and this is  
Click to see what's new on the Craftsy Crochet Blog!
Follow Along
 Tutorials and Patterns


On Instagram 
Look for me, I'm RobinBrz


Places I Post

 Archives
July 2015
Categories
All
 
Thank you for visiting!
My name is Robin. I am a wife, mother and strong believer in the power of faith. I'm a maker, a crafter and an artist. I love exploring new mediums and sharing my adventures with you. Did you enjoy your visit? Let me know by leaving a comment. I love knowing you dropped by, and hope to see you again soon! Be Blessed and Stitch & Read with Love! 
|