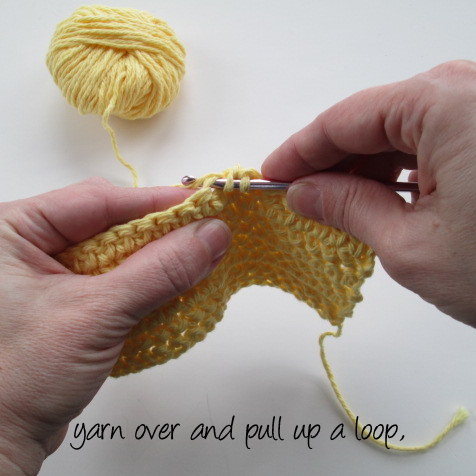
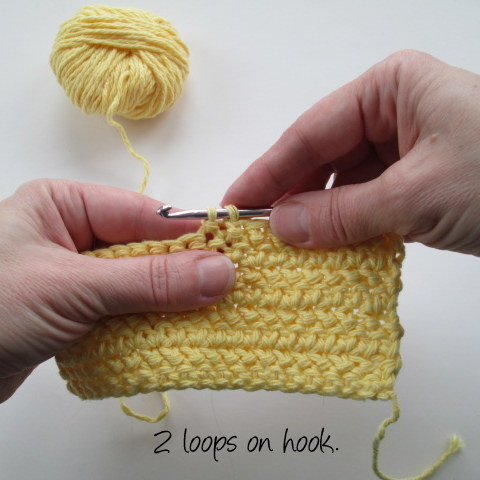
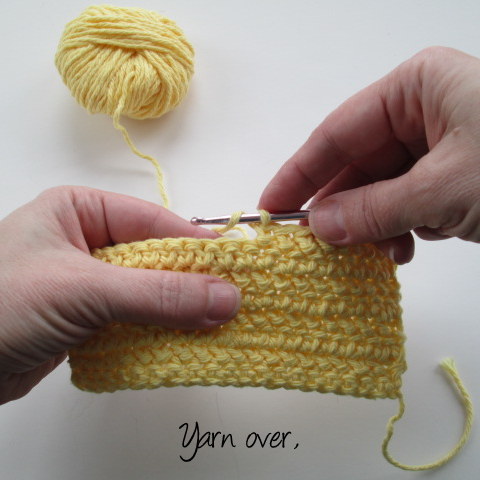
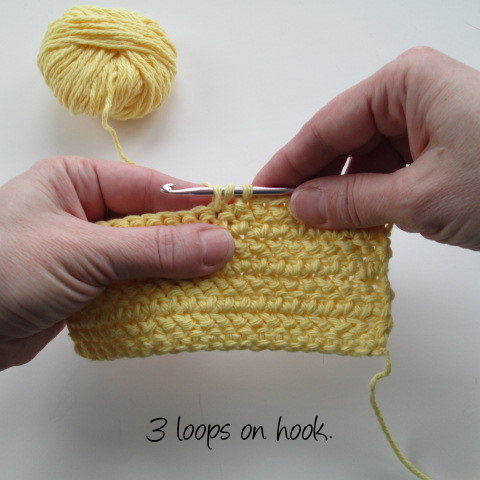
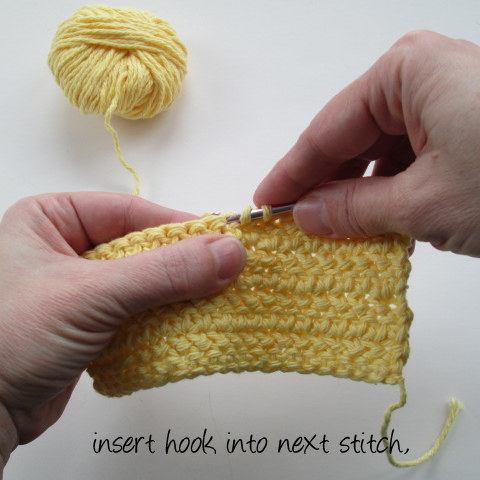
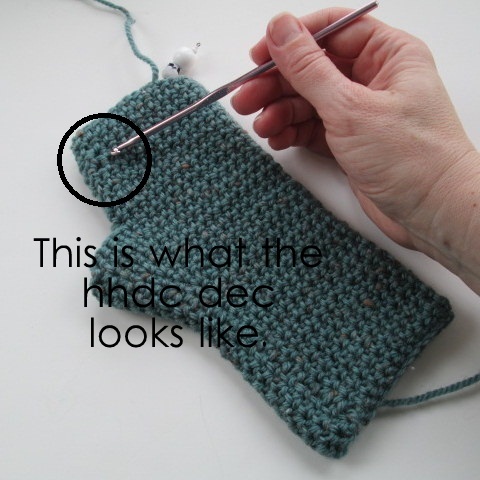
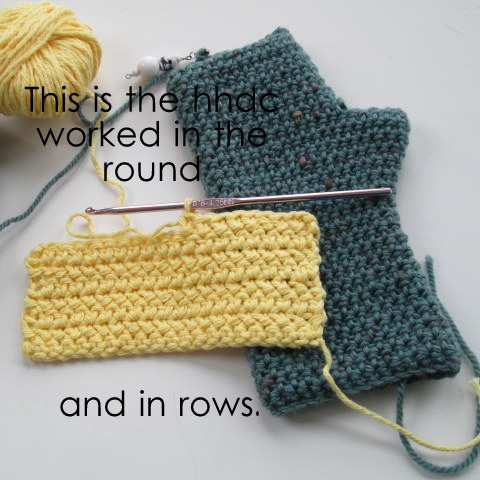
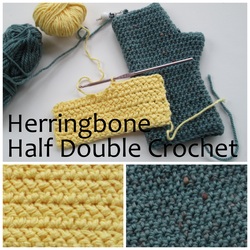
 Greetings Friends! Today I want to tell you about an awesome crochet stitch called the Herringbone Half Double. I was introduced to it a while ago in a pattern for fingerless mitts (Firecracker Gloves). Truthfully at the time I was new to crochet and found the stitch awkward. I never finished the gloves, and the pattern was forgotten. Earlier this week a series of unrelated events led me to discover the pattern stashed in a pile of old papers. It was crochet serendipity since I wanted make a pair of fingerless gloves to help combat the cold at work. I got started and discovered the stitch that once seemed difficult was now fun and interesting. After a few rows I found my rhythm and the yarn was gliding off my hook. The fabric that it produces is smooth and dense, perfect for gloves. Worked in the round it reminds me a bit of the fabric that the basic Tunisian stitch produces. Worked in rows it creates the herringbone design. I think that it would look lovely in a cardigan and it can probably be used in any pattern that calls for a standard half double crochet without much (if any) adjustment. Learning new stitches is one of the things that keeps me interested in crochet. For anyone who might be new to this one, or in case you need a refresher I put together this picture tutorial to encourage you to give it a try. At the end of the post are links to PDF files that you can download demonstrating the basic stitch as well as the increase and decrease. Working the Herringbone Step-by-Step
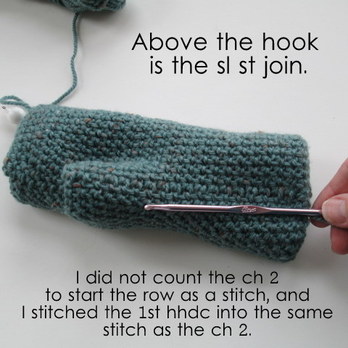
 I also want to show you how nicely this stitch seams together when working in the round. Typically I prefer working in a spiral to avoid the gaping, obvious seam that you get when joining rounds with a slip stitch.
The join blends in so well that it's hard to tell where it is unless you're looking for it. I've found that most patterns tell you to count the starting chain as a stitch. By working the first hhdc into the same stitch as the ch 2, and then joining the last stitch with a sl st to the first hhdc there's no gap. I will definitely try this technique on other patterns. There you have it! I sure hope that you give this versatile stitch a try. If you're a beginner, be patient and give yourself time to get used to the movement. It's not hard, it just feels different than what you might be used to. Let me know if you've ever made anything using this stitch. I'd also love to hear about other stitches that you think I should try.
Thanks so much for stopping by and spending a bit of your day with me.
Until next time friends, Be blessed and stitch & read with love!
26 Comments
kristin
1/14/2013 02:23:17 am
Thanks for the tutorial. I can't wait to try this stitch. 1/15/2013 11:44:31 am
Great tutorial with very nice pictures, Robin! I've got to try this stitch myself. Pinning this post! Thanks for sharing at Hookin On Hump Day!
Susie
1/17/2013 01:11:18 am
That IS a beautiful stitch! I'm excited to try it! Just curious as to what size hook you used? I'm fairly new to crochet but want to expand my stitches from the basic sc, dc, hdc, tc, etc and this one looks like the perfect one to try. Thanks for the awesom pictures! : ) So happy to hear from you Susie. I think that you'll find this stitch to be a great addition to your repertoire. For the fingerless gloves I used an F/5 - 3.75mm hook and worsted weight wool. For the yellow swatch worked in rows I used an H/8 - 5.00mm and worsted weight cotton. I think it will work well with whatever combination of hook and yarn you choose to use. Good luck, have fun and please feel free to share pictures on Facebook (http://www.facebook.com/RobinBrz)
Karen
1/17/2013 03:43:54 am
Very nice! I love to learn new crochet stitches, too. I will def give this one a whirl! Thanks for sharing
Ann
1/18/2013 03:39:48 am
Always looking for new stitches. This looks fun. Do you chain an odd or even number of starting chains? And which chain do you start in at the beginning of your first row? Thanks for your help. Hi Ann. Thanks for stopping by. I don't think that it matters how many chains you start with since this stitch is only worked into one chain (or stitch) at a time (unless increasing or decreasing). For the beginning row: YO, insert hook in 3rd ch. When you get to the end of the row, ch 2 and turn. When I worked in the round I did NOT count the turning chain as a stitch, but when I worked in rows I did. I'd say it;s up to you and which method gives you the look you're after. Have fun!
Spoonie Treasure
1/18/2013 07:14:00 am
This is my all time favorite stitch. Great for blankets, thick and squishy. Also good for trinket bags. Tight gauge or loose, it is easy and beautiful.
Mercy
2/2/2013 10:10:45 am
Gracias por compartir, me hiciste muy feliz!!!!!!!!!
martha
2/28/2013 02:11:57 pm
Thank you so much for posting this... ive been looking for a herringbone stitch. And its so easy. BONUS!!!!
Kate
7/3/2013 05:39:54 am
I'm confused, this sounds like a double crochet? Is there maybe a step that I'm missing?
Donna
5/30/2014 07:24:31 am
Me, too. Is this the UK version?
Donna
5/30/2014 08:32:46 am
Got it. There's a bit of a twist. It's not actually a dc. Here's a video: https://www.youtube.com/watch?v=WEhVZDmbUaA
Donna
5/30/2014 11:35:25 am
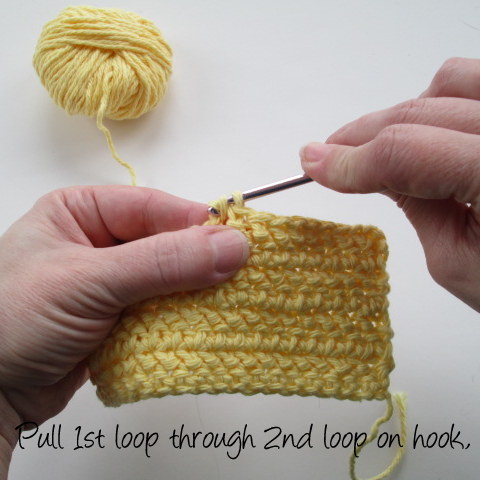
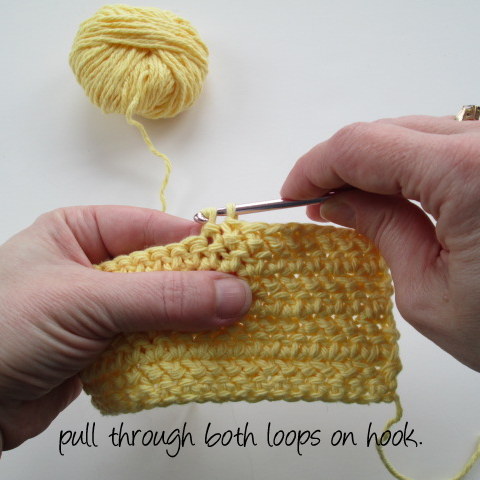
Found a video on youtube which made it clearer for me as my "crochet imagination" was adding steps to the above photos! :) The difference between hhdc and dc comes after the" yo, insert, yo, pull thru" part. In dc, you'd next " yo , pull thru 2, yo, pull thru 2:. In hhdc, you skip the yo, and pull thru the 1st lp on hook, THEN yo and pull thru 2." Very cool!
Joelle (JTBP)
10/17/2013 01:13:08 pm
Thanks so much for your great photographic tutorial for this stitch. I was working a gauge swatch for a hoodie/sweatshirt and was supposed to get a 4" square with 12 rows but couldn't do it, pattern was too tall. Found your instructions and HUZZAH! it worked just fine. Turns out there's an error in the instructions. Thanks muchly, your pic-torial saved my project :)
novicecrafter2
11/29/2013 10:34:23 pm
Now that I know the basic stitches I will give it a try Leave a Reply. |
I'm Robin and this is  
Click to see what's new on the Craftsy Crochet Blog!
Follow Along
 Tutorials and Patterns


On Instagram 
Look for me, I'm RobinBrz


Places I Post
 Archives
July 2015
Categories
All
 
Thank you for visiting!
My name is Robin. I am a wife, mother and strong believer in the power of faith. I'm a maker, a crafter and an artist. I love exploring new mediums and sharing my adventures with you. Did you enjoy your visit? Let me know by leaving a comment. I love knowing you dropped by, and hope to see you again soon! Be Blessed and Stitch & Read with Love! 
|
||||||||||||||