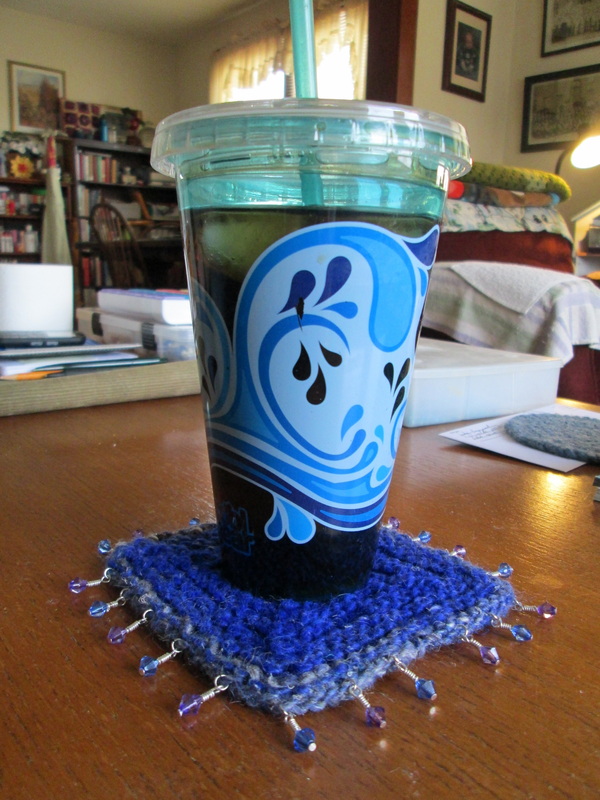
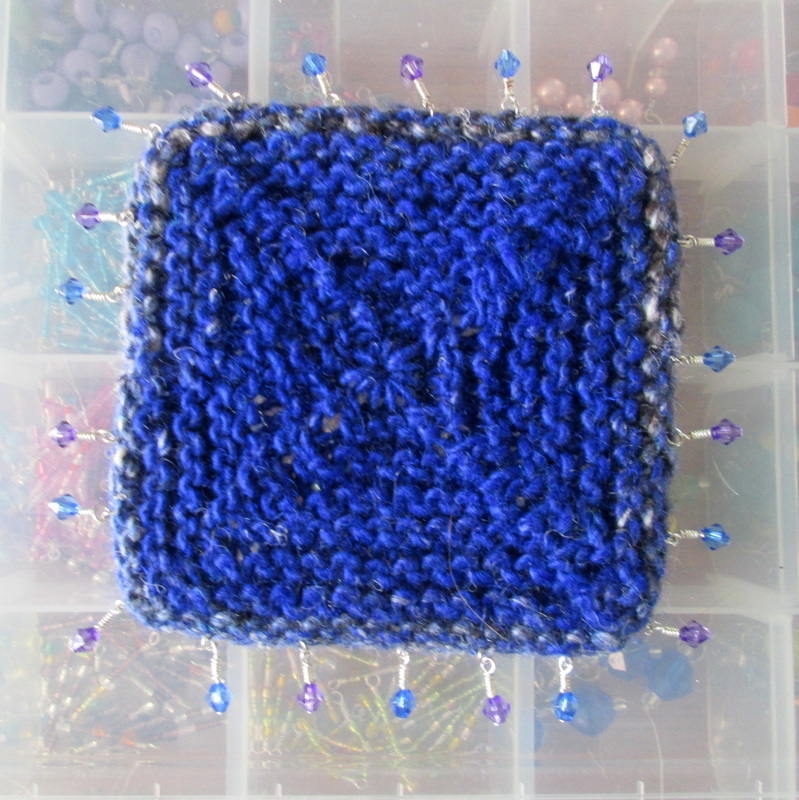
Additional fuel for my short attention span is my love of books. Pattern books to be specific. Not only do I receive terrific titles in the mail for review, but working at the library I can not resist browsing the catalog and borrowing anything - make that everything - that strikes my fancy! That's where I came across this quick and interesting project. In One-Skein Wonders; 101 Yarn-Shop Favorites I found Knitted Coasters with Charms. I thought that it would be a great way to combine John's beading with my knitting.
This is just a peek at one of the many projects that's been keeping me busy. I've been doing a whole lot of crafting, and not very much blogging. Time to get back in swing! I used to wonder what I was going to write about, not any more! I've got plenty of finished projects, works in progress plus don't forget the books to review and giveaway. I think you're going to be seeing a lot of me!
Thanks so much for stopping by and spending a bit of your day with me. Until next time friends, Be Blessed and Stitch & Read with Love!
6 Comments
Greetings! Being a new(ish) knitter, there are plenty of things that I'm still learning. Binding off (or casting off if you prefer) is one of those things. I've learned how to do a traditional bind off - where you knit (or purl) a stitch, then pass one over and drop the stitch off the needle. For some reason though, my bind offs are always loose. I've tried using smaller needles, but I still can't get it just right. It's a challenge because not only are my edges ending up floppy, I can never tell how big my item is going to be when I'm finished. When I crochet I don't have any of this trouble. I can see just what size my item is going to be, and I know exactly what my finished edge is going to look like. It's comforting. With knitting it's more of a leap of faith! Here's the thing. I really enjoy knitting and I know that with practice I'll improve, but I needed a plan! If you've been here before, you know that I'm all about trying new things. I figured that maybe a different binding off technique would give me the finish I was looking for. I remembered downloading a free ebook from Knitting Daily that had to have the answer. (If you're not familiar with Knitting Daily I urge you to check them out. The have a bounty of free ebooks available - on all kinds of topics!) That's where I found the sewn bind off. The book says that it creates a very elastic edge that is ropy in appearance, much like a purl row. Perfect the cowl that I was making as a Christmas present! 
On another note, I'd like to thank all of you who participate in my giveaways. I'm blessed to receive review copies from various publishers and they are kind enough to provide me with copies to share with you. Giving books (and other goodies) away is such a great feeling. I love reading your comments and getting to know you through Facebook, your blogs, Etsy shops and all the other ways we connect! I hope that you'll come back and visit again - I've got several amazing new titles that I know you're going to love!
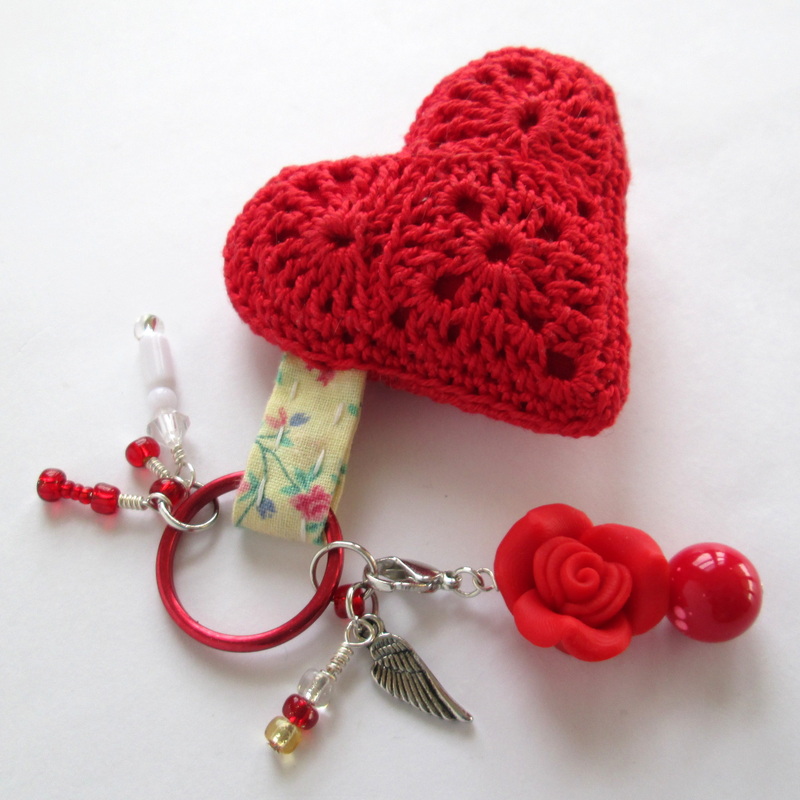
Thanks so much for stopping by and spending a bit of your day with me! Until next time friends, Be Blessed and Stitch & Read with Love! 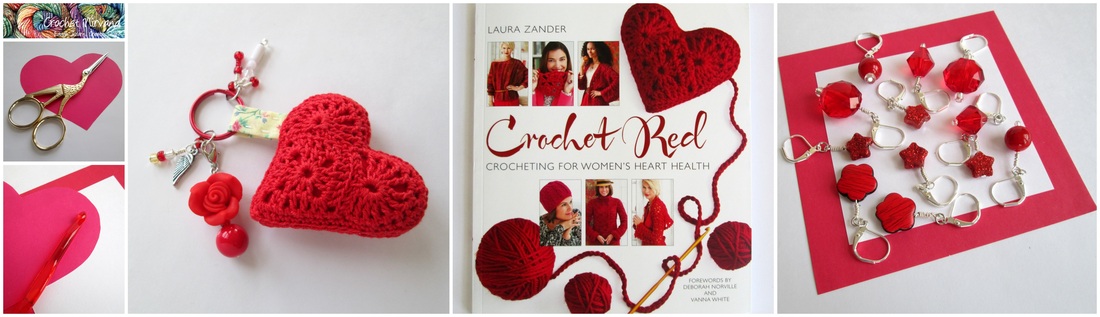 Greetings Friends! It's been a while since we've gotten together. Don't think that I've been slacking! I've actually got so many things in the works right now that I struggle to keep a healthy balance. Since my last post and giveaway I'm excited to report that I've acquired some great new books and accessories to share with you. So let's get right down to business and talk about the Stitch Red series and the newest book: Crochet Red. The Stitch Red series of books are the brain-child of Jimmy Beans Wool co-founder Laura Zander. Their designed to promote awareness and support for women and heart disease. Today heart disease is the number one killer of women and is more deadly than all forms of cancer. Wow! The good news is that we can change! Information gives us knowledge and that makes us powerful! Beautiful projects are coupled with personal stories from the designers, tips for healthy living and even enticing recipes. On top of that, a portion of the proceeds go to The Heart Truth® and women's heart health education and research. 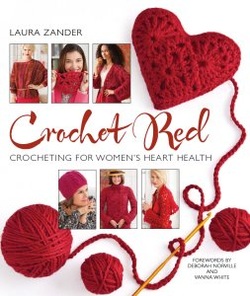 When the publisher asked my if I was interested in reviewing a copy I didn't hesitate to say yes. While the women in my family have been fortunate, in 2012 my husband at the tender young age of 50 suffered a major heart attack. Thanks to the amazing medical professionals and the technology available he's made a tremendous recovery. He's got a pacemaker that helps his damaged heart beat strong and steady and we're both now non-smokers after more than 30 years! Our family has made lots of changes and as devastating as the whole ordeal has been we appreciate each other more, let the little things slide and enjoy every single moment we have together. Things I'm sad to say we didn't always do before. During those difficult times going in and out of the hospital, crocheting was my serenity. I was too distracted to concentrate on books and reading, but the easy rhythm of hook and yarn helped to keep me calm and let time pass without counting every minute. I continue to find peace and relaxation with my yarn, and a project bag is always with me just in case! Now, about the book... Crochet Red is an attractive, nicely laid out collection. The book is divided into 3 primary sections. Following the introductions by both Deborah Norville and Vanna White we have: Projects & Profiles, Heart-Healthy Living, and Crochet Know-How. There are a variety of projects, and while a complete novice may need a little guidance, there seems to be a little something for everyone. There are bigger items, like the Peplum Jacket by Kathy Merrick with it's flattering shaping and detailed stitching at the waist and small fun items like the Heart Sachet (that I chose to make) by Kristin Nicholas. The patterns are clearly written and easy to follow. I did run into a little trouble making the heart sachet, but I think that was more due to being tired than any problem with the pattern!! I am a fan of charts as a means to enhance a written pattern, but I was able to get by without them and I think the end result is just lovely!! The photography is wonderful with multiple images from different angles including close ups of stitch details. I found this helpful (in the absence of charts) to make sure that I was following the pattern correctly. As a book and reading geek I especially like this book as the profiles of the designers and details about the patterns add insight and feelings that we don't always see in pattern collections. I'm always interested in what inspires a design and like to understand how it came into being. If you've read my reviews in the past, you know that I have a pet peeve about book bindings. I'm pleased to report that while this is a paperback with a glued binding, it easily stayed opened to the right page!! Crochet Red Prize Package
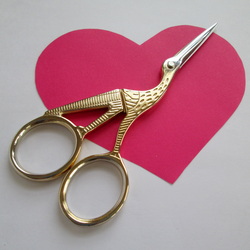
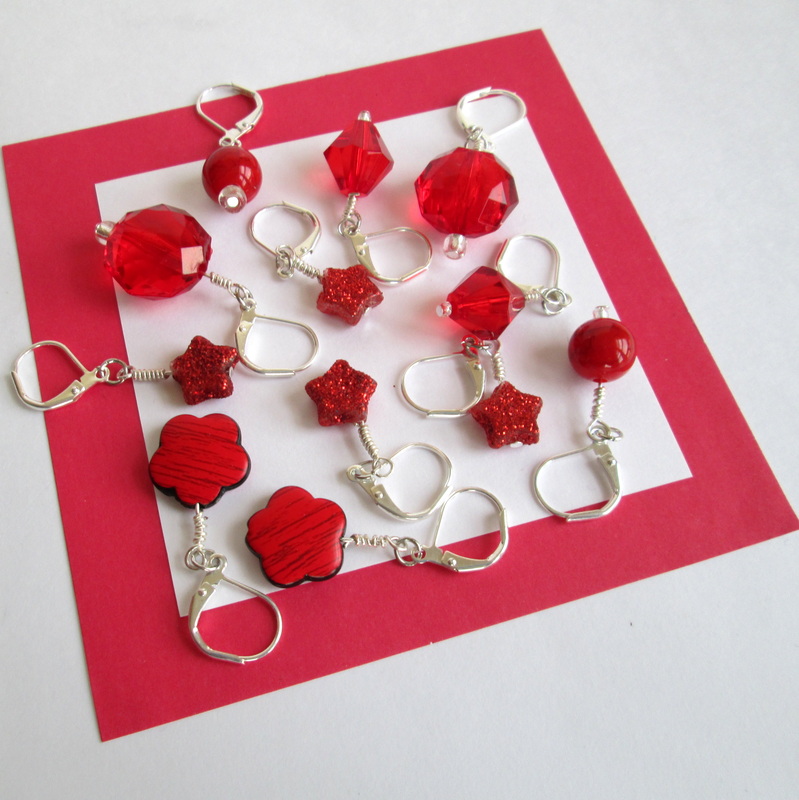
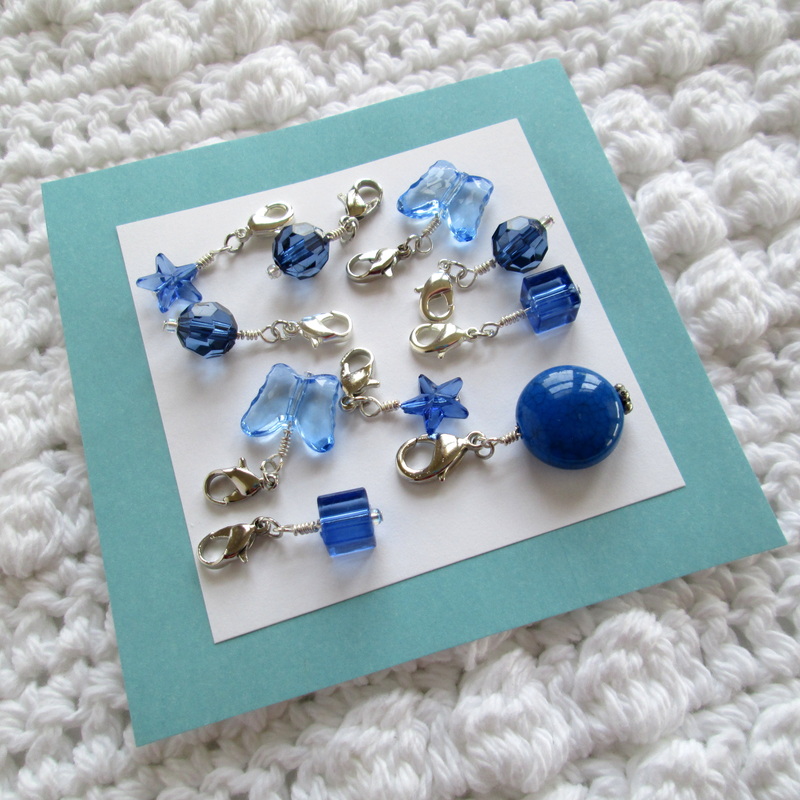
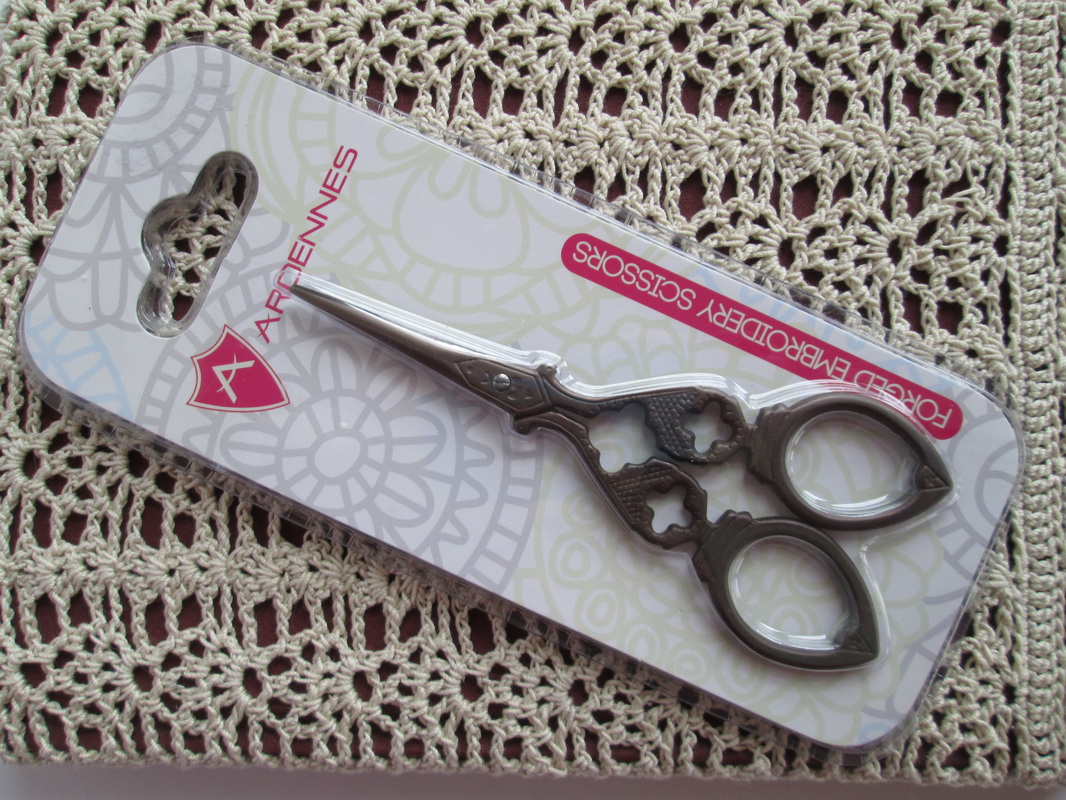
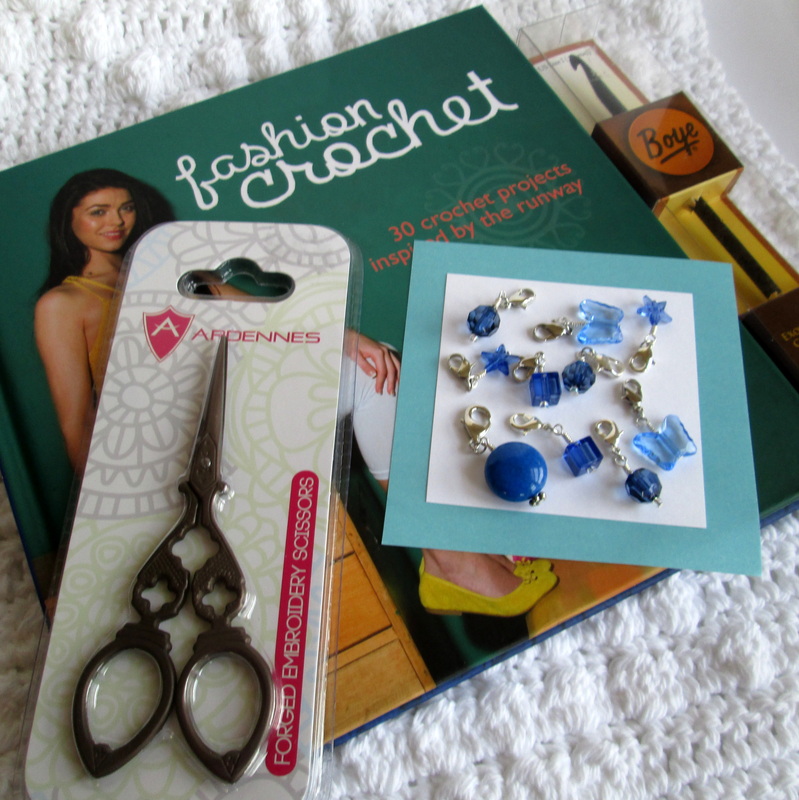
I'm really excited to have this red themed prize package for you. All of the pieces just seemed to come together and I think it may be one of the best giveaways yet!! Here's what you'll win: A copy of the book (from the folks at Sixth&Spring Books); A pair of my favorite stork scissors; A key chain made from heart sachet pattern in the book embellished with beaded charms; A set of hand crafted stitch markers from our shop Nirvana Designs with easy open lever backs (that could even make cute earrings!!); and finally a red crochet hook. WOW!! It's free, easy and open to EVERYONE!! If I can send it to you through the US post office - you can enter!! Well folks - I hope you're all as excited about this one as I am!
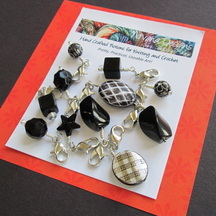
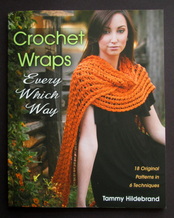
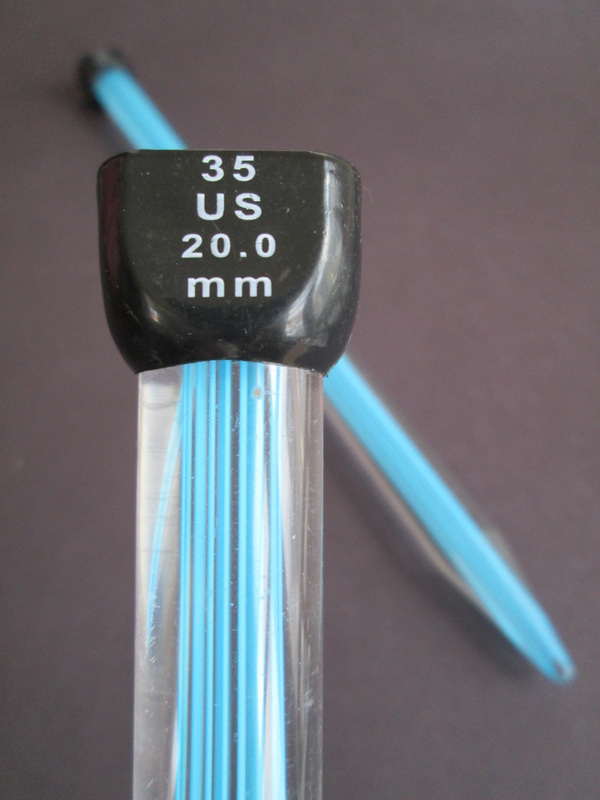
Thanks so much for stopping by and spending a bit of your day with me. Until next time friends, Be Blessed and Stitch & Read with Love! 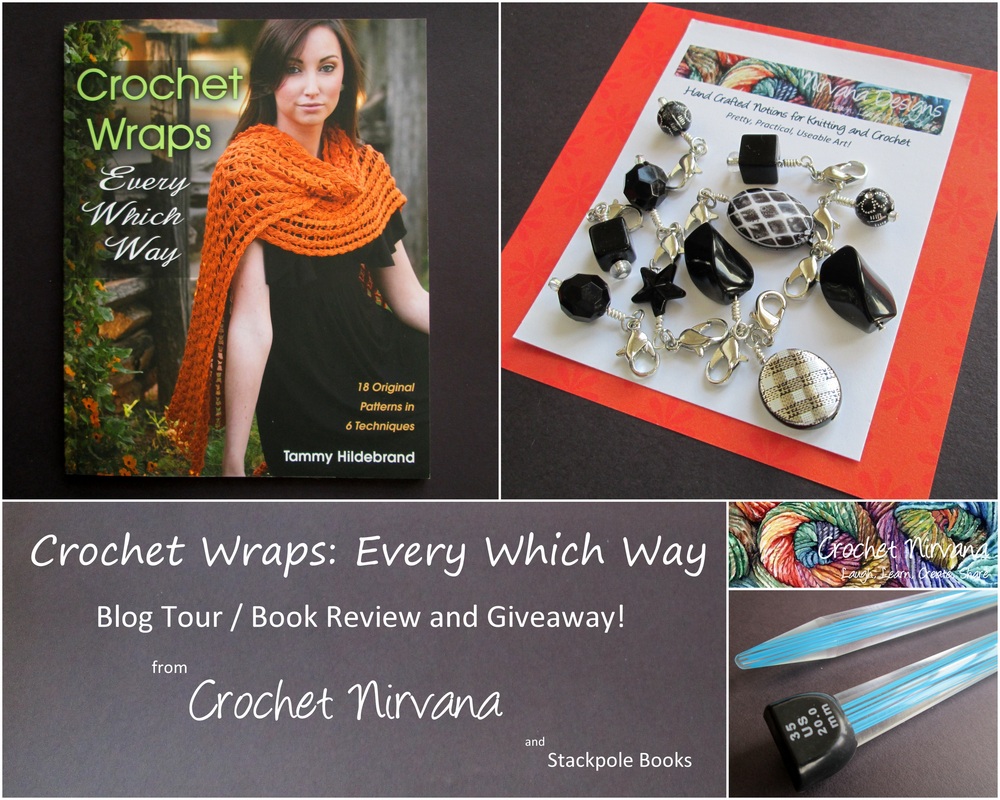 Greetings Friends! I live in Massachusetts. It's cold here. Not all the time, but right now in the middle of winter we're seeing some pretty low numbers! Add in the wind chill and we're talking negative numbers! And as much as I'd love to stay hunkered down in the house with a hot steamy cuppa and my latest project, the need to eat, which necessitates the need to work, means that I have to brave the elements. The best way to combat the wintery winds? Layers. And the final layer before the coat? The Wrap. Don't get me wrong - I love a good scarf, but The Wrap is what I reach for when I'm dressing for the weather. I have wraps in all shapes, sizes, colors and materials - I love each one and I will never have too many! As if their powers of warmth weren't enough, wraps are so stylish and versatile that they simply beg to be worn anytime and anywhere you need to keep a little (or big) chill off your shoulders and neck. Wraps are a wardrobe staple that can see you through every season and any kind of day - from work to weekend, casual to formal there is a wrap for every occasion! So when Tammy Hildebrand's new book Crochet Wraps: Every Which Way landed on my doorstep, I knew that I was in for a treat. Not only is it about my favorite accessory, it showcases 18 patterns and SIX different techniques! How perfect for someone (me me me) who is always looking to try something new?! Tammy has put together 3 patterns (easy, intermediate and advanced) for each method: Traditional Crochet; Motifs; Broomstick Lace; Hairpin Lace; Tunisian; and Double Ended! Wow! With so much to choose from, it's hard to know where to start! The Introduction and Tips & Hints at the beginning of the book are quite uplifting and inspirational. It's easy to see that crochet brings Tammy great happiness and she wants us to enjoy it just as much as she does. She offers lots of encouragement to experiment with new colors and not to be afraid to tweak the patterns to suit your personal taste. Because there are six techniques, Tammy's advice to seek out on-line video tutorials and practice along with them is a great idea. The book does have a How-To section with step-by-step instructions and clear photography to help you, but sometimes you need a little more guidance - especially when learning something new. 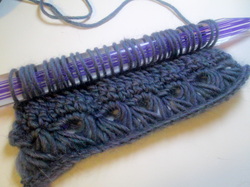 My first attempt at broomstick lace. My first attempt at broomstick lace. I have lots of projects on my hooks and needles at the moment, so I wasn't able to commit to a new wrap that I would finish by the time my stop on the blog tour came around. I did however recently have the opportunity to purchase two pairs of giant (US 35/20 mm) knitting needles - perfect for making broomstick lace. It must have been fate! I'd been admiring the look of the "peacock" design you see in typical broomstick work, but had no idea when I'd ever get my hands on those huge needles. I decided when I saw them that I'd keep one pair to give it a try - and give the second pair away as part of the blog tour prize package! Wielding the large needle feels pretty awkward. I had more trouble getting the loops on than working them off. I'm sure that with practice it gets easier, just like everything in crochet! I don't know that I'll be jumping right into a big broomstick project, but I can see it looking great as trim on a scarf, table runner or place mats. Since I didn't actually make anything from the book I'm not able to comment on the accuracy or clarity of the instructions. However, each project is beautifully photographed with many shots showing different ways to wear the wraps, as well as the stitch details. In reading through the patterns things look complete and I wasn't thrown my any unfamiliar abbreviations or wording. Plus, I was able to figure out how to do the basic broomstick lace by following the pictures. Tammy has put together a lot of kick in a little book! It's rare to see so many different techniques all in the same place, and I think using the wrap to showcase the variety of stitches is a brilliant idea! Although there are patterns that are "easy" a true beginner may be overwhelmed. I'd say a confident beginner who is familiar with the basics and is looking for a challenge or the intermediate crocheter who is ready for something new will be very happy with Crochet Wraps. Also, to complete most of the projects specialized tools are required. In addition to the "big" knitting needle for the broomstick lace, you need a loom for the hairpin lace, an extra long hook for the Tunisian crochet and a double ended hook for the double ended crochet. All of these tools are available on-line, but chances are they're not part of your everyday tool box. And finally, my personal pet peeve about craft book bindings. Like most paperback craft and pattern books this one has a traditional glued binding. While in most instances this is just fine, in craft books it's a bit frustrating because they don't easily stay open while sitting in your lap. You can press the pages open and it will sort of do the trick, but it's hard on the spine, and after a while the book flops open to the page you've used the most. I'm always much happier when my pattern books have a spiral binding! That said, it's certainly not the kind of thing that stops me from buying a book - it's just my personal preference! (I'll be getting of my soap box now and moving on to the fun stuff!) The folks at Stackpole Books have generously offered a copy of Tammy's book for me to share with you. To spice it up a little I'm including a set of hand crafted stitch markers from Nirvana Designs and a pair of US 35/ 20 mm knitting needles to get you started on your broomstick lace! The contest will run for a week, is free and open to US residents. Win: A Selection of Goodies to Add to Your Library & Tool Box!
Thanks so much for stopping by and spending a bit of your day with me!
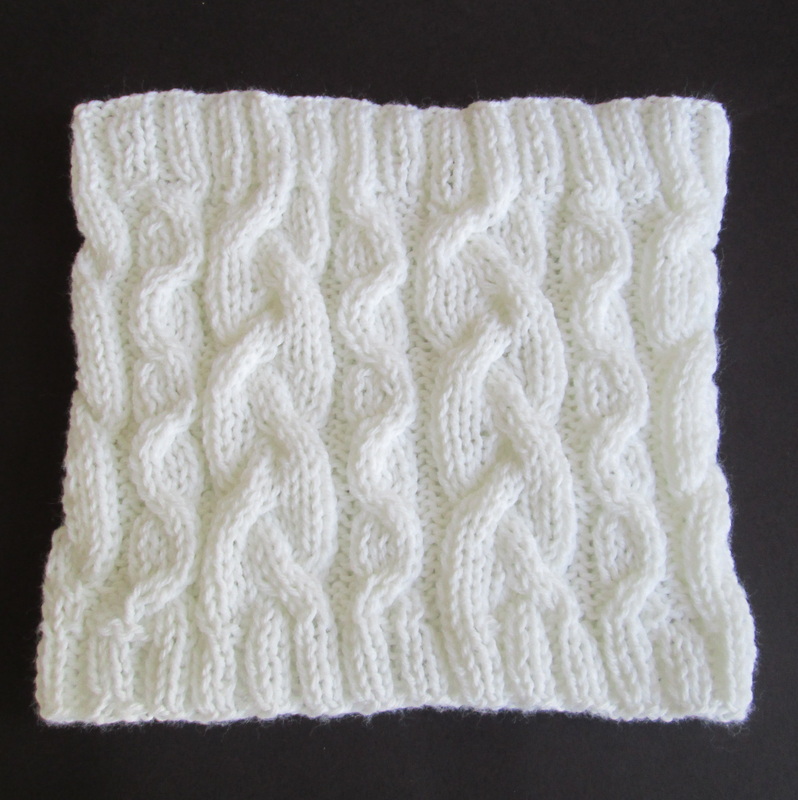
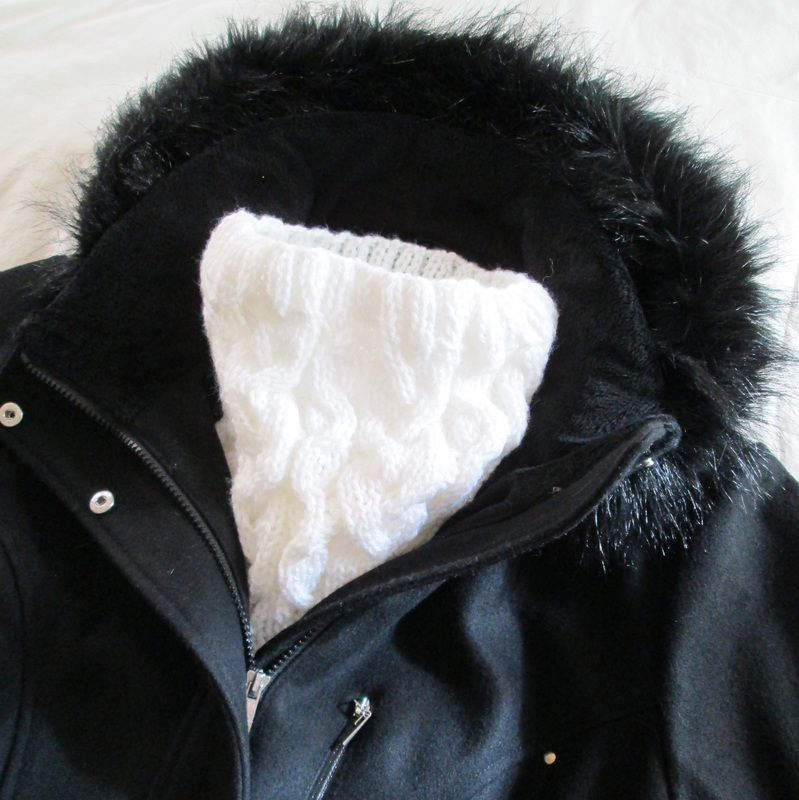
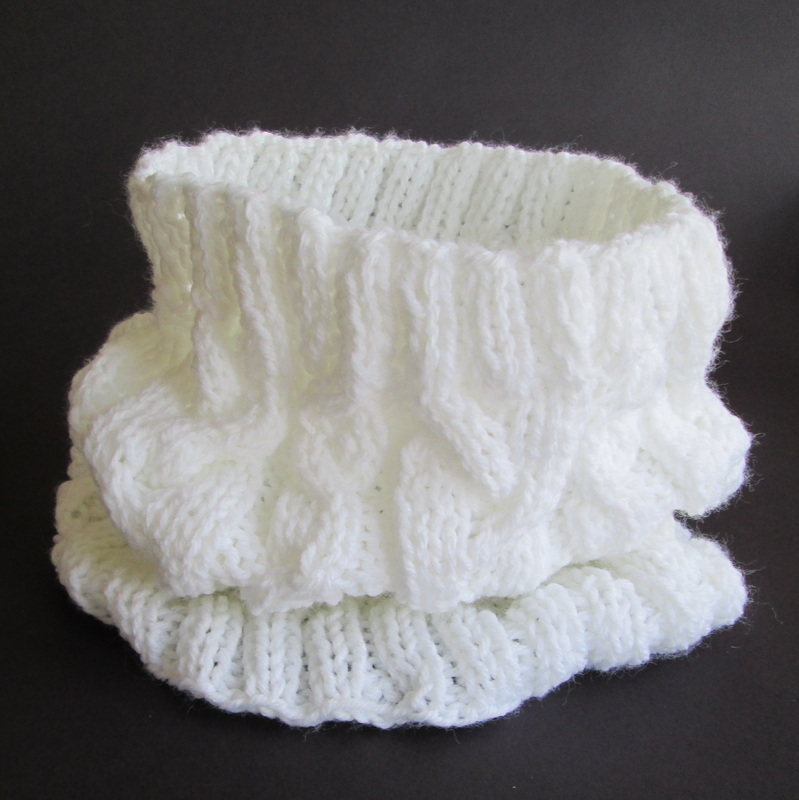
I hope you enjoyed the review and will take a moment to enter the contest. Until next time friends, Be Blessed and Stitch & Read with Love! 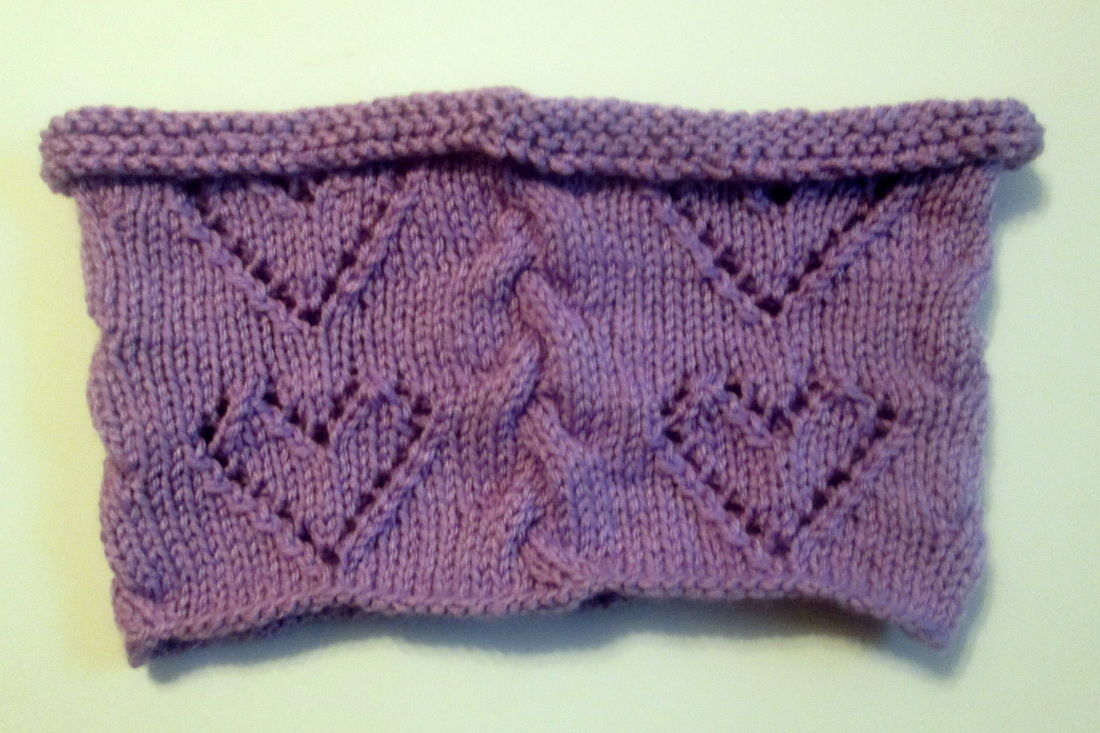 Hmmmm.... I can tell that it has potential but things just didn't work out the way that I planned! Greetings Friends! Usually I like to write about good things, you know - projects that have worked out well. Pretty things that I've made or tips that I've figured out to help make things easier for us. I don't often write about - or read about - projects that have gone wrong! In fact, when I was planning my posts this one was supposed to be about a super cute hearts and cables cowl. It still is about the cowl - just not the super cute part... Let me tell you what happened: I have been knitting for less than a year - I cast on my first swatch last February 21, 2013. (I only know that because of the blog - before I looked I thought it had been a few years!) Anyway, in that time I have done a lot of knitting, and I really like it! Most everything that I've made has come out nicely, and I'm continuing to stretch myself and try new things. So after making a very lovely cowl for my mother-in-law for Christmas I decided to do a little (more) pattern modification. I guess I was feeling pretty confident. In my mind I could see a Valentine cowl with cables & hearts - that look like X's & O's. For this new project I took the basic size (cast on 100 stitches) and the hearts repeating 4 times around then added the cables, a sewn bind off, and a crocheted trim around the bottom. Unfortunately, things didn't turn out the way I planned. I'm not sure if it's my inexperience or if it's just the nature of knitting, but I'm never really sure exactly what is going to happen when I bind off. Seeing the project off the needles for the first time is always a surprise - and after all that work, the last thing that I want is to be disappointed - which seems to happen most when working in the round. This cowl is the perfect example of thinking that everything was going along splendidly only to find out that it wasn't! It doesn't look too bad in the picture, but in real life the bottom is a good 2 inches smaller than the top and the top edge rolls down hiding the pretty hearts and cables. I didn't even bother with the bottom trim because I knew it never was going to be what I had hoped! 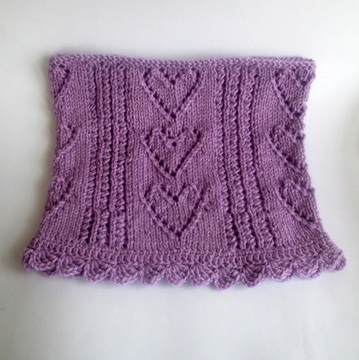 My version of the Sweetheart Lacy Cowl by Cheryl Murray. My version of the Sweetheart Lacy Cowl by Cheryl Murray. Take a look at the first cowl. It's the Sweetheart Lacy Cowl by Cheryl Murray from the book 50 knitted gifts for year-round giving. It's beautiful right? I followed the pattern for main body, but changed the top to the sewn bind off. I also decided to crochet the bottom edge instead of knit the edging and then sew it on as the pattern indicated. The main difference between this one and "mine" with the cables is well - the cables. I also only did two repeats of the hearts and included a few more rows between them to space them out a bit.
So what have I learned and what comes next? I've learned that knitting in the round allows you to avoid seaming, but prevents you from getting a good look at the real size of the item. That I need to practice binding off - so that one day my tops and bottoms will be close to the same size. And I've learned that even small changes to a project - like a few extra rows here or there can sometimes end with unexpected results! I've also learned that I don't run into these kind of challenges when I crochet. If I start with 100 stitches in the round and end with 100 stitches I'm certain that my bottom and top will be the same size. I also don't have to worry about what the project really looks like - because you can see the whole thing. Does this mean that I'm going to stop knitting? No way! I love knitting and I really do love a challenge! So far I've tried the traditional bind off and the sewn. I know that there are still more out there - and eventually it will all come together! In the mean time - adding crochet edging helps - and so does using a little clear elastic to firm up an unruly top! Will I keep making changes to the patterns? Of course I will. It's a way to express my creativity and continue to grow as a fiber artist. When I first started crocheting I never would have dreamed of doing something different from what the pattern said - now I use them as a guide. As a framework to help be build and shape new projects. What will become of the cables and hearts? I think that they look good together and that there is potential. Maybe a scarf? Ribbing is always an option to give stability to the body of the cowl and stop the top from rolling down. And finally I'm thinking that I should just let it rest while I work on something else! We all need a little space one in a while - especially after things go wrong! Thanks so much for stopping by and spending a bit of your day with me. Until next time friends, Be Blessed and Stitch & Read with Love!
 Which one makes cables easier? Which one makes cables easier? Greetings Friends! Are you afraid to try knitting cables? You love the way they look - the texture and motion they give to garments, but the idea of adding another needle into the mix is more than you're willing to attempt? Fear no more!! For I was once like you! Timid and leery of a third needle for stitches to slip off of. Because really, how would I possibly fix that kind of mistake when it takes every once of concentration to pick up a dropped stitch in a simple knit row? The skills required to make cables are basic. It's no more than slipping stitches and knitting (and sometimes purling). The tricky part is wielding that third needle. It's typically a three step process: 1) Slip the stitches onto the cable needle and hold it in back (or in front) of the body of the project. 2) Knit the required number of stitches (according to the pattern) using the main set of needles (making sure the slipped stitches on the cable needle stay in back or in front of the project). 3) Knit the slipped stitches from the cable needle to the main needle. That's it. Piece of cake right? I know you may not believe me yet, but I promise you can do it. The two biggest challenges I have with cables are making sure the stitches don't slid off, and actually knitting from the cable needle. While working on this cowl I had an ah-ha moment. I was looking through my supplies for a larger cable needle (I have several that were given to me when I started knitting) and I came across my 12 inch circular bamboo needles. Honestly these needles haven't been good for a whole lot (they're too small for most projects and the short needles are tedious to work with). But I thought why not use it instead of the short slippery metal cable needle? Ah-ha! 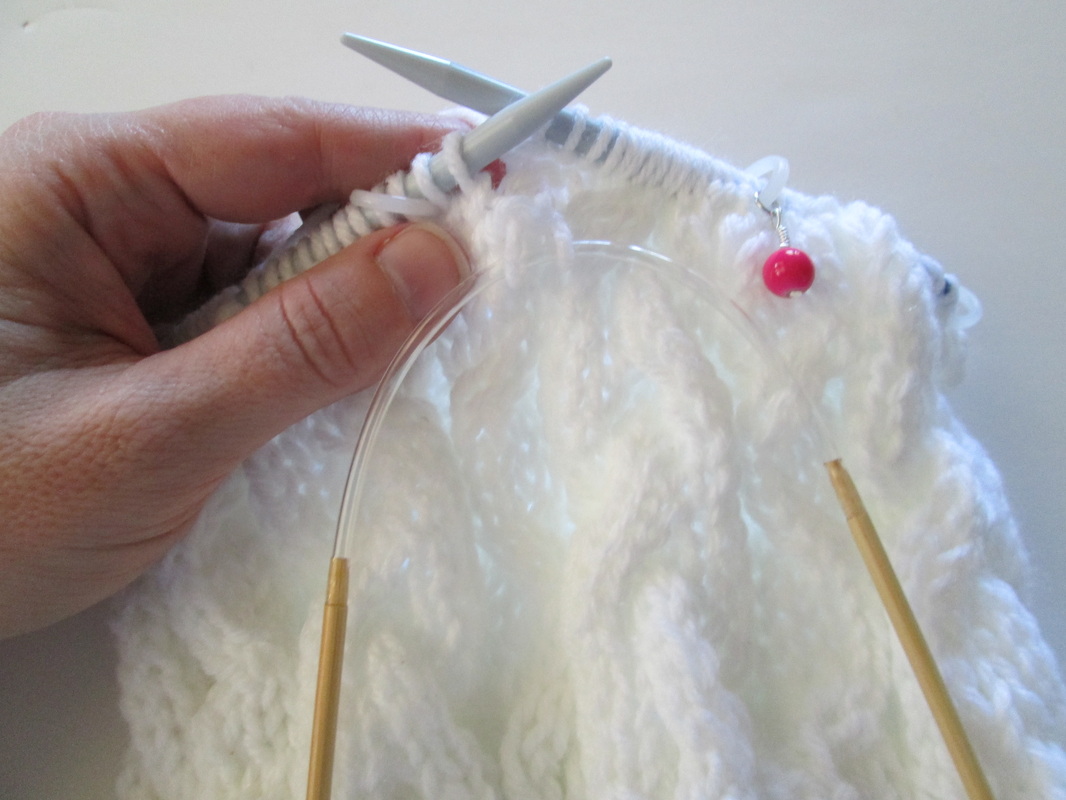 Here my stitches happily hang! Here my stitches happily hang! Right away I knew I was onto something. Once you slip the stitches onto the circular needle you can just let it hang in back or in front of your project. No more worrying about dropping stitches! When you're ready to knit the slipped stitches just slide them up to the tip of the needle and you're in business. I find that it really works like a dream. There was some concern that the hanging circs. would get in the way, and I imagine if you don't have a short stubby pair of 12 inchers that could be a problem. For me the piece of mind that I get from not worrying about dropping stitches is worth it. Don't have circular needles? I've been told that using a bamboo double pointed needle is a much better option than a slippery metal cable needle.  Here I'm working C6B using my 12 inch circular bamboo needles instead of a traditional cable needle. The other part of cables that took me some time to master is the language. Cable abbreviations seem confusing. The first time I saw C6F and C6B I was stumped. Now that I understand the construction of cables it makes perfect sense. Here's what I learned. Basic cables are formed when you work stitches in front and in back of other stitches. The C tells you you're making cables, the number is how many stitches you'll be using in total and F or B lets you know where to hold your slipped stitches. So C6F is a Cable worked over a total of 6 stitches, holding slipped stitches in Front. That means that you will slip 3 stitches onto your cable needle and let it hang in front of your main body of work. Knit 3 from your main needles, then knit the 3 slipped stitches. C6B is a Cable worked over a total of 6 stitches, holding slipped stitches in Back. So that means you slip 3 stitches and let them hang in back of your main body of work. Knit 3 from your main needles, then knit the 3 slipped stitches.
Like everything in knitting, cables come in many shapes and sizes. They can be classically simple or wonderfully complex. Personally they are one of my favorite fabrics. I love the texture and movement they bring to any garment. My desire to create cables is one of the reasons that I learned to knit! Using the short circular needles instead of a standard cable needle has really been a breakthrough! I still have plenty to learn, but understanding the language and how they're made makes me feel like I can tackle more complicated patterns with much more confidence! So what do you think? Are you ready to give cables a try? I hope you do. And for my knitting friends who are well versed in the ways of the cable, I would love to hear from you! What kind of cable needle do you use? Do you have any tricks or tips to share? One last thing, I'm looking for my next cable project and welcome any pattern suggestions you might have. Thanks so much for stopping by and spending a bit of your day with me! Until next time friends, Be Blessed and Stitch & Read with Love! 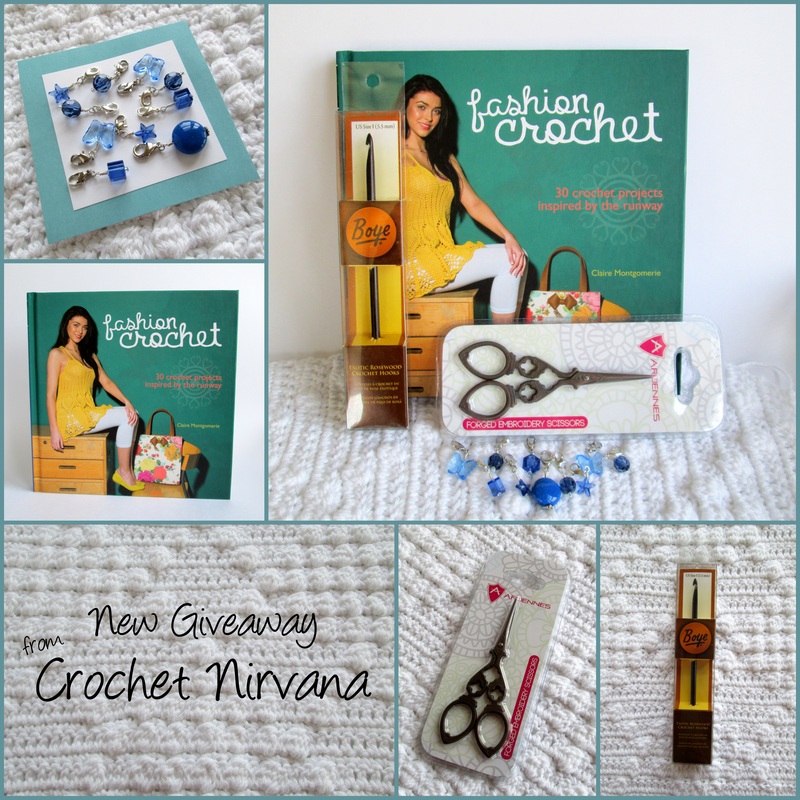 Hello Friends and Welcome! I'm so glad you're here. Today I have a fresh and exciting new book to tell you about, plus a prize package of crochet goodies to get you hooking in style! So lets get right down to it!! Fashion Crochet: 30 crochet projects inspired by the runway by Claire Montgomerie Carlton Books, (reprint) September 3, 2013 Hardcover, 173 Pages When Katie from Sterling Publishing contacted me about this new book I almost said no thank you. Why you ask? Well, the hard truth is I am about as far away from fashion conscious as you can possibly be while still wearing clothes, and my only experience with the runaway occurs when I happen to pass by Project Runway on my way to National Geographic. I changed my mind when I realized that it might be interesting to try something new and step outside of my crochet box. I' d be lying if I didn't say I was nervous about what I'd find. When my copy arrived I anxiously flipped from back to front to see what secrets it may hold. I was quite pleased to find a very friendly union between fashion forward and traditional patterns. The book is set out in sections that include: Practicalities, Wraps & Scarves, Accessories, Dresses, Skirts & Shorts, Tops & Jumpers. Plus the usual intro, resources, index and acknowledgements. What sets this one apart from so many others is you can actually see the pieces that inspired the patterns. The work of fashion icons (that even I've heard of) like Stella McCartney and Marc Jacobs become accessible to all of us. You also get to see the originals in action with some of entertainments most trendy names (Angelina Jolie and Sienna Miller). There are lots of photographs and whimsical water colors of the designs that give it the feel of a coffee table book. There are written instructions as well as charts where appropriate. There's a real variety of styles allowing something for everyone. The Granny Square Cowl is an updated take on the classic motif. The Chain Shoulder Bag is a great blend of function meeting fashion. And the Little Black Dress is a classic beauty with its yoke and sleeves done in an open floral stitch set against the solid form fitting body. Wow! I've never seem crochet look as grown up and sophisticated as it does in this book. I think that's one of the reasons why I found myself enjoying these patterns. While I don't necessarily see myself wearing any of the skirts or shorts it features, it's nice to know I have the means to make them should I want to. And while they might not all be my style I definitely can see myself carrying the Bobble Bag that I decided on. If it's looks good on Angelina imagine what it will do for me! I was hoping to have it finished to share with you, but it's not quite there. The pattern and extra large chart are easy to follow - although I did get confused for a moment when I started. For some reason I failed to realize that the patterns are all written in UK terms. Once I replaced my tr with dc I was fine! I'm done with the first side and about 10 rows for the top of the second. The geometric pattern has great texture and is an excellent photo backdrop for the goodies in my giveaway. All in all I think Fashion Crochet is a unique and trendy collection that will add variety and style to your library. Most of the patterns are in the intermediate level so a good foundation of basic skills will be helpful. We often fall back on things that are comfortable and easy. This book moves beyond the ordinary and reminds us to push the envelope and take risks. The world of crochet is a big and wonderful place. There's plenty of room for chevron afghans, cozy hats and lacy shawls as well as sleek tunic dresses, beach shorts and pineapple halter tops! Now it's your turn to try something new. The folks at Sterling have given me a copy Fashion Crochet to share with you, and I've put together a selection of some of my favorite crochet notions. The giveaway is free, easy and open to residents of the US. Log in to the Rafflecopter widget below for your chance(s) to win this awesome prize package. Step outside of your crochet box and take a chance on something new!
Thanks so much for stopping by and spending a bit of your day with me!
Until next time friends, Be blessed and stitch & read with love!  Greetings Friends! I am so excited to announce that our Etsy shop is now officially open! If you've been reading the blog then you know that we've been working on this for a while. And let me tell you it's been work! I really had no idea what is involved in opening up a shop. It's a lot like when I started the blog. Learn as you go. Be patient and flexible. If somethings works - keep doing it and if it doesn't, change it! Our shop is called Nirvana Designs and it's development has been a somewhat organic process. I learned how to crochet, started writing about it and the blog was born. I took up knitting and wrote about that. As I learn things I like to share them with you. It's a way for me to record my experiences and hopefully lend a hand to you along the way. My husband ties flies for fishing. It's small, precise work. One day I admired the beaded earrings a patron at the library was wearing. It turns out her daughter made them. I thought we can do that! And so we did. With John's amazing dexterity and my creative motivation we began making earrings. Then came stitch markers. And more jewelry. It's fun and a terrific way for us to share a hobby. We didn't set out to sell anything, but since we've pretty much saturated our friends and family with gifts and we're not ready to stop making things a Etsy shopped sounds like the obvious next step.  For nearly a year we have been refining our techniques, searching for raw materials and slowly building our inventory. The past month I've been doing product photography and learning about Etsy. Believe me there is a lot to learn! Thankfully there are plenty of books available and more importantly, the site is designed for people just like us.
Now after more that 1000 pictures and many hours on the computer we are happy to welcome you to our grand opening. We're hopeful that you'll take a look at what we've been busy making. To break the ice, we're offering 50% off your first purchase. Use the coupon code: WELCOME at checkout. Initially we're only listing our stitch markers. The jewelery collection is coming next and eventually I hope to offer a selection of knit and crochet pieces. We're having a great time with our new project and we're looking forward to learning, growing and finding our place in the world of Etsy boutiques! Drop in for a browse and maybe even treat yourself to a little something! Thanks so much for stopping by and sharing a bit of your day with me. Until next time friends, Be blessed and stitch & read with love!  Join the Love Affair with Yarn!
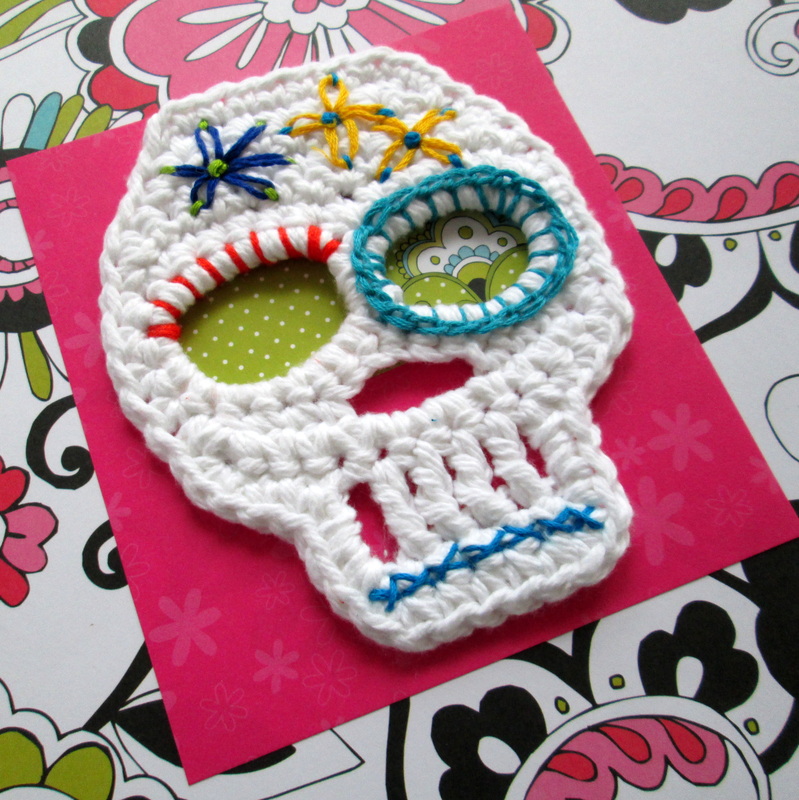
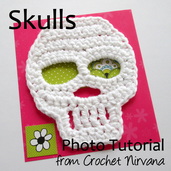
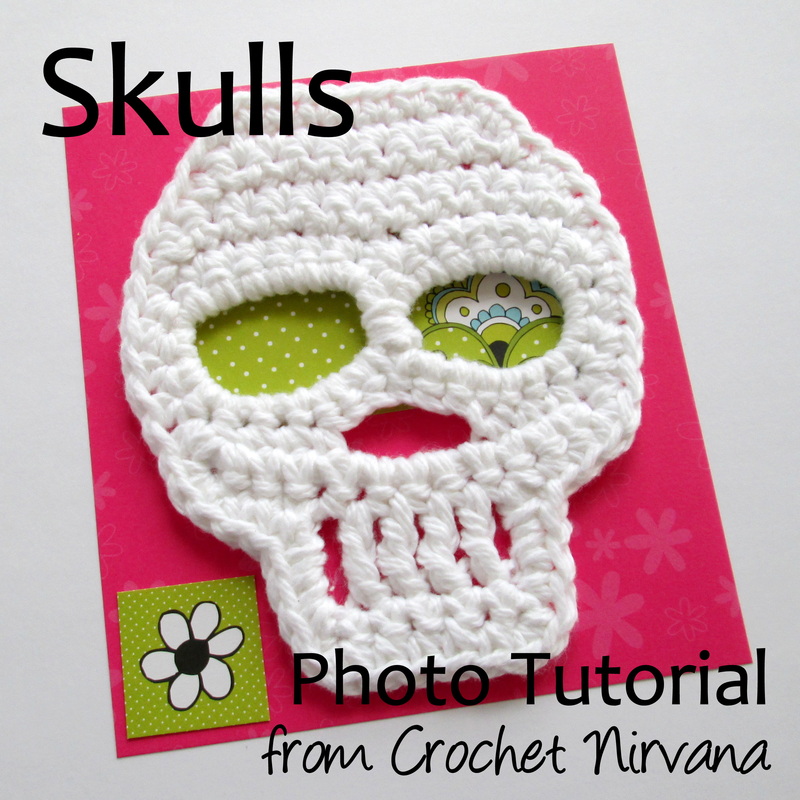
Guest Post by Author and Yarn Enthusiast Betty Hectman A lot of people are going to be celebrating I Love Yarn Day on October 11. According to the Craft Yarn Council there are over 50 million people of all ages who knit, crochet or otherwise work with yarn. And it’s no wonder. It’s not just the destination of getting a scarf or sweater; the journey is full of benefits. Knitting and crocheting are great anxiety busters, offer something productive to do while waiting and can be a social outlet when done with a group. Want to Join in? Getting Started It’s great if you have a friend or family member to teach you, but if not, there are other options. Check out your local yarn store. According to Lisa Garcia of the Close Knit Circle yarn shop in Tarzana California, for a nominal fee they will teach someone to knit or crochet. In addition with a yarn purchase comes the invitation to hang out at the group table in the store and get help on a project. Some of the craft stores like Michael’s or Jo-Ann’s offer group lessons. Try your local community college. Pierce College in Woodland Hills, California offers yarn craft classes as part of their extension program. *Your local library is another spot to check out. Many have groups that welcome sharing their skill and experience with new members. If you’re more of a do it yourselfer, it is possible to learn on your own. There are numerous books on the market, but Betty Hechtman, author of two yarn related mysteries series suggests doing what she did and trying a kids’ kit. “I found that the instructions were broken down into easy to follow steps with lots of illustrations. And if the instructions would work for a ten-year-old, I figured they would work for me. I learned how to crochet granny squares with a kit meant for kids and it changed my life.” First Projects Don’t defeat yourself by choosing something too complicated for a first project. Also, it is best to stick with easy to work with yarn like basic worsted weight. A scarf is a great project to start with using either this free knitting pattern or this free crochet pattern. Both use only the most basic techniques. The Beauty of Handmade Every knit or crocheted item has its own story. The experience of picking the yarn, making the project and what was going on in your life are all woven into the stitches. Remember that what makes handmade items special is they look like real hands made them. That means there might be a wiggly stitch here and there, but just look at it as part of the tale. About Betty Hechtman Betty Hechtman is the author of “Yarn to Go,” the first book in the Berkley Prime Crime Yarn Retreat mystery series, as well as the author of the best-selling Berkley Prime Crime Crochet mystery series. The eighth book, “For Better or Worsted,” comes out in November. She has also written newspaper and magazine pieces, short stories and screenplays as well as a children’s culinary mystery. She has a bachelor of fine arts degree and has been active in handicrafts since she was a small child. Hechtman divides her time between Los Angeles and Chicago. I hope you enjoyed Betty's post! I couldn't agree with her more. In fact, I learned how to crochet by checking out children's books from our library. And when I needed more help I turned to our resident experts - The Knit Wits, who have been meeting on Wednesdays at the library for years! The comment following the * is mine. I had to mention the library, not just because I work there, but because they're such a great resource in so many communities Thanks so much for stopping by and spending a bit of your day with me. Until next time friends, Be Blessed and Stitch & Read with Love! 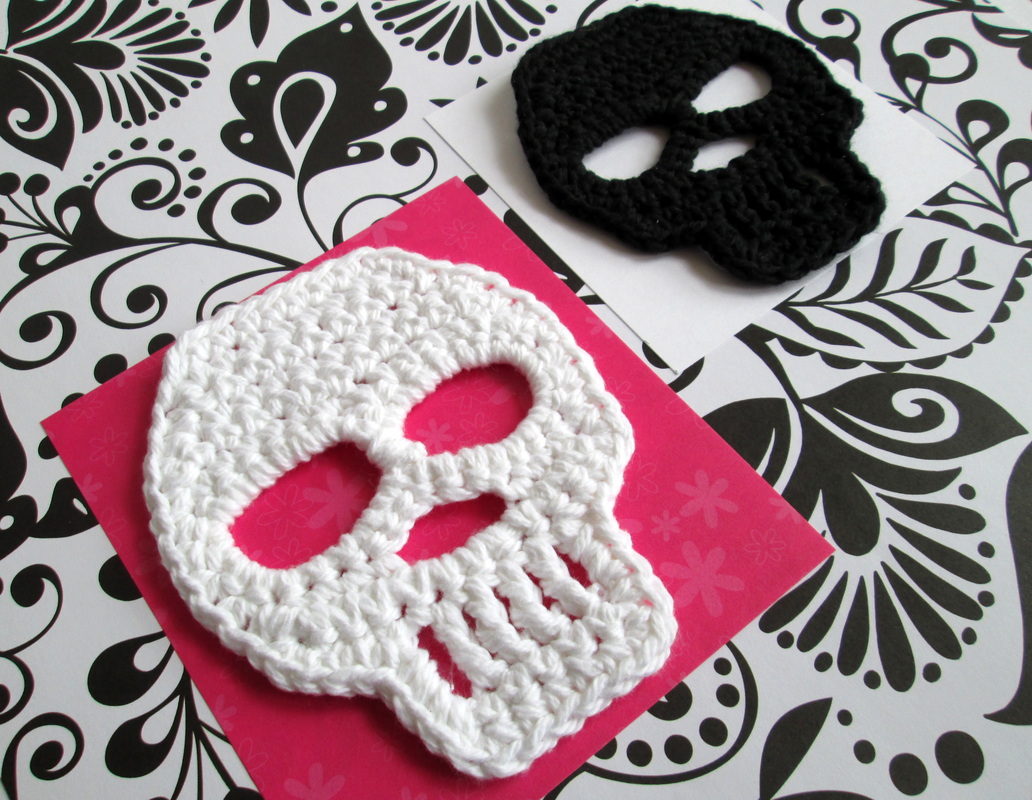 Greeting Friends! It's October already! Wow! For so many reasons this is my favorite time of year. New England foliage and the brisk, refreshing weather rank at the top of the list, but so do the bounty of holidays: Halloween, Day of the Dead, I Love Yarn Day, and my birthday! I try to come up with an October project that embraces all of these favorite things. Last year I filled our house with little pumpkins. (Check out the post, and the link to the super easy pattern!) This year's inspiration comes with a story. Last year I signed up for an account with Stumble Upon. As instructed, I selected several categories I was interested in (crochet, knitting, photography, nature etc.). Like Pinterest, these were the topics that I would see when visiting their website. I did a bit of stumbling (that's what they call it), and promptly forgot about it. Because really, how many social networks can I be a member of ? Anyway, I must have signed up for emailed "highlights" because about once a month I'll get a message with links to what's hot in my categories. Usually I just glance, but recently something caught my eye. It was a skull scarf and a series of pictures showing how to make the skull. Cool. This is something I'm willing to stumble over to! After 15 frustrating minutes of trying to remember which version of my username and password I used I finally made it to the page. As it turns out, it was just a jpeg - with no link to the website or person who contributed it. But that's okay, because I just wanted to print the picture and try making the skull. Printing proved another challenge and required saving the image to my desktop and printing from there. I'm not so thrilled with my stumbling experience, but I am glad they delivered the skull picture to my inbox. I made the skull according to the pattern. It came out okay, but as I was making it I was thinking of all the things that I would do differently next time. After a few hours of trial and error I came up with my version of the skull - and this is what I am sharing with you today. Because next to pumpkins, what can be better in October than skulls!?! However, I realize that if it hadn't been for the creative person who posted their skull scarf on the internet, I wouldn't be sharing my version with you today. The original picture has a watermark on it for a face book group: ClubeDasCrochedeiras. After much searching, I was able to locate them and the original picture! It appears that the group is Portuguese. While I wasn't able to figure out exactly who posted the pattern, I was able to reach out to the group and say thank you. I know that there are only so many ways that you can make a skull motif, and that nobody would have ever known if I just posted my version without this story. But I know, and even though I could have come up with the pattern on my own by looking a pictures on the internet, someone in Portugal gave me a good foundation and made it a whole lot easier, and for that I am thankful! And so my dear friends, here in my version of the skull motif. I've been having a great time making them. Once you've done a few they're super quick. Like all motifs there are lots of ways you can use them. Link them together like our Portuguese friends to make a scarf, use them as coasters, hang them in your window as spooky decorations or just make them because they're fun. No matter what you do with them - Enjoy!! The Pattern 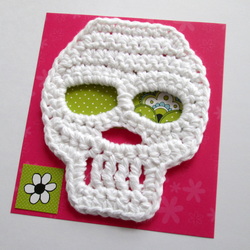 I used worsted weight cotton and an f/5 - 3.75mm hook for the white skull. I've made several and prefer this combination. The finished size is about 3 3/4" x 5". The cotton has nice structure for this kind of motif. However, use whatever you have on hand. Skulls are a great stash buster!! The first one I made was a little messy, by the fourth one I had the pattern memorized and they came out neat and even! Step 1: Ch 14, sl st in beg ch to form loop. Step 2: Ch 14 (again), sl st in 14th ch from hook to form another loop. Now you should have 2 loops that look like the number 8 or a pair of glasses. Step 3: Work 18 sc evenly around the first loop, then work 18 sc evenly around the second loop. Step 4: Using the yarn tail left at the end of the starting chain, wrap it snugly around the space between the eyes 3 or 4 times. Secure the end by pulling it through the loop you make while wrapping. This gives your skull a nice finished look. Now you’ll be working in rows to create the Top of the Skull above the eyes (the forehead!) Set Up Row: Sl st in the next 7 sts. This will get you from between the eyes to the top edge so you can start working in rows. Row 1: Ch 1, turn. 14 sc across top of eyes. Row 2: Turn (don’t ch 1), skip 1st sc, 12 sc across, leave last sc unworked. Row 3: Turn (don’t ch 1), skip 1st sc, 10 sc across, leave last sc unworked. Row 4: Turn (don’t ch 1), skip 1st sc, 8 sc across, leave last sc unworked. Row 5: Turn (don’t ch 1), sc in each sc across. (8 sc) Stop here and use stitch marker to hold your place. Cut yarn leaving about 36 – 48 inches. After finishing the lower portion of the skull you’re going to come back to the marker and use the extra long yarn tail to create the border around the skull. You can fasten off after Row 5 and the reattach the yarn for the border, but if you do it this way there are fewer knots and tails to weave in. Bottom of the Skull (the nose and teeth) Turn the skull upside down. Find the center under the eyes, count 7 stitches right and join the yarn in that stitch. Row 1: Sc in same st as join and in next 3 sc, ch 4, skip 6 stitches, sc in next 4 sc. (8sc, ch4 sp) Row 2: Ch 1, turn. 4sc, 4sc in ch 4 sp, 4 sc. (12 sc) Row 3: Turn (don’t ch 1), skip 1st sc, sl st in next 2 sc, ch 4 (counts as 1 tr ch), tr ch in next 5 sc, leave last 3 sc unworked. (1 unworked, 2 sl st, 6 tr ch, 3 unworked = 12 sts) Row 4: Ch 1, turn, sc in each tr ch across , sc in top of ch 4. (6 sc) Fasten off. Border around the Skull Go back to the top of the skull where you left off (at the stitch marker). Ch 1, then evenly sc all the way around the skull. Work 2 sc into the corners at the cheeks and bottom of the jaw for smoother transitions. (52 sc) Finish off with the invisible join or with a sl st into the starting ch. Weave in the ends, and lightly block to the correct shape. Enjoy!!
But first I decided that I should probably know just a little bit more about the tradition. I'm happy to report that the skulls are used as a way to recognize and remember loved ones who have passed on. Day of the Dead is celebrated in central and southern Mexico on November 1 & 2. The indigenous people believe that the gates of heaven are opened at midnight on October 31, and the spirits of all deceased children are allowed to reunite with their families for 24 hours. On November 2, the spirits of the adults come down to enjoy the festivities that are prepared for them. The sugar skulls, which are often adorned with the name of the deceased, are part of the alters that families prepare in anticipation of their loved ones visit. If you'd liked to read more about this interesting tradition visit MexicanSugarSkulls.com.
|
I'm Robin and this is  
Click to see what's new on the Craftsy Crochet Blog!
Follow Along
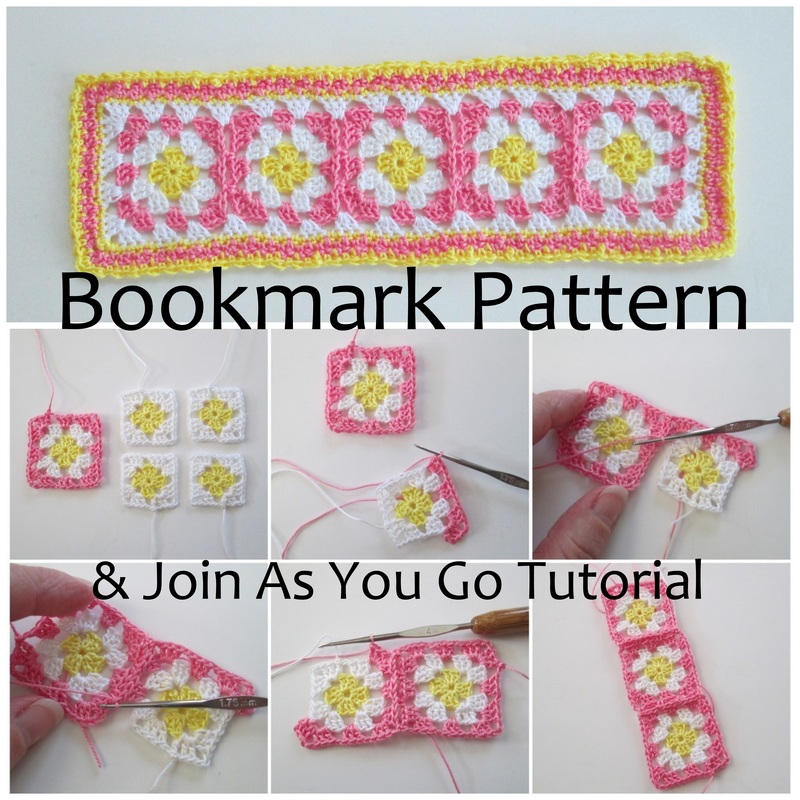
 Tutorials and Patterns


On Instagram 
Look for me, I'm RobinBrz


Places I Post
 Archives
July 2015
Categories
All
 
Thank you for visiting!
My name is Robin. I am a wife, mother and strong believer in the power of faith. I'm a maker, a crafter and an artist. I love exploring new mediums and sharing my adventures with you. Did you enjoy your visit? Let me know by leaving a comment. I love knowing you dropped by, and hope to see you again soon! Be Blessed and Stitch & Read with Love! 
|