Hi there! One of the things that I really enjoy about crochet is learning new things. So when the folks at Annie's Catalog contacted me a few months ago and asked if I was interested in reviewing one of their on-line classes I jumped at the opportunity! If you're not familiar with Annie's they're a cornerstone in the crafting industry. Their first catalogs were mailed to homes in 1975 and crafter's have been turning to them for patterns, supplies and instruction since. There are on-line classes for crochet, knitting, card & paper crafts, quilting, sewing and beading & jewelry. In each category you'll find several different topics to choose from. The classes range in price from $19.95 to $24.95. Once you pay for your class, it's yours forever. You can access it as many times as you want, anytime you want. I chose Crocheting with Beads. It's something that I've been wanting to try and this was the perfect opportunity. The class includes the video instruction which is broken down in segments for each technique and project. It has a total running time of just over an hour. There is a downloadable / printable PDF file that contains the pattern for each of the projects. There is something called "My Notebook" which allows you to record your own notes as your watching and practicing. I used this are to keep track of what yarn and hook I was using and what kind of beads I chose. I also used it to note the projects I liked the most and the things that I had trouble with. There is also a place to "Ask the Instructor" with several FAQs that get immediate responses. I did ask a question that wasn't on the list. Later the same day I received an email letting me know that Ellen had answered my question! I logged back into my class and sure enough there was my response! That's pretty cool. Overall the course is easy to access and I had no trouble navigating through it or downloading my patterns.  Now, let me tell you about the class. First of all, it's very well done. The audio and video are clear, the instructor, Ellen Gormley, is easy to listen to and does a great job showing you what to do and how to do it. Like many of you, I've watched plenty of videos on YouTube and while the intention may be good, the end result often leaves a lot to be desired and you can never be sure of what you're going to get. I feel confident that all of the videos in Annie's series are the same caliber as this one. In this class there are 6 projects. Ellen shows you how to make each one of them from beginning to end. Each one uses a new beading skill. Every skill is demonstrated step by step using heavier yarn and large pony beads. By practicing with the bigger beads you can really get the hang of it before switching to the smaller beads the pattern calls for. In addition to beading, other techniques like joining motifs as you go, making button holes and using jewelry notions are also covered in detail. 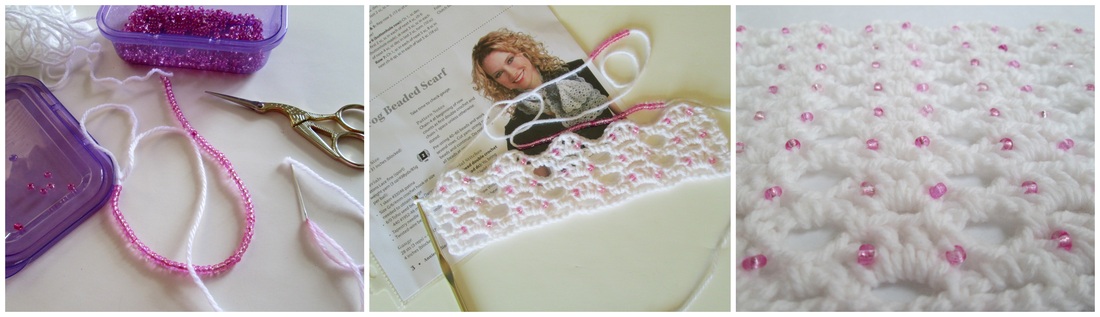 So what did I make? After watching the video all the way through, I decided that I was going to try to make the beaded bracelet which is basically a tube with a bead in every stitch. It's the second project in the class and Ellen made it look so easy!! Actually, the technique itself wasn't too bad with the pony beads - but I know myself well enough to realize that I needed to start with a different project. No sense in getting frustrated right off the bat. Next I decided to try the beaded scarf. This is the third lesson. Again the technique was easy to pick up. I really liked that I could start and stop as much as I wanted. After making one pattern repeat with the pony beads I got started on my scarf. I didn't have the yarn the pattern called for so I made do with what I had on hand. This was much easier going! The hardest part (most tedious?) part was stringing the beads. Mainly because I didn't have the right tools. I think with the proper weight yarn and beading needle it would be much faster. I haven't finished the scarf, but after completing about 2 dozen rows I was ready to try something else. Not because I didn't like it, but because I wanted to actually finish something to show you!!  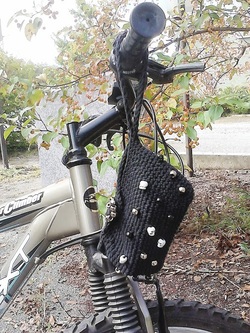 Which brings me to my final project - the Wristlet Clutch. How cute is this?! This is actually the first project in the class and as it turns out the one that I should have started with! It's a small project and if you want you can use pony beads like I did. We have a big pile of these wonderfully fun skull beads. John has been making stitch markers with them, but I was able to grab a few in order to make my bag. As with my previous class experience, this technique was a snap to master. Ellen shows you how to do everything from making the handle and the button hole to creating the button itself! I made this little beauty in two afternoons and everything about it was fun and easy. The best part was putting it to use! I often ride my bike to the country store and I always have to make sure I have pockets. Not any more!! Now I just slip my little bag over my wrist and I'm good to go! There are 3 more projects that I haven't tried yet. The beaded shawlette uses the "hooked on" technique. I'm looking forward to seeing the difference between pre-stringing them vs. adding them as you go. I feel confident that I'll be able to follow other patterns that include beading, especially knowing that I have my class available to me if I need a quick refresher.
In case you're wondering, Annie's hasn't paid me for my endorsement. I was given the class in exchange for my honest review. That's it. Happily this is a fun and informative program that I feel good about recommending. Especially if you take advantage of the coupon code they gave me to share with you! Just click here and you can take 50% off any of their on-line classes. Now that is a great deal. Unfortunately, the code expires soon so you have to act fast. The good thing is once you pay for it you can watch it whenever you want - so even if you don't have time right now, it will be ready for when you do.
Thanks so much for stopping by and spending a bit of your day with me. Until next time friends, Be blessed and stitch & read (& bead!) with love!
0 Comments
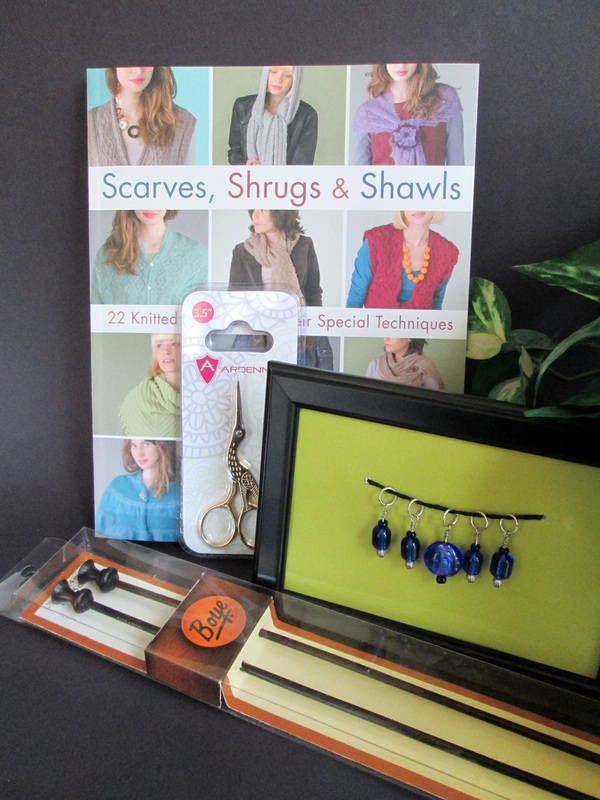 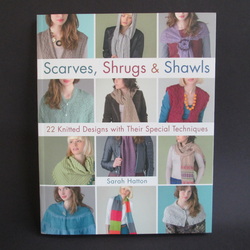 Scarves, Shrugs & Shawls: 22 Knitted Designs with Their Special Techniques by Sarah Hatton St. Martin's Griffin February 26, 2013; 136 Pages Scarves and wraps are the perfect canvases for experimenting with new stitches and practicing new techniques. From well-respected Rowan Yarn designer Sarah Hatton with Sharon Brant as the technical editor, Scarves, Shrugs & Shawls offers over twenty easy-to-make and fun-to-wear designs that explore a range of knitting techniques—from gorgeous textured and cabled stitches, to intricate openwork and lace patterns, to interesting and appealing shaping. A gallery of designs features the garments photographed in full color and includes a helpful and inspiring "How to Wear It" section, showcasing the myriad ways to wrap your shawl, twist your neck warmer, or tie your scarf. Making these popular accessories even more versatile so you can wear them over and over, and still keep them looking fresh! (from Amazon.com) Greeting Friends! Welcome to a new review and an awesome giveaway. First, let me tell you about the book. As most of you know I'm a lover of books - that includes all kinds from fiction to dictionaries and everything in between. As a crocheter and more recently a knitter I love browsing through the pages of pattern books looking for projects and inspiration. Having checked out many titles from our library I fancy myself a bit of a connoisseur. So how does Scarves, Shrugs & Shawls measure up? On a scale of 1 - 10 I give it a solid 8. The book is set up in sections. Right away I was drawn in by the full page photographic spreads featuring each item. So often in pattern books you get one little picture. Not here. After you've had a chance to view each piece from a variety of angles it's on to the patterns. Again there are more (different) pictures that really show you what you're making. Along with the line by line instructions charts have been included allowing you to use whichever format you prefer. Now I haven't made any of these items, so I can't speak to the accuracy or ease of following the patterns, but I did read through several and it appears that they are well laid out and complete. As the publisher promises, there are a variety of different techniques featured in the patterns providing an opportunity to try new things. As a beginner I feel like several of the patterns are more advanced than I am, however the technique section at the back of the book seems to offer good insight on the skills needed by covering everything from how to avoid holes when doing two handed fair isle work, how to string beads using a needle and thread, to making a no-turn bobble. I'd say the projects are best suited for those with knowledge of the basic skills and some experience under their belt. A confident beginner should be able to handle many and might be inspired to give some of the more complicated designs a try. Intermediate and advanced knitters will be pleased with the options available. There really is something for everybody. I'd say my favorite part is the "How to Wear It" section. What a brilliant idea! As a scarf and shawl enthusiast I'm always struggling to find new and interesting ways to wear them. While this section is showcasing the garments from the book they make it easy to see how it would work on any item of similar shape and dimension. In addition to the pictures they tell you what to do to achieve each look! For the fashionably challenged like me this is important! The paperback book is nicely bound and lays open fairly easily. It's 9.7" x 9" size makes it big enough to see things clearly, but small enough to fit in your bag if you wanted to take a project on the go. I like the matte finish of the pages, too. Overall I think this is a well done book that any fan of shoulder and neck wear would be happy to have in their collection! Now, for the fun part - the giveaway!! 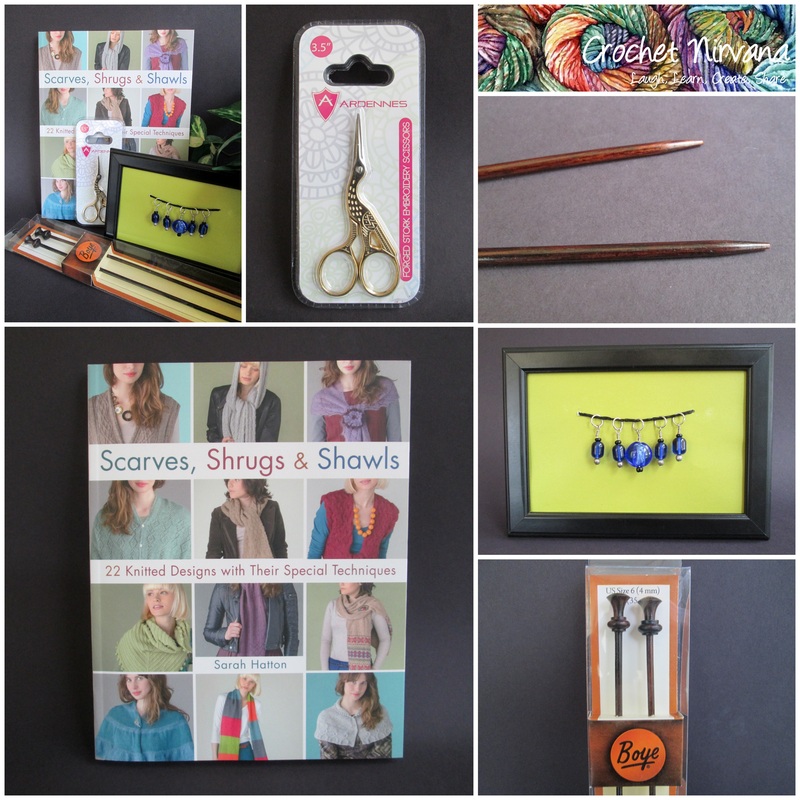 I love giving things away! I'm so blessed and thankful to the people at St. Martin's who send me all kinds of books to review. It only seems right that I spread the joy and share them with you. I've been collecting little trinkets to put together a fun knitting prize package. In addition to the book, there are stork scissors!! These are a classic item and a huge favorite of my Facebook friends. This pair is 3.5" tall making them perfect for home or on the go in your travel bag. I have a 5" pair that I use every day - they cut beautifully! Next I found a pair of Rosewood knitting needles from Boyd. They're US size 6 and 14" long. They're quite lovely and while I've never tried them, I know that my Rosewood crochet hooks feel warm and natural and seem to get better every time I use them. Finally there is a set of handmade cobalt blue glass stitch markers. They're one of a kind and will help you keep your place in style! So there you have it! All the tools you need - just add your favorite yarn and you're on your way to knitting nirvana!! Enter now for your chance to win! Thanks so much for stopping by and spending a bit of your day with me. I hope that you'll take a moment and throw your name in the hat. I've tried to come up with lots of different ways to enter giving you plenty of options. This time I'm opening the drawing to everyone everywhere! If I can send you mail through the US Post Office than you're welcome to enter. If you're a crocheter and are feeling left out - don't! I've got something special planned for you coming up towards the end of the month! I promise you're going to love it!
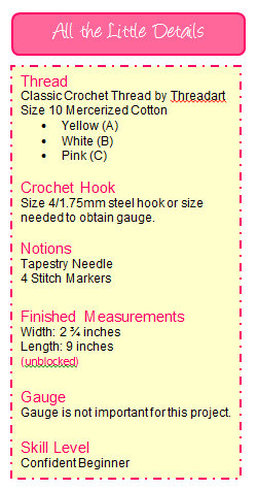
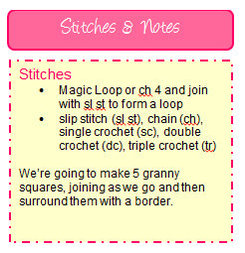
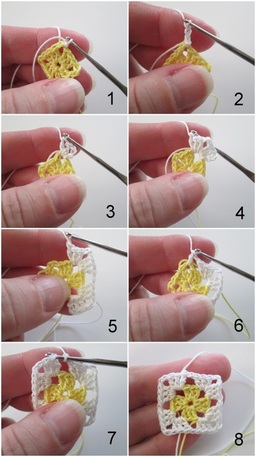
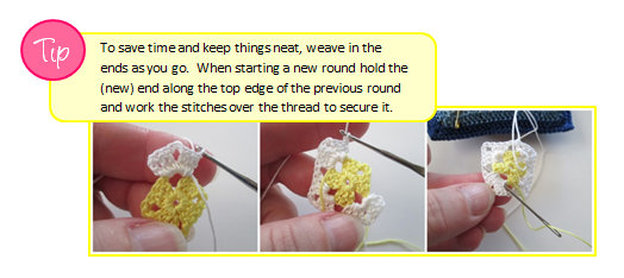
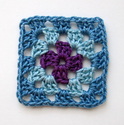
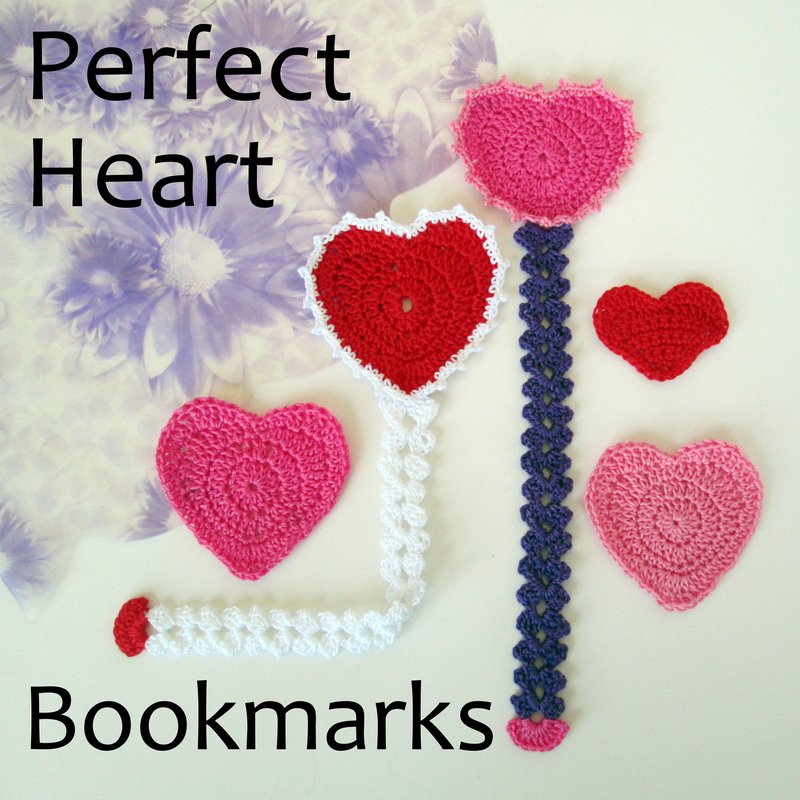
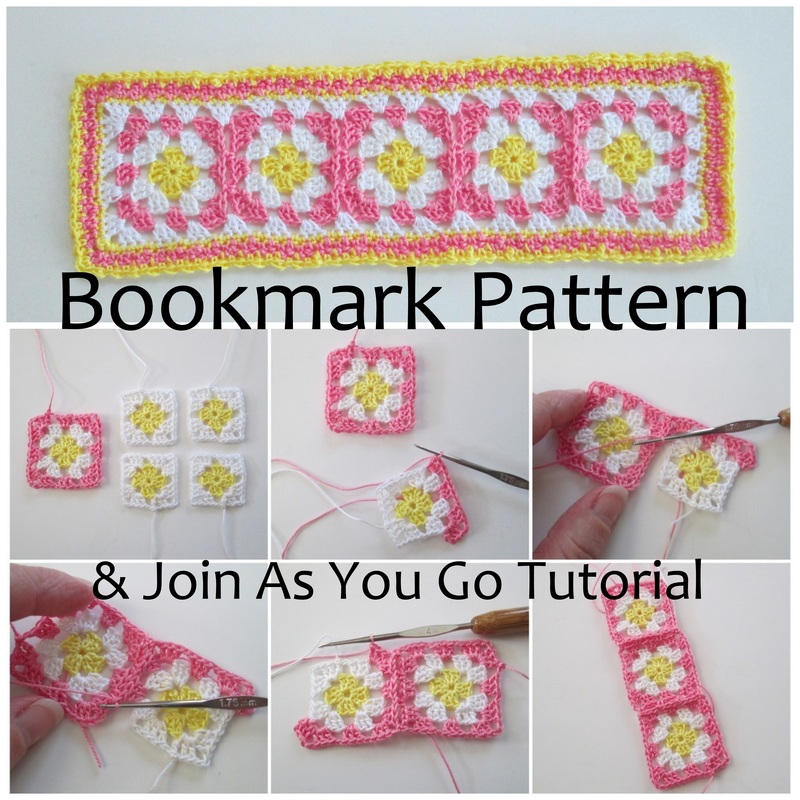
Until next time friends, Be Blessed and Stitch & Read with Love! 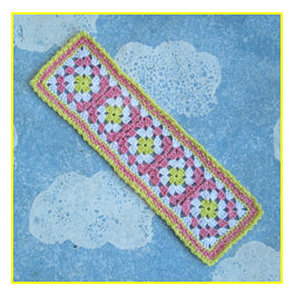 Working with thread can seem intimidating. I know the first time I picked up a tiny steel hook and #10 cotton thread I thought isn’t thread for sewing?! I felt out of my element. There were a few rough moments, I won’t kid you, but with a little perseverance I discovered the magic feeling you get when bits of thread suddenly come together into a recognizable work of art that you created! As an avid reader, bookmarks always seem in short supply at our house. How better to combine my two passions than by designing a pattern for thread crochet bookmarks! For the thread newbies out there I’ve taken lots of pictures to show you how it’s done. If you’re very new to crochet, and have never made a granny square before I do recommend that you make a few with worsted weight yarn and an H hook before you try the thread. As long as you’re comfortable with basic crochet techniques, and know the standard stitches than you should have no problem entering the wonderful world of thread. 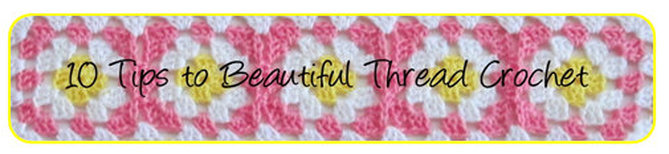 1. Don't be afraid! I know the hook and thread seem impossibly small, but give it a chance. 2. All projects look messy and are hard to hold/work during the first few rows or rounds. Keep going and it will come together. 3. Always work in good light and when you're not tired. 4. Many patterns for yarn can be adapted to thread, and doilies are always in fashion. 5. Take the time to use an invisible join instead of a slip stitch to join rounds. 6. Use standing stitches to start rows/rounds instead of starting chains. 7. Learn the join-as-you-go technique for motifs and grannies. 8. Weave in ends as you go. 9. If your hook is too thin to hold comfortably try wrapping the end with scrap yarn for an easy custom handle. 10. Blocking and stiffening your finished project are worth the time. The Classic Granny Square Bookmark Pattern
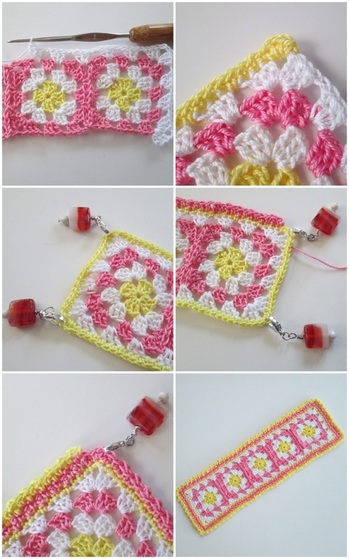
 Rnd 3: Join C in any ch2 corner sp. (ch3, 2dc, ch2, 3dc) in same ch2 sp, ch1. * 3dc in next ch1 sp, ch1, (3dc, ch2, 3dc) in next ch2 corner sp, ch1. Repeat from * 3 times. 3dc in last ch1 sp, ch1. Join with sl st to starting ch3. Fasten off.  Joining Rnd 3: Join C in any ch2 corner sp. (ch3, 2dc, ch2, 3dc) in same ch2 sp, ch1. 3dc in ch1 sp, ch1. (now we start the joining edge) 3dc in ch2 corner sp of working square, ch1, sc to join in any ch2 corner of finished square, 3dc back in same ch2 corner sp of working square. Sc to join in first ch1 sp of finished square. 3dc in ch1 sp of working square, Sc to join in next ch1 sp of finished square. 3dc in ch2 corner sp of working square, ch1, sc to join in next ch2 corner sp of finished square, 3dc back in same ch2 corner sp of working square, ch1. (join is finished) 3dc in next ch1 sp, ch1. (3dc, ch2, 3dc) in next ch2 corner sp, ch1, 3dc in last ch1 sp, ch1. Join with sl st in top of starting ch3. Fasten off. Attach remaining squares in the same fashion. 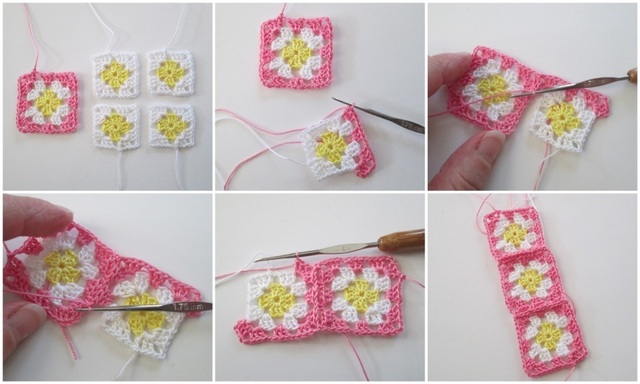 
Thanks so much for stopping by and spending a bit of your day with me. Be sure to check back for the final installment in my working with thread mini-series. I'll show you how to stiffen your bookmark and other thread projects using plain old white glue. For your convenience I've included a downloadable copy of the pattern, just click on the link below and enjoy!
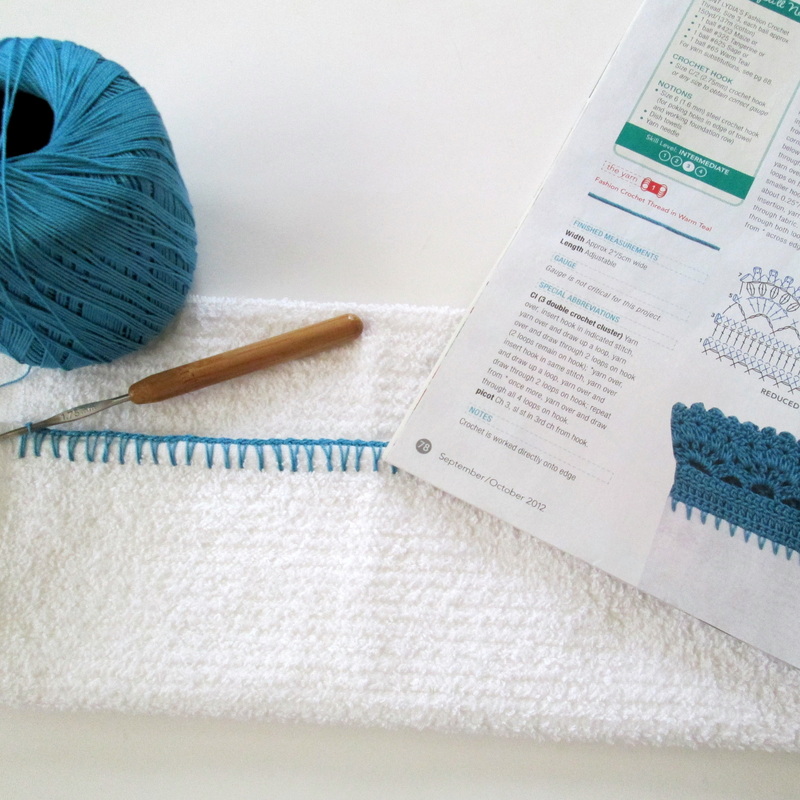
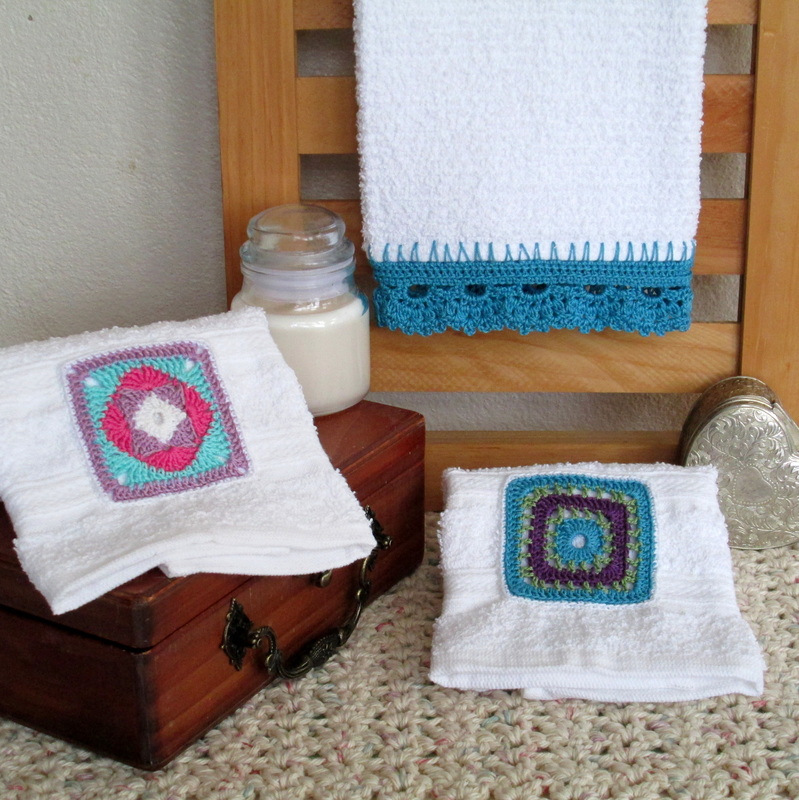
Until next time friends, Be Blessed and Stitch & Read with Love! 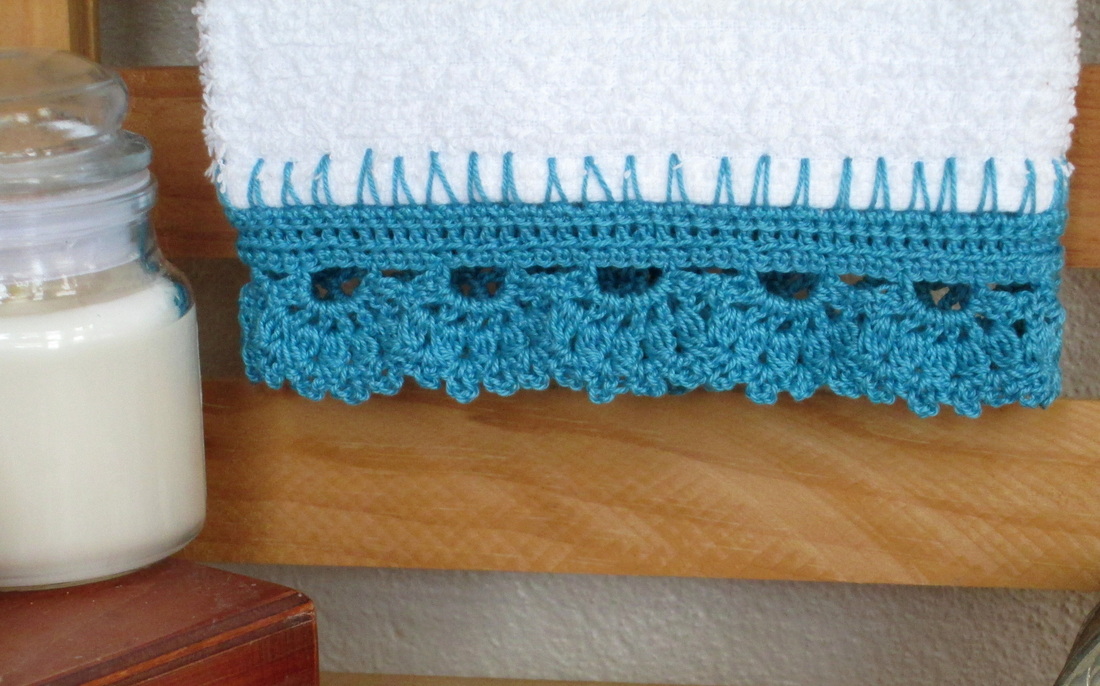 Greetings! Throughout the summer I've been dabbling with different thread projects. Keeping them short and sweet helps to ensure that I'll stay interested and actually follow through to the end! I was working on the review of the book 100 Colorful Granny Squares to Crochet which meant that I tried out several of the patterns. I made some with worsted cotton and more with cotton thread. It didn't take long for a collection to develop. They were just too pretty to leave in a basket, so I bought a bunch of plain white washcloths and hand towels to embellish. Stitching one square to each washcloth worked beautifully (you can see how I did it in this post). I wanted to try something different with the towels. Flipping through my library of books and magazines I came across a pattern for lace edging that was perfect - the Dolly Dish Towels in the Sept/Oct 2012 issue of Crochet Today.
It was just a coincidence that I had the same color thread they used on hand. The soft cotton towel was supple enough to work the foundation row without pre-poking any holes, and once that was done the design rapidly took shape. Perhaps the toughest part was making sure that I had the right multiple of stitches evenly spaced along the bottom of my towel. After finishing this quick and easy project I understand why lace edging is such a classic embellishment. In times past if you wanted something fancy you had to make it yourself, unless you were wealthy enough to pay someone to make it for you. Adding lace to household linens makes them look good and was probably excellent practice for more intricate pieces like wedding dresses, veils and christening gowns. While I don't see any of those in my future, my towel and washcloths make a lovely addition to our bathroom. My husband says they're too nice to use, but I say they're too nice not to!
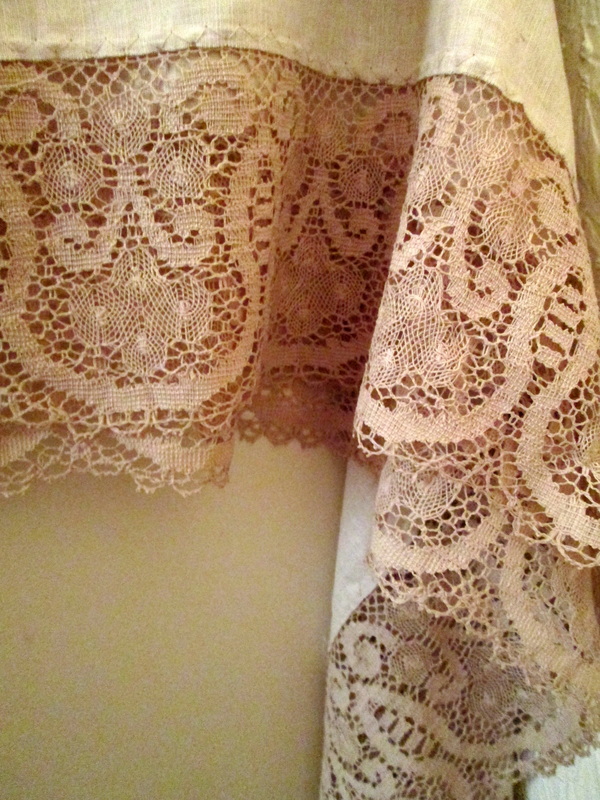
That's all for now. Thanks so much for stopping by and spending a bit of your day with me. Until next time friends, Be Blessed and Stitch & Read with Love! A Little History 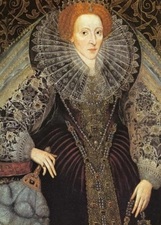 Crochet is one of the youngest of the fiber arts. Textiles are easily traced back to the Stone Age, but the first written reference to crochet (or crotchet as it was sometimes spelled) wasn’t until 1812. The early patterns (of the 1840’s) gave detailed instructions on the use of the hook, possibly implying that crochet was not a needle craft familiar to the ladies of the day. We know that fine lace was tremendously popular during the Elizabethan Period (1558-1603). These early laces were made using needles or bobbins of thread that were woven into intricate patterns. They were very expensive and took a long time to produce making it available only to the wealthy nobility. Even though the art of crochet is a relative newbie its history is quite impressive. In 1846 & ‘47 crocheted lace helped save many Irish from starvation during the Great Potato Famine. How? A group of nuns taught men, women and children the art of making lace. When Queen Victoria accepted the laces as a gift and started wearing them they became instantly fashionable. With their work in such high demand, many families were able to earn enough money to survive the famine and even immigrate to America. 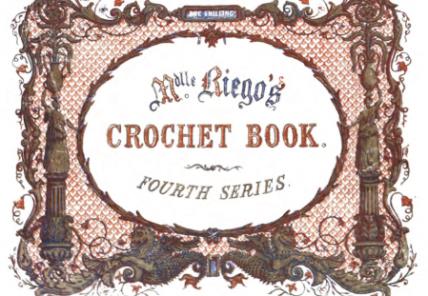 Irish Lace was all the rage and its popularity continued to grow as patterns became available. Mlle. Elanore Rigeo de le Branchardiere, one of the most gifted artists/designers of the time, published numerous books of thread crochet techniques and lace patterns from 1846 - 1887. She was best known for her ability to write clear and precise instructions allowing anyone who could afford her books to produce the intricate designs of the Irish style.
 At a time when resources were limited and ingenuity was necessary, other forms of crochet proved indispensable. Of course I’m referring to the granny square. This simple motif (that may have originated as a thread pattern) when worked with scraps of yarns left over from other projects or recycled from old garments became a favorite for crocheters allowing blankets and throws to be fashioned from otherwise useless materials. Thread crochet in the 20th century adapted to the ever changing conditions of our economy. Like all of the leisure arts, in times of moderation projects would take on a utilitarian style. Crocheters would focus on making items that were relevant because of their function and affordability. During times of prosperity function could become secondary and crocheters would create exquisitely frivolous projects purely for pleasure. However, thread crochet projects nearly always have the ability to look good! Even the simplest washcloth is easily adorned with a little lace border turning it into something special without adding much to the overall cost. Thread Crochet Today In the 200 years since the first mention in print, thread crochet has moved in and out of fashion. Proficiency in needle work was once necessary for ladies as part of their education. As women’s roles have changed so has our relationship with fiber. What we were once expected and even required to do we now must choose to learn. However, fiber arts such as crochet, knitting, spinning and weaving have experienced a resurgence and they are now more popular than ever. Many of the patterns that were originally written by our foremothers have a timeless quality that makes them just as relevant today as when they were published. So what’s changed? Color!
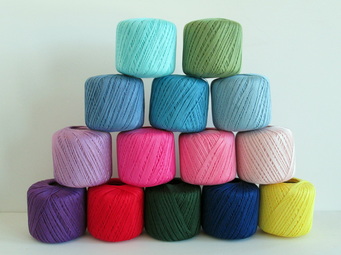
What We're Making With the colors that are available and the adventurous spirit of the latest generation of crocheters there’s nothing old fashioned about thread today. Of course there will always be a place for doilies and lace edging, it just might look different than you expect! Here's a glimpse at what we're making today:
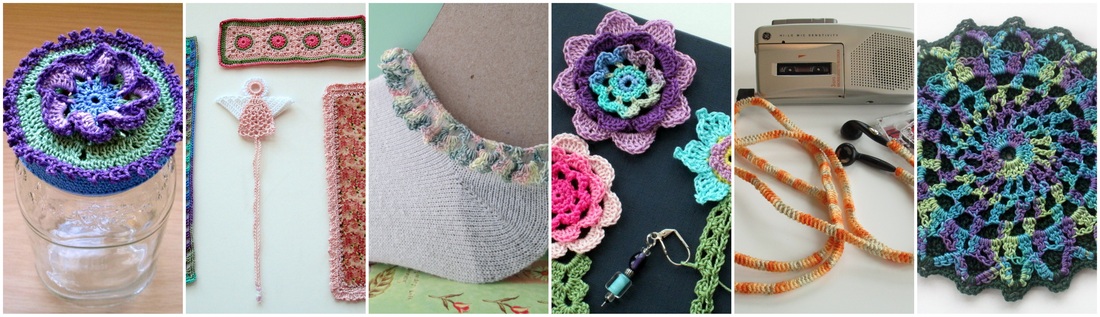
Who's Doing It? Everyone! Young, old and in between! Let’s just say that the image of gray hair and rocking chairs has been replaced by tattoos and pink hair. Okay, maybe not everyone has pink hair, but today's crocheter is young (no matter how old, we’re young at heart!), hip and through various electronic devises virtually connected to other fiber enthusiasts. And it’s definitely not just for the ladies. In fact some of today’s top designers are men! What's Next? I think that we’re at something of a crochet crossroads. Historically we’ve seen that what we make and how much time we spend making it has been influenced by what’s going on in the world. Given our current climate, history would dictate that we’re making utilitarian projects and not spending a lot of time enjoying the leisure arts. But that’s not what we’re doing. Sure, we’re making (pretty, colorful) things you can use, but we’ve discovered that crochet is a great way to relax and unwind. Our lives our hectic and busy, we’ve got lots to do, and our resources are limited. We’ve learned that we have to take care of ourselves and that we need economical outlets that help us to decompress when dealing with tough situations. Thread crochet fits the bill perfectly. For a minimal investment you can purchase several balls of thread and a set of steel hooks that will keep you stitching for months! It’s portable, easy to learn, and convenient. There’s also the added bonus of the on-line fiber community. Not only can you find groups dedicated to crochet on social networks like Facebook, Pinterest and Google+, we have our very own network in Ravelry! It’s like the modern version of the quilting bee where like-minded fiber enthusiast get together to share friendship, tips and encouragement! Are you Inspired? Are you ready to grab your steel hook and get started creating something exciting? If you’re worried that it’s too hard or too small, don’t be. The stitches and techniques are the same whether you make them with yarn or thread. Yes it does take some time to get your tension right and to feel comfortable with the hook. But, with a few helpful hints and a little practice you’ll be amazed at what you can do!
I hope that you’ve enjoyed this look at the evolution of crochet. We are the new generation and it’s up to us to carry on the traditions while continuing to expand our craft. We have the opportunity to make our mark on history by ensuring that the designs we create today are available to the crocheters of tomorrow. Be sure to come back for Part II of my series on Thread Crochet. Next up is a pattern and tutorial for a project that’s perfect for all skill levels. If you’re looking for more information on the history of crochet The Encyclopedia of Crochet by Donna Kooler is an excellent resource. Or you can check out The Granny Square Project. It’s a 5 part series all about crochet's most popular motif, and you'll find the links at the top of blog in the sidebar! Thanks so much for stopping by and spending a bit of your day with me. Until next time friends, Be Blessed and Stitch & Read with Love!  Greetings Friends! Today I've got something really cool to tell you about. If you ever visit me on any of the social networks you may have already seen this hat, and have heard me talking about My Mountain. So what is My Mountain? It’s a little hard to explain, but I’ll give it a try… The concept started as a promotion in Europe where the Schachenmayr Yarn Company asked people what gives you that exhilarating feeling of accomplishment, or the adrenaline rush like you’ve just slalomed down a black diamond trail or summited a world class peak. Now they're reaching out to North America to see how we challenge ourselves and what makes us feel like we're on top of the world. Well, I’m not much for mountain sports, but there are a few things that make me want to throw my arms in the air and let out a big whoop of joy! Right now my greatest mountain moments come from creating original crochet designs. It's something that I'm just getting into, and the process of going from idea to sketch then watching as it comes to life with the yarn and hook is just awesome. The final thrill comes from putting the whole thing together on paper so I can share it with you. How cool is it then, that as part of the promotion the folks at Schachenmayr Yarns and Westminster Fiber are having a My Mountain hat design contest. By submitting a design using their yarns you can be eligible to win some really awesome prizes. As if that weren't enough, by emailing [email protected] they'll even send you the yarn for free! I don't know when the cut off for the yarn request is, but your finished hat pictures need to be submitted (also by emailing Linda) by August 30.
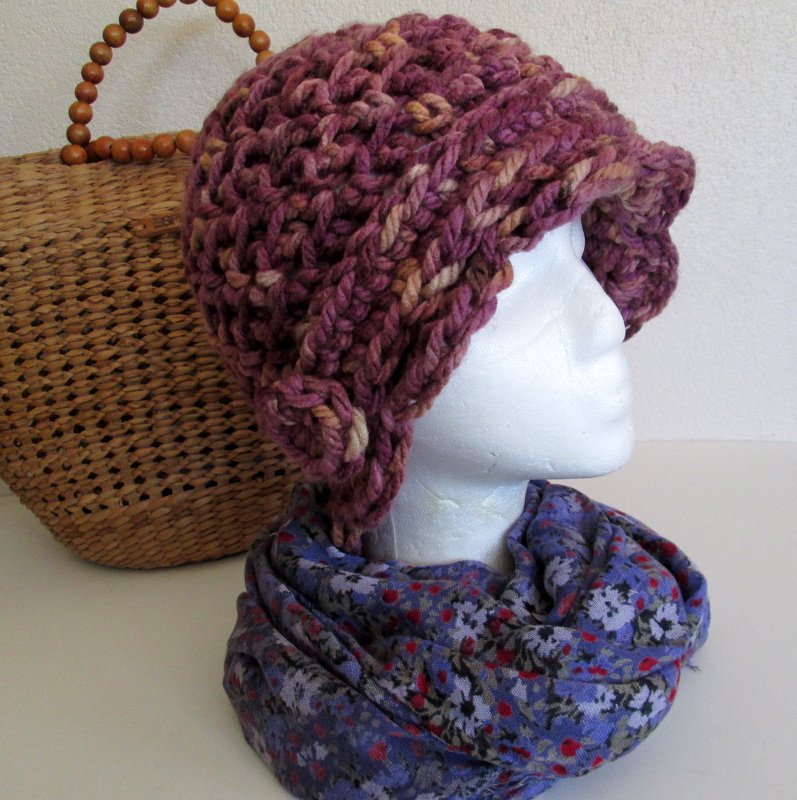
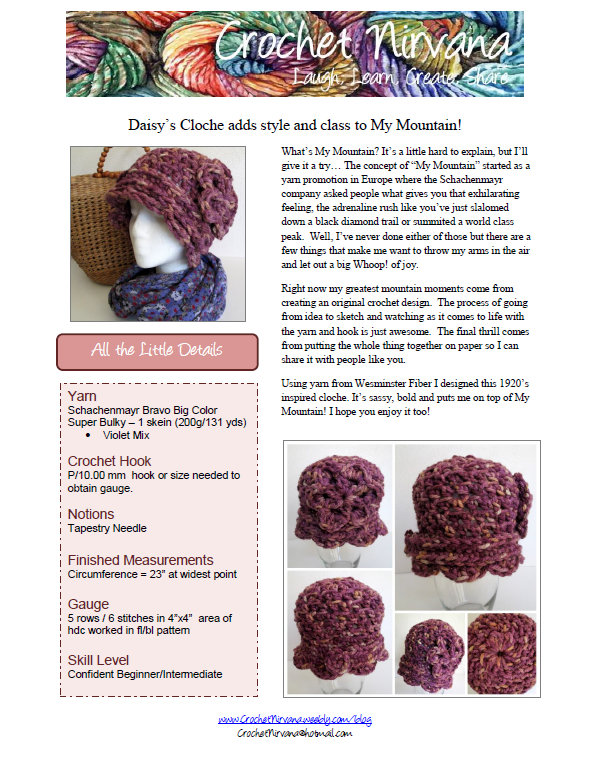
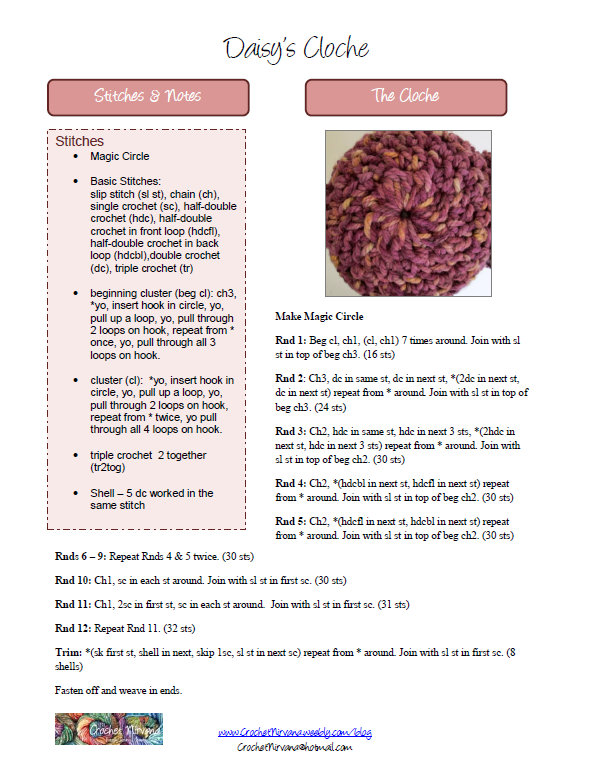
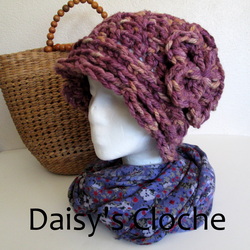
Using the yarn that they sent me I came up with this 1920's / Gatsby inspired design. If you know the book then you know that Daisy was bold and sassy. I think she would have rocked this hat, so in her honor it's called Daisy's Cloche. In addition to this beautiful violet colorway, they also sent me their new specialty Lumio yarn that has threads that reflect when you take a flash picture. I've made a hat similar to Daisy's that I'm just about finished with. I figure it they were kind enough to send the yarn then I'm going to use it to make some cool hats for their contest!
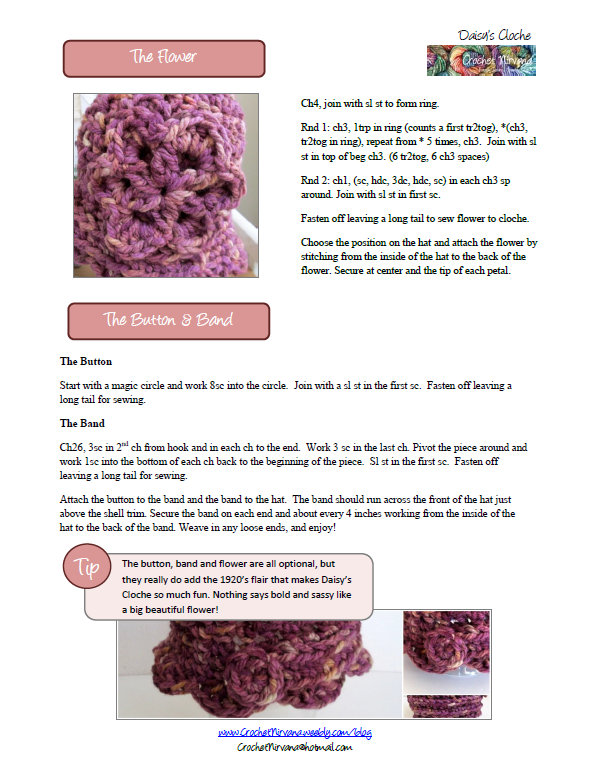
I'm not sure how the winners are going to be picked, and while winning is always nice, the truth is that participating in the promotion has been a great experience. The yarn that they sent is squishy, soft and so pretty. Plus it's really given me the confidence to come up with my own designs. Lately I've been doing a lot of work with thread, and I don't usually use super bulky yarn so it was a real challenge to move outside my comfort zone and try something new. My initial thought was what on earth am I going to do?! I started brainstorming and incorporating some of my favorite thread elements (like the flowers!) and before too long the cloche was born. Along with the designing, it's also given me a reason to work on my pattern writing skills. I think the presentation of the pattern is really important. One of my biggest pet peeves is bloggers who share their designs, but don't have downloadable PDFs. I never work from patterns on my laptop, and I don't have a tablet. That means in order to print I have to copy and paste into a Word document. It's not hard, but the formatting is always off and honestly unless the item is really special I usually don't bother. With that in mind, I'm working on a layout that I can use for all of the patterns I share here. My goal is to design something that I want to use - with a little background, clear pictures and of course accurate instructions!
If you're interested in making Daisy's Cloche for yourself or for a gift (the holidays are coming!) just click on the link below and you're in business. Because you're using such thick yarn the whole project comes together really quickly making this a great pattern to keep on hand for when you're looking for a fast project that looks harder than it is! Since I did edit the pattern myself you may come across something that doesn't make sense. First, accept my apologies and then let me know about it so I can fix it! Good luck to my fellow entrants - I hope you have as much fun as I did creating your designs. Thanks to the folks at Westminster Fibers for reaching out, sending the yarn and encouraging us to embrace life, conquer our mountains and live each moment to the fullest! Thanks so much for stopping by and spending a bit of your day with me. Until next time friends, Be Blessed and Stitch & Read with Love! A lacy shawl teaches a lesson about using the right tools. 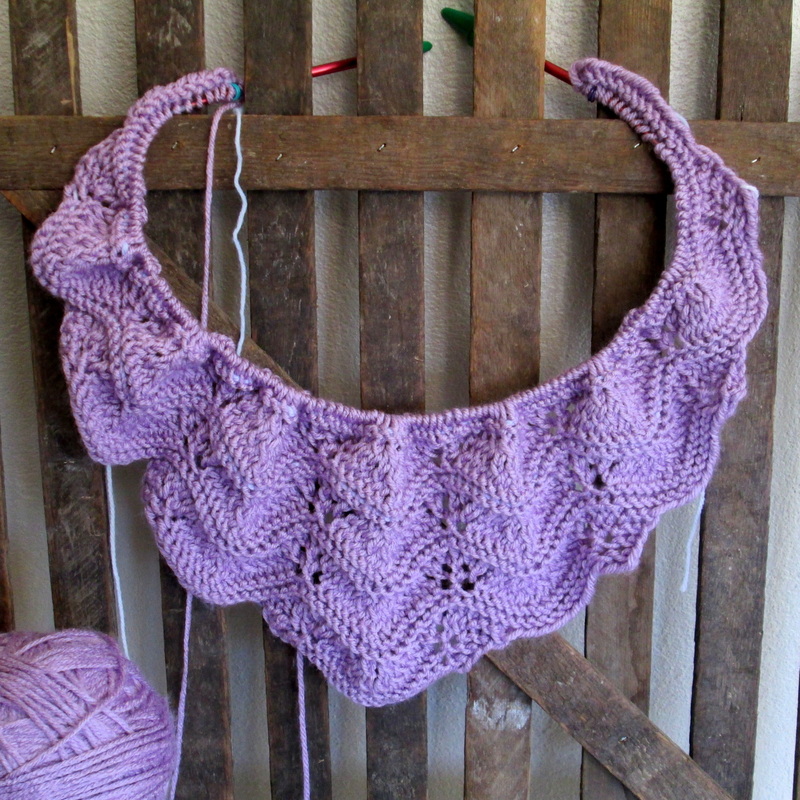 Greetings Friends! The recent break in the hot weather has me thinking about fall (my favorite of all the seasons)! One of the best things about the cooler weather is wearing wraps and shawls. I have several that are crochet, but none that are knit. For the past year or so I've been pinning and bookmarking patterns for the someday when I'd finally give knitting one a try. It's been a while since I picked up the needles so I figured now is a good time to work on my skills. If you remember, I've only been knitting for less than a year, and my entire repertoire includes one pair of socks, a small stuffed baby toy, a few pairs of fingerless mitts, oneleg warmer and a scarf and hat that are still in progress. (I have issues with finishing I know!) I sifted through the mass of beautiful patterns and finally settled on one called Blossoms by the Brook. It's quite lovely and looks like it will keep me interested and be a good way to practice lacy techniques. It calls for worsted weight yarn and since I have a bounty of acrylics in pretty colors I decided that's what I'll use. Normally I'll pick a fiber that feels better next to the skin, but since this is my first attempt it seems the wiser choice to use something economical. If all goes well then a knit shawl in gourmet yarn is in order, but for now I'll stick with the cheap seats!
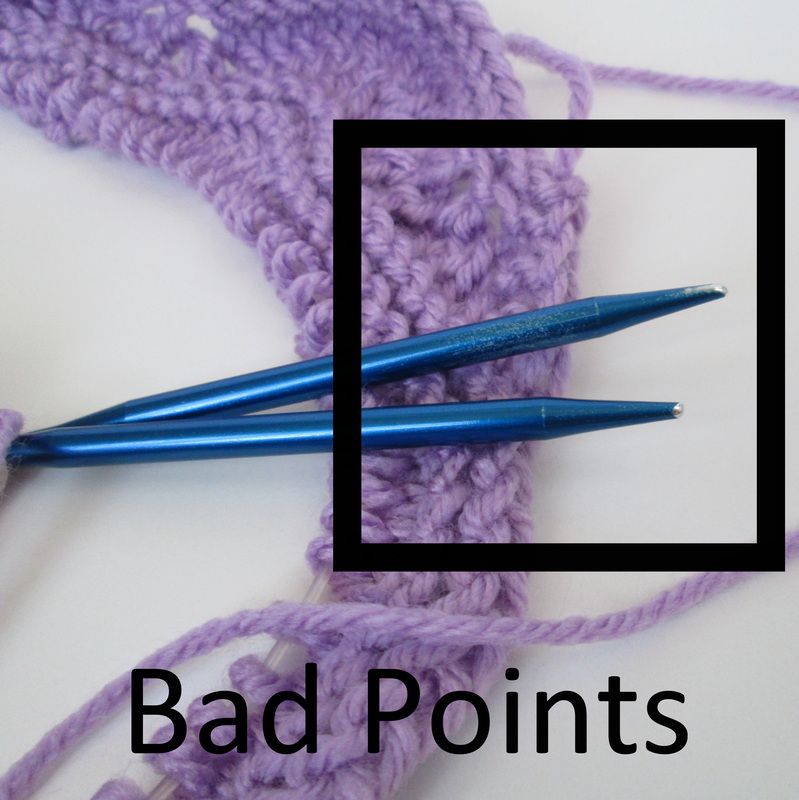
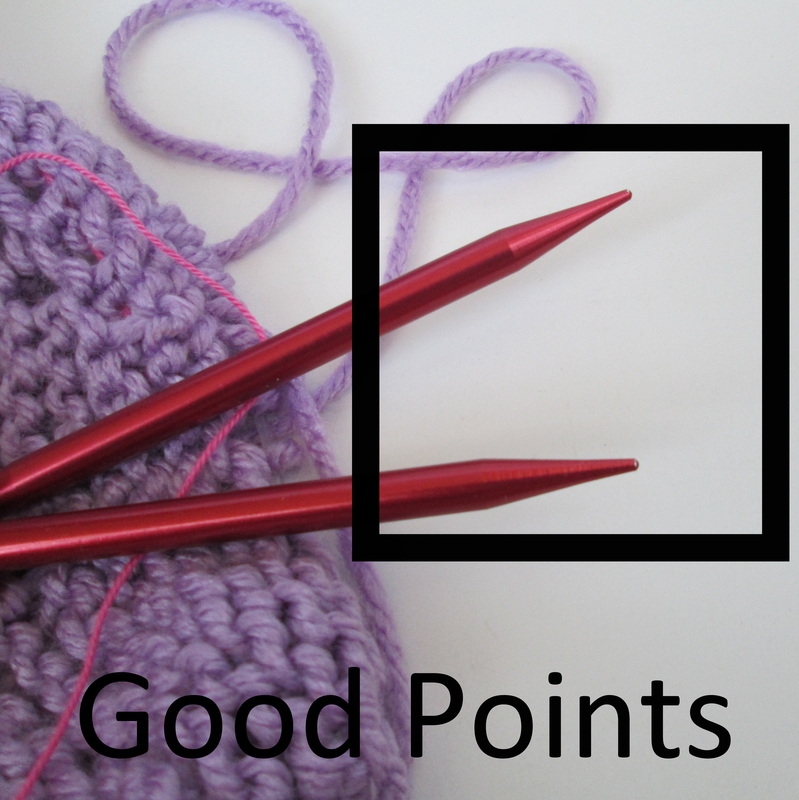
I have a fair collection of knitting needles. However, with the exception of a pair of dpn's I bought to make John's socks they've all been donated. Which means that lots of them have been very well used. Many of my crochet hooks came to me the same way and they've always treated me well. I have learned that all hooks are not created equal and to use the same one throughout a project, but I've never had one not work properly because of it's age. So when I picked out the size 8 circulars that the pattern calls for I didn't think twice about their condition. I used the long tail cast on and set to work. The first row is usually tight and hard to pick up, but once I get past that the tension evens out and I can get a good rhythm going. So why after 4 or 5 rows was I still struggling so much?? That's when I took a closer look at the tips of my needles. Well how about that! The finish was worn off and it's clear that these babies have knit a lot of stitches! What was once a fine chiseled tip is now blunt and dull! Of course I don't have another pair that size so I had to decide if I want to go up or down. I chose bigger needles figuring that with the worsted yarn the larger stitches would improve the drape of the fabric. Wow! What a difference! Now I get it. I had the right tool but it's worn condition made it so hard to work with that I could probably use chop sticks with better results! And so I've learned a valuable lesson. Make sure your tips have good points. For a moment I thought that I had lost my knitting mojo, but once I got going with a healthy set of needles it was smooth sailing. The larger size has helped with the drape and the pattern is proving to be a fun as I hoped. Now that I'm nearly half way done I'm already picking out the "nice" yarn I'm going to use for my next knit shawl! I'm sure that you seasoned knitters know exactly where I'm coming from, and may have even enjoyed a chuckle at my naivety! Somewhere deep in the recesses of my brain I know that I've read about points and lace needles and what makes for good easy knitting, I just got so caught up in the excitement of the project that I never even considered that I might have dull needles! 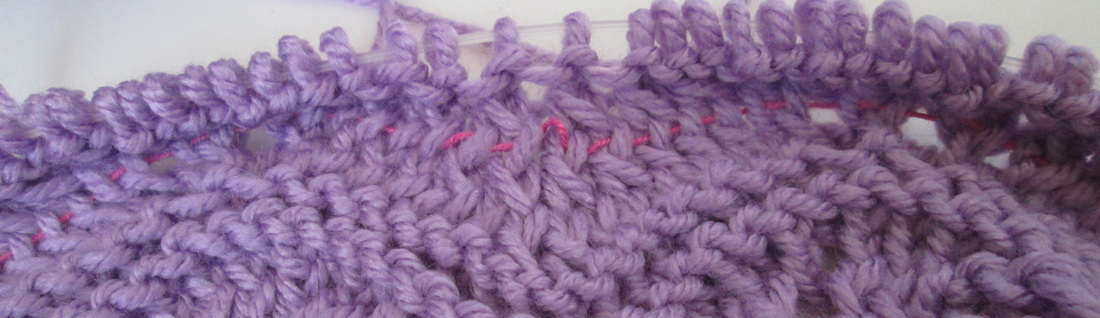 For this pattern I'm running a life line once in every repeat. Crochet and knitting are activities that you really learn by doing. Books and videos are definitely helpful but the real knowledge comes from taking the yarn in hand and getting to it. One of my biggest knitting fears is having to rip out my work, that's why I'm using life lines. It's another valuable lesson I learned "on the job". Yes, it's a bit tedious but I'd much rather take the time to run a safety line than have to leave in a mistake (never!) or start over!
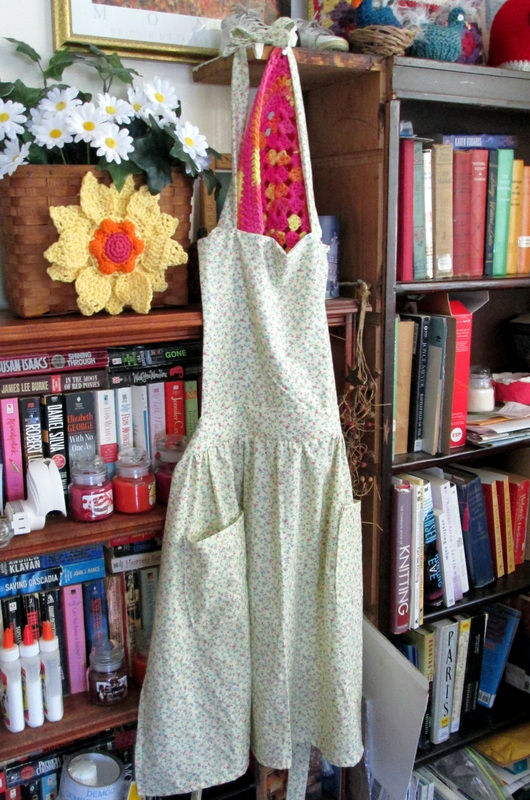
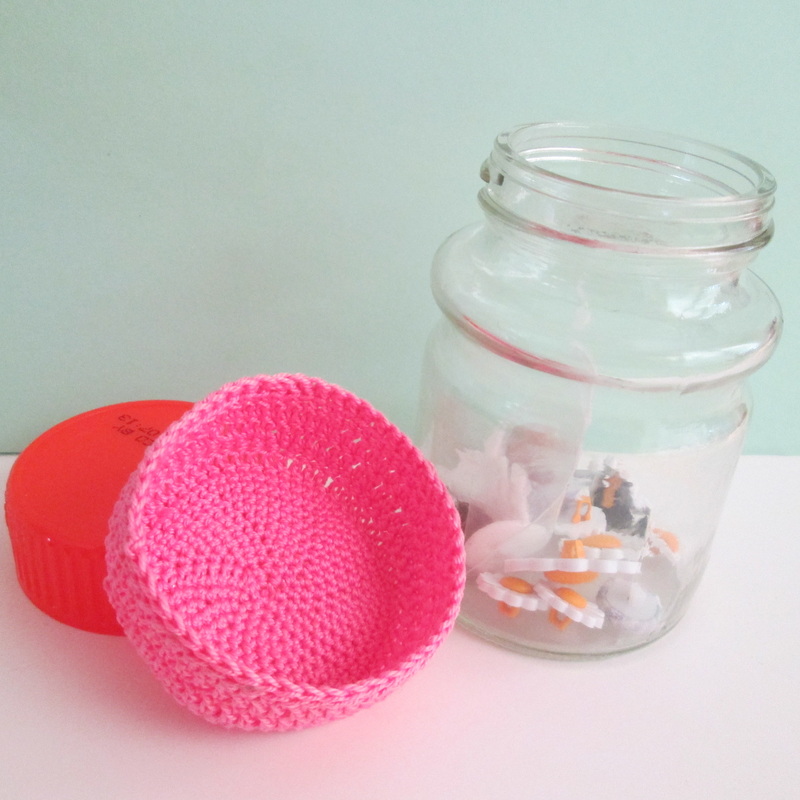
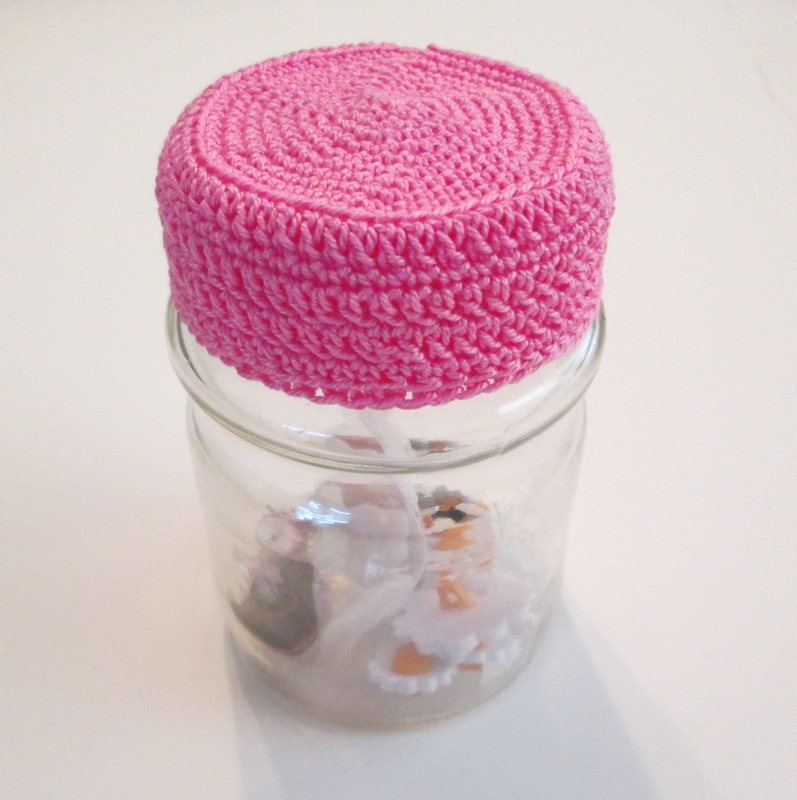
So there you have it. Check your tips! Working with dull points is frustrating and time consuming. Don't let shabby equipment ruin your knitting experience. Thanks so much for stopping and spending a bit of your day with me. Until next time friends, Be blessed and stitch & read with love! 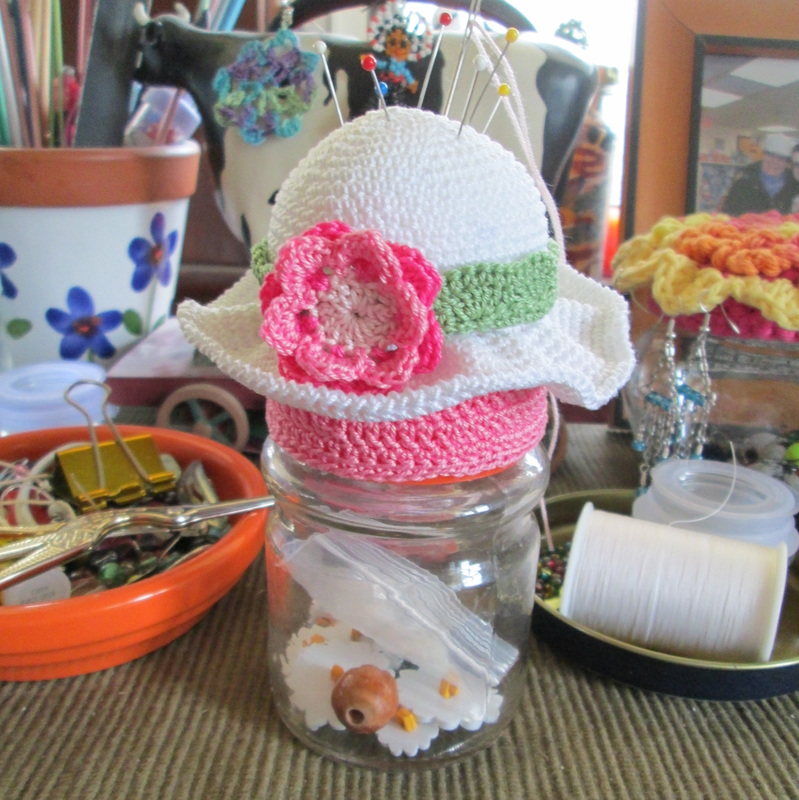 Hello Friends! It's a beautiful day in the neighborhood and while we may be smack dab in the middle of summer Mother Nature is finally cutting us a break! When it's hot out I tend to lean towards small thread projects to keep me busy. Lately I've been focused on pincushions. When I came across this little gem in the April 2013 issue of Crochet World I knew I had to make it. The original pattern is for a tape measure holder/pincushion. Of course I didn't have the same kind of tape so I needed to find something to use in it's place. At first I thought about just stuffing the bottom, and then I remembered the little jar in my sewing box that I'd been keeping stray buttons in. 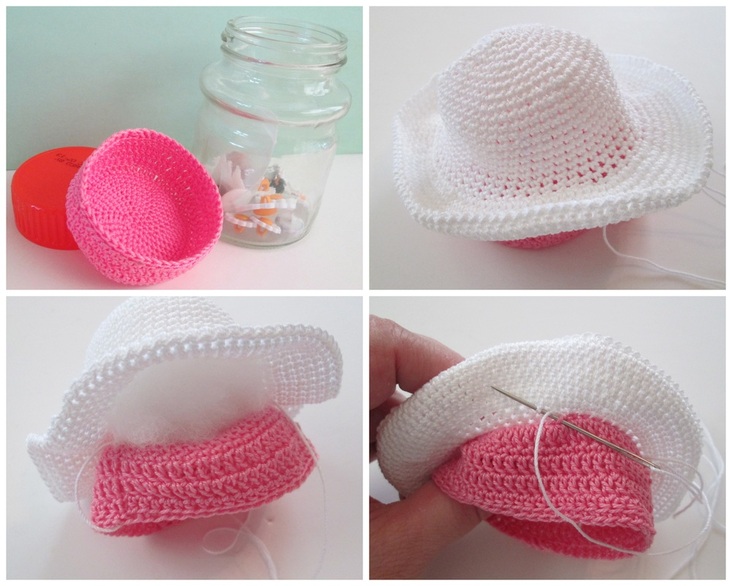 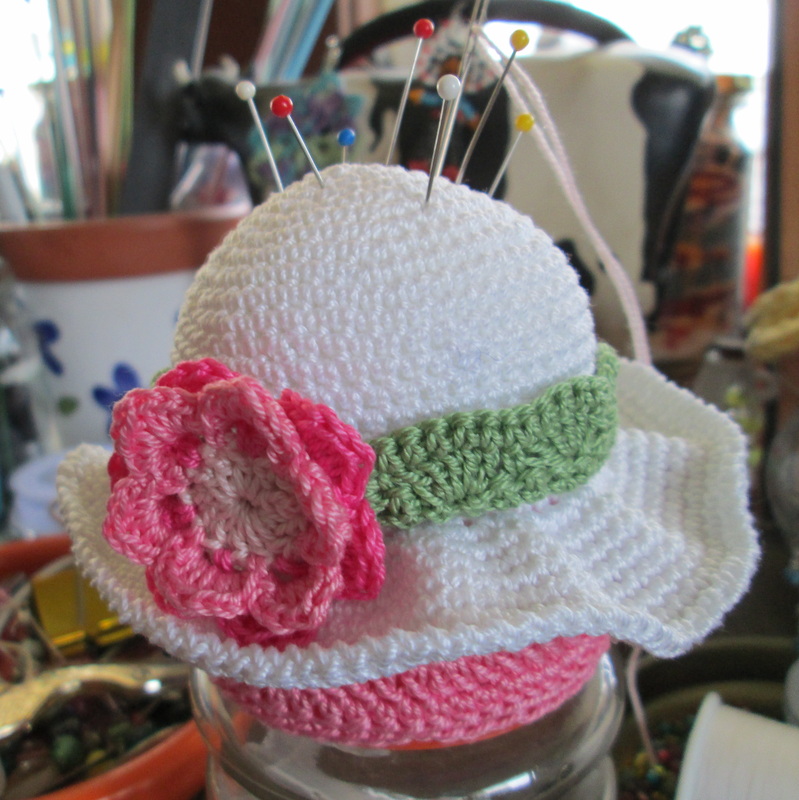 As it turns out it was just about the same size as the tape and minimal modifications were needed to make it work. I figured if I made the pincushion into a jar topper the bottom could be used to hold notions like a needle threader, safety pins, small spools of thread and even the stray buttons, making it into a handy sewing kit perfect for those little mending jobs. I followed the pattern through Rnd 8 of the Hat Bottom which is just a basic circle. I added one more round (following the established pattern) so that the circle was the same size as the top of the jar. Then I worked a round of sc in the front loops only. This give you the edge and you can start working down the sides. I worked 4 rounds of dc in both loops until it covered the top. I finished with a round of sc worked into the front loops to form a small lip. For the hat I followed the pattern again through Rnd 8, adding one more round just like I did for the base. This way I knew that when I sewed them together I'd have the same number of stitches on both pieces (54, I think). I did make one more modification. I used a different flower than the one indicated. I'm a fan of the traditional crochet roses so that's what I made using 3 different shades of pink.
It's a fairly easy project - the magazine says "Confident Beginner" and I'd agree. Even with the modifications it only took a few sittings. I almost forgot. I used a bit of fabric glue to secure the pincushion to the jar top. That way when it stays put when you open and close the jar. I'm quite pleased with the whole thing. It's quite charming and will certainly make a lovely gift. Well folks that's all for now! Thanks so much for stopping by and spending a bit of your day with me. Until next time friends, Be blessed and stitch & read with love!
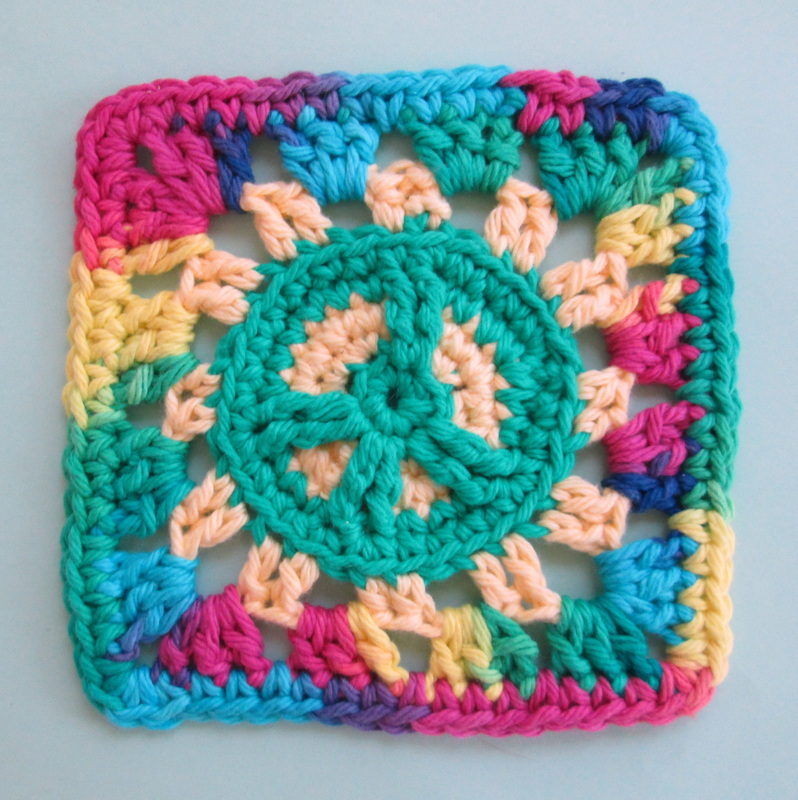
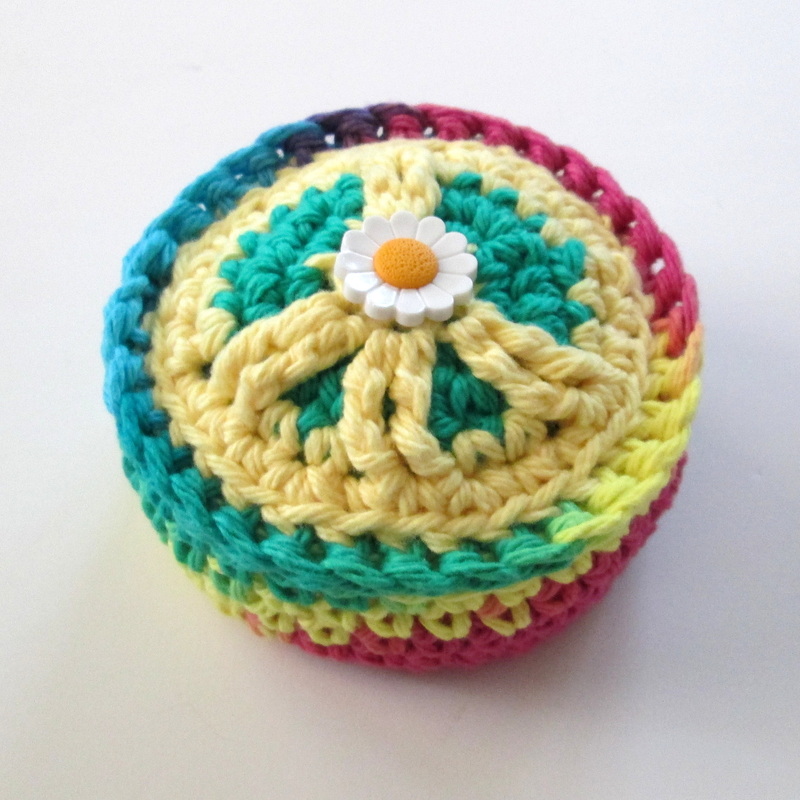
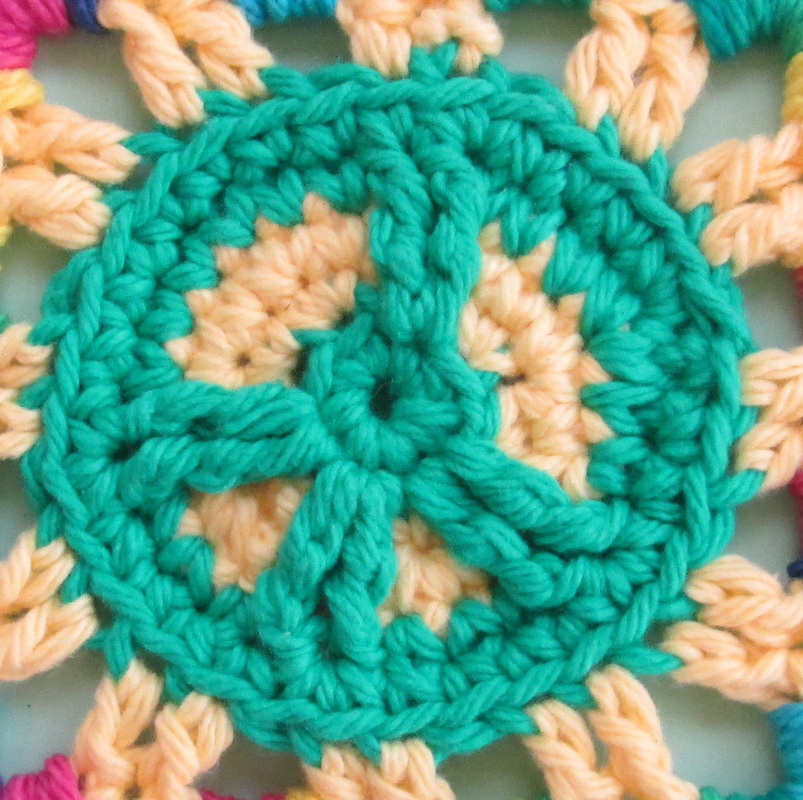
Greetings Friends! Last week one of the projects that I showed you was the totally groovy peace sign granny square from Petals to Picots. My mission was to turn it into a pincushion for lovely young lady named Phoenix who volunteers at our library. As you can see it was a terrific success and I'm overjoyed with the results. It's a simple project that came together in just a few hours. I made mine using Sugar 'n Cream Cotton in Sunshine, Hot Green and Psychedelic and a G hook. Here's how: 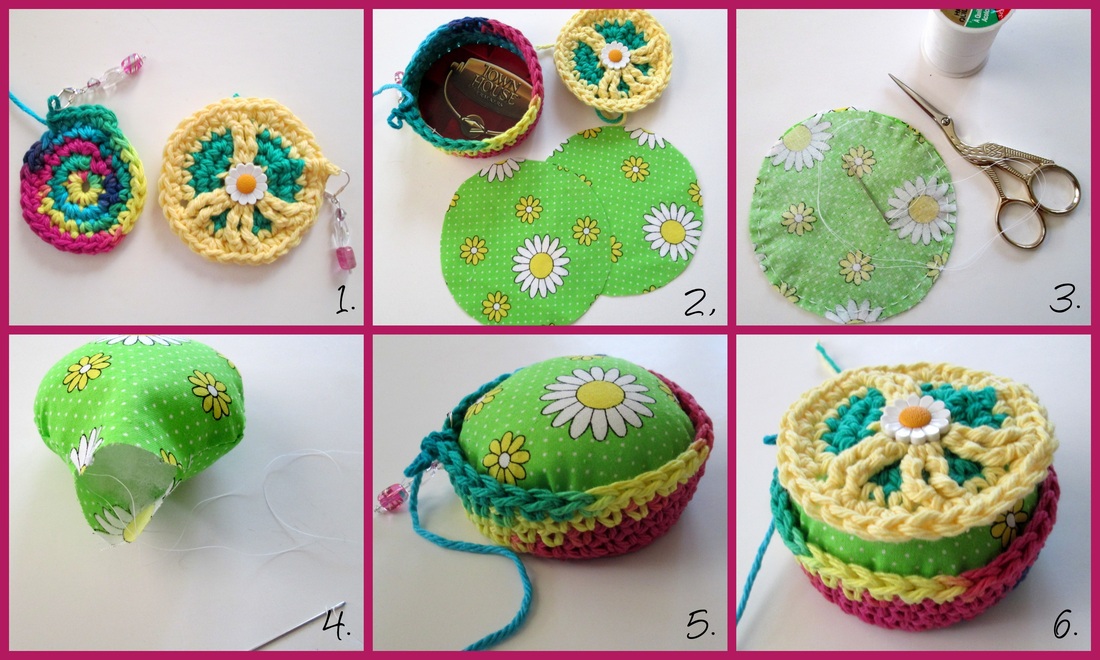
1. Using the granny square pattern, make just the peace sign. For the base make a basic circle working in continuous rounds moving the stitch marker after each round. 2. When it's the same size as the peace sign work one round into the front loops only. That forms the little edge and allows you to start working up. Work 4 more continuous rounds making it about an inch and a half tall. Don't finish off. To give it a bit more structure using the peace sign as a template, cut a piece of cardboard to fit snugly in the bottom. To make the cushion, using the cardboard circle as a guide, cut 2 pieces of fabric about a 1/2 to 3/4 of an inch larger than the cardboard. 3. Put the wrong sides of the fabric together and using a basting stitch sew around the circle. Leave 1/4 inch seam allowance and an 1 1/2 - 2 inch opening. Leave the needle and thread attached. 4. Turn the circle right side out and stuff with fiber fill. Over stuff so it's nice and firm and puffy. Fold the edges of the opening in and stitch closed. 5. Plump up your cushion and stuff it into the base. It should fit snugly. You could stop right here and have yourself a great little pincushion. In fact, that's exactly what we're going to be making at the next YA craft class at the library! 6. To finish, attach the peace sign to the base by single crocheting through the back loops of the base and the front loops of the peace sign. Fasten off and weave in the end.
Well that it'll do it for me today. I have all kinds of projects to share with you so please stop back and visit again. Thanks so much for spending a bit of your day with me,
Until next time friends, Be blessed and stitch & read with love! This week it's Tie-Dye, Pincushions and Camo (don't forget the books!) 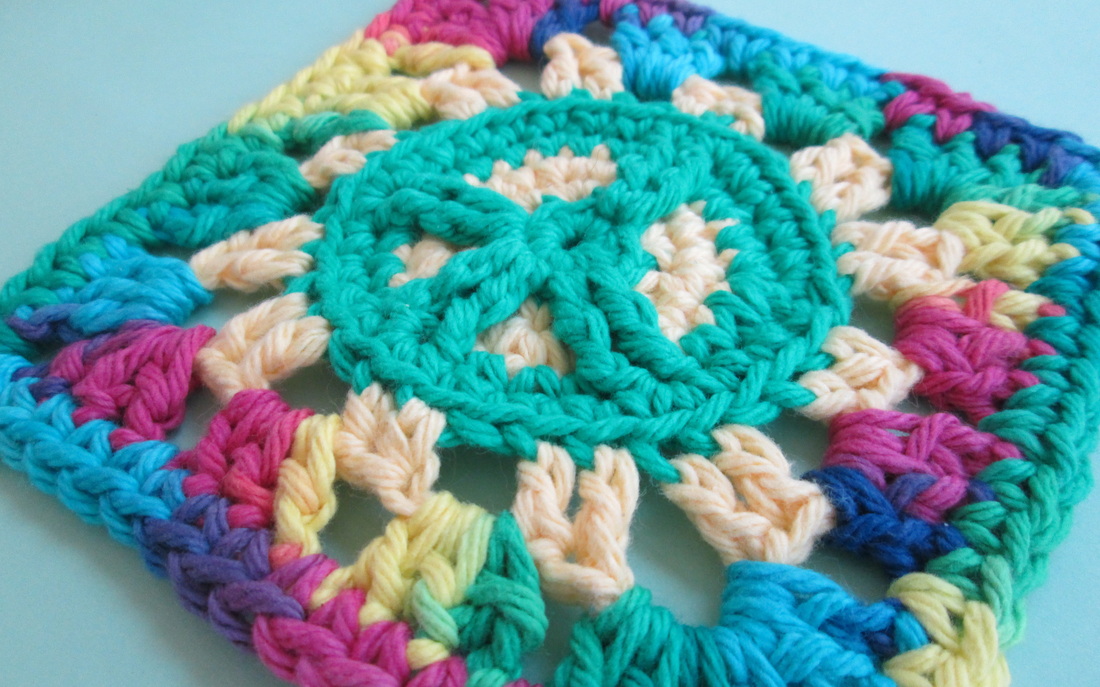 Hi there! I don't know if it's hot where you are, but in north central Massachusetts the mercury has blasted through the top of the thermometer and the humidity is residing consistently in the "tropical" zone. As far as I'm concerned this weather is inappropriate for anything except exotic plants and certain members of the animal kingdom. Humans (especially this one) not included! At our house we have one air conditioner. It's centrally located in the dining/living room and we gather around it in hopes of maintaining some margin of sanity. So far so good, yet I question how long we (my family and the A/C) can hold out! The one thing that the heat has not stopped me from doing is starting new projects. It must be some sort of condition that I suffer from that causes me to thrive on juggling multiple tasks . It's not just in the crochet world, but in the book world too, as I always have at least two novels and one audio book going as well as the reviews that are in the works. It used to worry me, now I just go with it! Eventually things get done, and those that don't must not have been that interesting anyway.
Turns out I never did get to that Yarn Along post. I will tell you that the book, The Sisters Brothers is a quirky delight. It's a western set in the 1800's and the main characters are outlaws. But truly they are the most endearing hired guns you're likely to ever encounter! Good reading if you like off-beat humor and unconventional sentence structure.
There is one more project that I've been toiling with this week - Hats. Specifically for the My Mountain project (more on that soon!) I'm working on some designs that combine my favorite granny square and doily components with traditional cloche styles. I finished one that's good, just not perfect - yet... but don't you worry, I'll be sure to show you what I come up with! So that's what's in my project bag today. How about you? What do you like to work on when the temperature hits broil? I'd love to hear how you stay cool. I was also wondering how many of you work on multiple projects simultaneously. And if you do, what's your secret for getting them finished?! Thanks so much for stopping by and spending a bit of your day with me. Even though it's Thursday, I'll be linking up with some of my favorite Wednesday blogs! Scroll down the sidebar to see who I'll be visiting with. Until next time friends, Stay cool, be blessed and stitch & read with love! |
I'm Robin and this is  
Click to see what's new on the Craftsy Crochet Blog!
Follow Along
 Tutorials and Patterns


On Instagram 
Look for me, I'm RobinBrz


Places I Post
 Archives
July 2015
Categories
All
 
Thank you for visiting!
My name is Robin. I am a wife, mother and strong believer in the power of faith. I'm a maker, a crafter and an artist. I love exploring new mediums and sharing my adventures with you. Did you enjoy your visit? Let me know by leaving a comment. I love knowing you dropped by, and hope to see you again soon! Be Blessed and Stitch & Read with Love! 
|