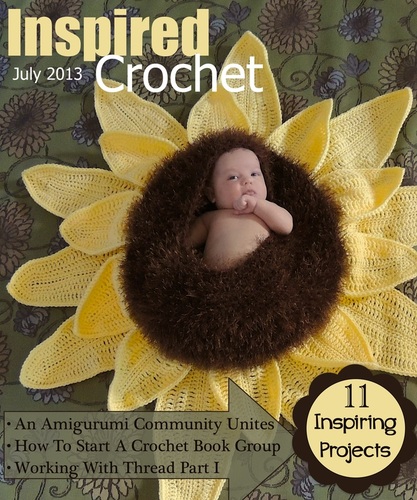
 Greetings Friends! Look what I have for TWO of you... a free copy of the July issue of Inspired Crochet Magazine! And what's so cool about that? If you're not familiar with this relatively young digital publication I can tell you that it's collaborative project that gives up and coming designers a place to show their stuff! Each issue is full of fun and fresh patterns that you'll only find here. What else? Well, the folks at Inspired got in touch with me and asked if I'd be interested in putting something together for an upcoming issue. One thing led to another, and what started out as one article ended up being a 3 part series on thread crochet!! How cool is that? You guys know how much I love working with thread, and I just couldn't pass up the opportunity to share my passion. In this issue I take a look at the past, present and future of this timeless fiber art. In August, I'll share a new pattern and tutorial, and in Part 3 in September I'll show you how easy it is to block and stiffen your lace projects. Of course, in addition to my stuff you'll get detailed patterns for eleven new projects, and more interesting articles. So who wants to win a copy? Since the magazine will be delivered to your email address this contest is open to everyone. I'm using the rafflecopter widget to give you all kinds of easy ways to enter. Good Luck! Thanks so much for stopping by and spending a bit of your day with me!Until next time friends,
Be blessed and stitch & read with love!
24 Comments
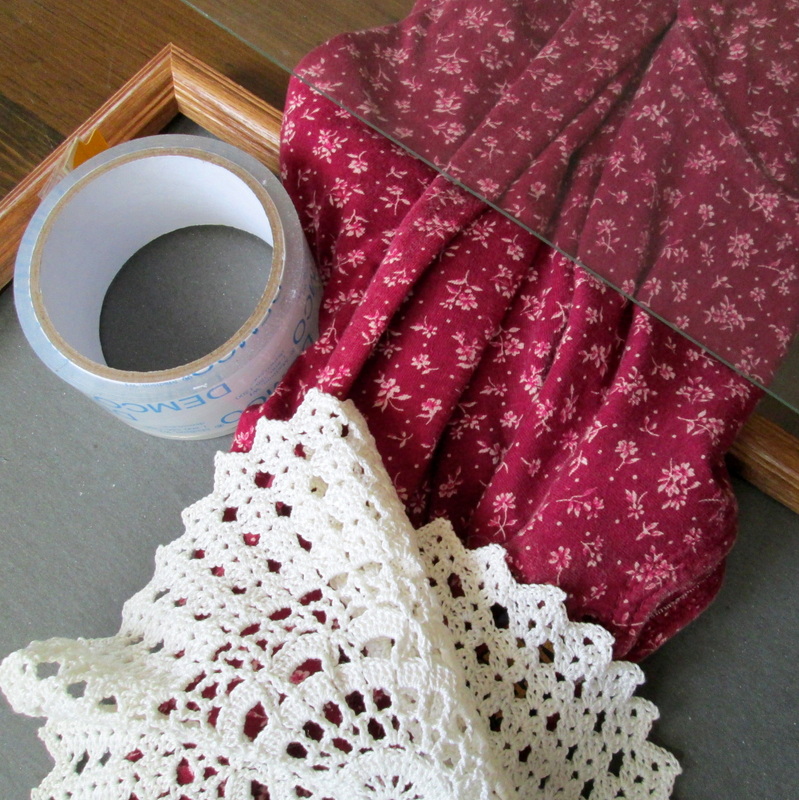
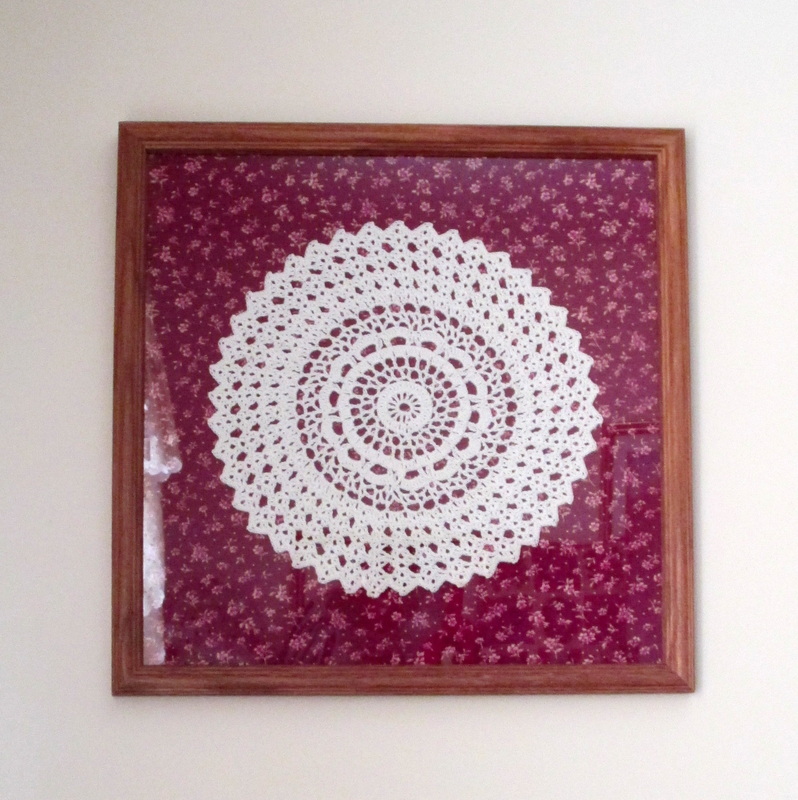
It was truly a moment of unexpected inspiration. I was looking for the right materials to make a display rack for my earrings. Since John has gotten bitten by the beading bug I have earrings and bracelets to match every outfit in my wardrobe - and then some. Believe me I am not complaining, but they need a proper home instead of laying all over my dresser waiting for kitty to decide they would make great toys. My plan is to take a picture frame, pull out the glass and cover the back with fabric or a decorative paper. Then I'll run rows of yarn across giving me a nice place to hang all the little gems. Yesterday I was rooting around and I found a frame. Since most of the fabric that I have is scraps and small squares I rummaged through the closet looking for volunteers. If you're like me you have plenty of clothes in the closet that you haven't worn in 10 or even 20 years and most likely will never wear again (can anyone say miniskirt?? how about leather miniskirt??!). I grabbed a few likely candidates and headed to the dining room table. That's when the doily caught my eye. It's actually the first one I ever made and it's been hanging out on the table (under stacks of books, mostly out of sight). I was considering using it as part of the earring hanger project when it dawned on me that it's round body fit perfectly in that square frame. And holy cow, wouldn't that just look pretty smart hanging above the table where I do most of my writing?! I quickly abandon the earring project and got busy creating my own framed work of art! All it took was a roll of heavy duty packing tape, my scissors, a ruler, some vinegar and water to clean the glass, a piece of cardboard to cover the messy edges and a label to record the details. In less than an hour my masterpiece was hanging proudly.   It's so exciting when a project just springs to life like this one did. Of course I've seen and admired framed crochet pieces. And I've even thought what a great idea it is, but I never actually set about doing it.
Sometimes when I think to hard on something, I think all the fun right out of it. It's easy for me to get consumed with the planning and trying to make sure that I have just the right ingredients to make it come out perfectly. This however was purely a spur of the moment event, and I know that I couldn't have planned it any better! That's all for now. Thanks so much for stopping by and spending a bit of your day with me. Until next time friends, Be blessed and stitch & read with love! 
Greetings!The warm weather has arrived in New England, and that means it's time for me to break out the ankle socks. (Do any of you call them Peds? I always have, but I'm not sure if that's a brand name, a regional thing, or just old fashioned). Anyway, I'm a sneaker girl. Don't get me wrong, I love shoes: heels, sandals, boots you name it. I've just learned that no matter how cute they look in the store, I won't wear them. Ever. I didn't figure this out overnight! It's been a long, expensive lesson. I'm finally willing to admit that comfort is way more important to me than fashion. But that doesn't mean that I have to forgo style! That's where the little lace socks come in. You see, not only do I always wear sneakers, but in order to keep my feet the happiest they can be I usually wear white cotton socks. Kind of plain and boring I know... I've looked for alternatives, but never with great success. And then it struck me! Why not add a little lace to the socks I have?! It can't be that hard, and then I can make them as colorful and frilly as I want. Brilliant! So I headed for the sock basket, found a matching pair, and got to it. 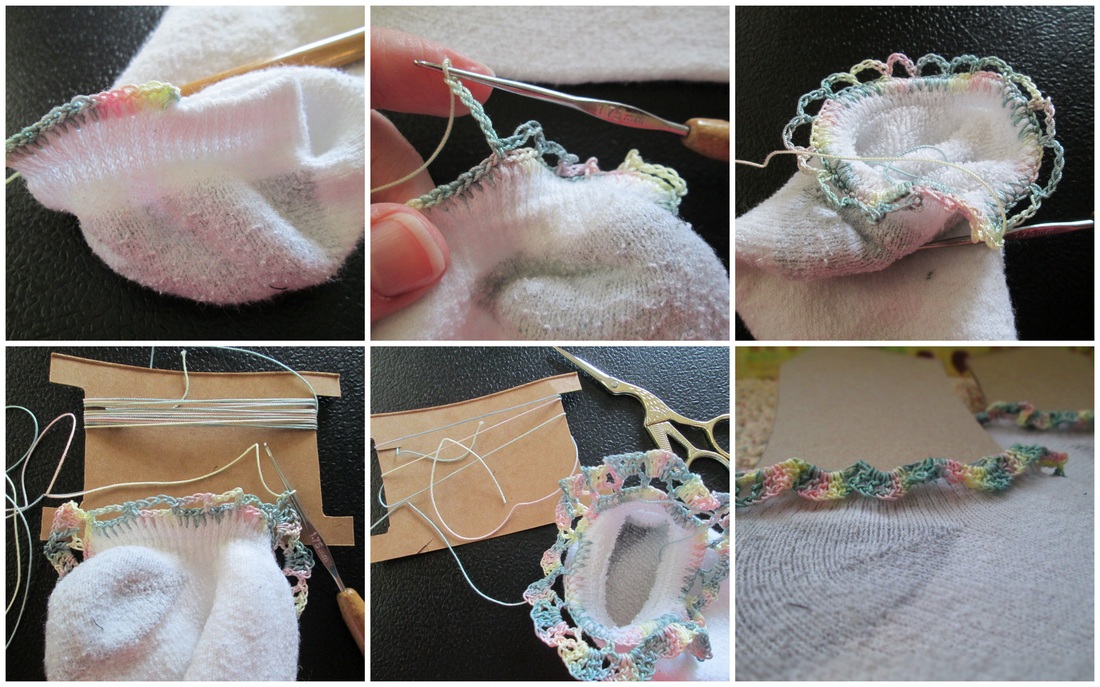
This is a very flexible and forgiving project. Rather than give you an exact, stitch my stitch pattern, think of this as a guide. Here's what I did: I knew that the fan pattern I wanted to use works in multiples of 4 plus 1. Using my favorite steel hook (no pre-poking holes required!), I attached the thread at the back of the sock and did a round of sc. I stretched the ribbing open and put one stitch between each rib. How much you stretch and how close together you put your stitches is up to you. Just remember if you don't stretch before stitching the sock won't fit, and to count the number of stitches you put in the first sock, so you can make the second one the same! Seems like common sense doesn't it? Alas. I speak from experience (head slap)! Next, I did a round of (ch5, skip 3, sc) to make a base for the fans. Then I did 5dc in each ch5 around. That's it! Next time I do these little fans I'll make the base smaller (ch4) and the fan bigger (ch7). I think that will give it a fuller look. And I'll make sure to count my stitches! I was looking through my magazine collection and there are so many edging patterns that you can adapt to your socks. And with all the amazing colors of thread that are available you can create one of a kind designs that will make everyone take notice! My next pair will be pink, purple and green I think, or maybe I'll do little flowers hanging off a vine.... No matter what, I know my feet are going to be happy!! 
I wore my lacy little socks yesterday and they're perfect! So I ask you, who needs a closet full of shoes that make your feet hurt, when with a little thread your comfy white socks will turn your sneakers into the cutest shoes ever!
That's all for today! Until next time friends, Be blessed and stitch & read with love! 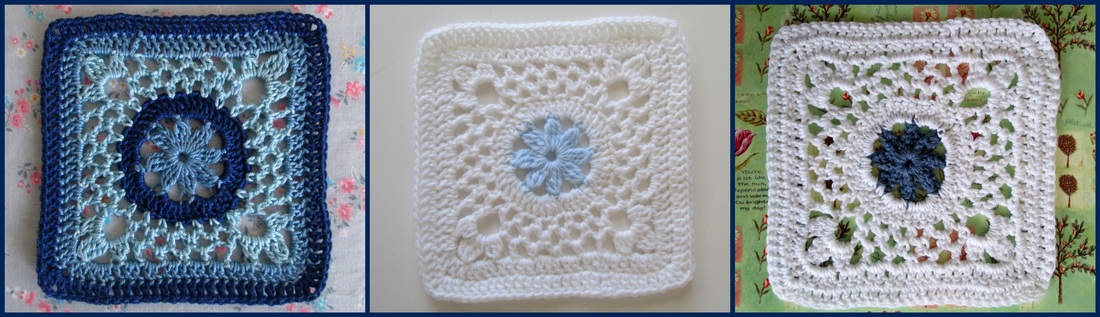
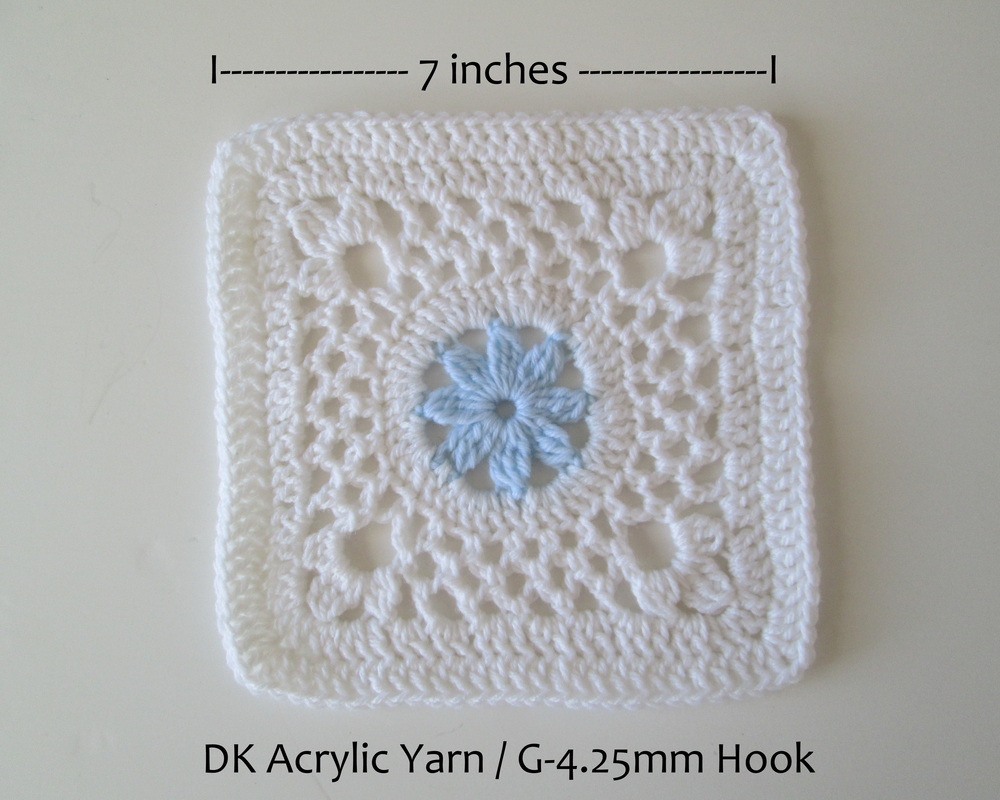
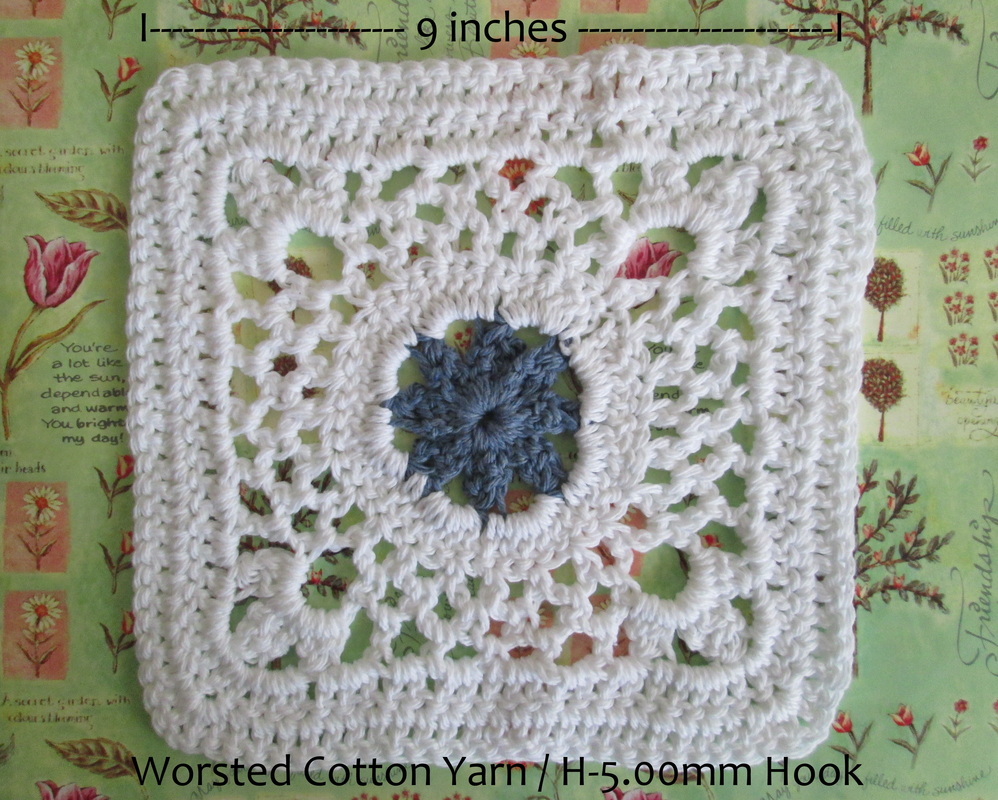
Does Size Matter?
I had no idea that there would be such a big variance in the size of the squares. Two inches is a lot, especially if you consider that there's only .75mm difference in the hook sizes. I'm not sure how much thicker the worsted yarn is, but I imagine it's 1mm or less. I'm a nerd at heart, and I'm partial to math and the role that it plays in crochet. That means that I had to see what would happen if I made the same square out of thread! This time I knew that the difference would be much greater, but how much? As you can see it's half the size of the dk/sport square. Now my love of math is elementary, so figuring out what yarn thickness, coupled with which hook size produces stitches that will make squares of what size is way beyond me. What I do know is size matters. And the only way to definitively know how big (or little) your square is going to be is to grab your supplies and get hooking!
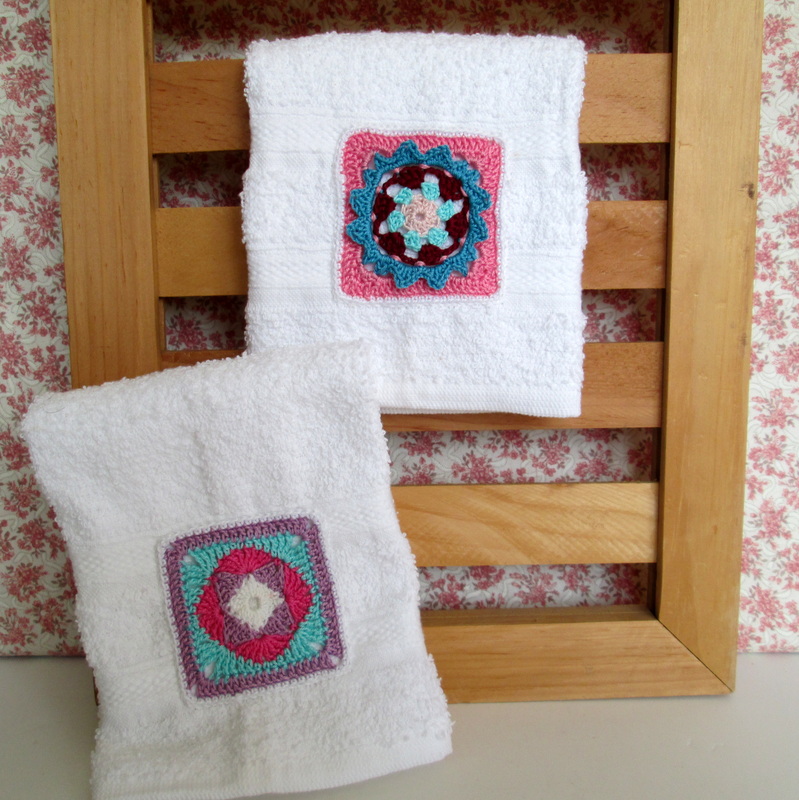
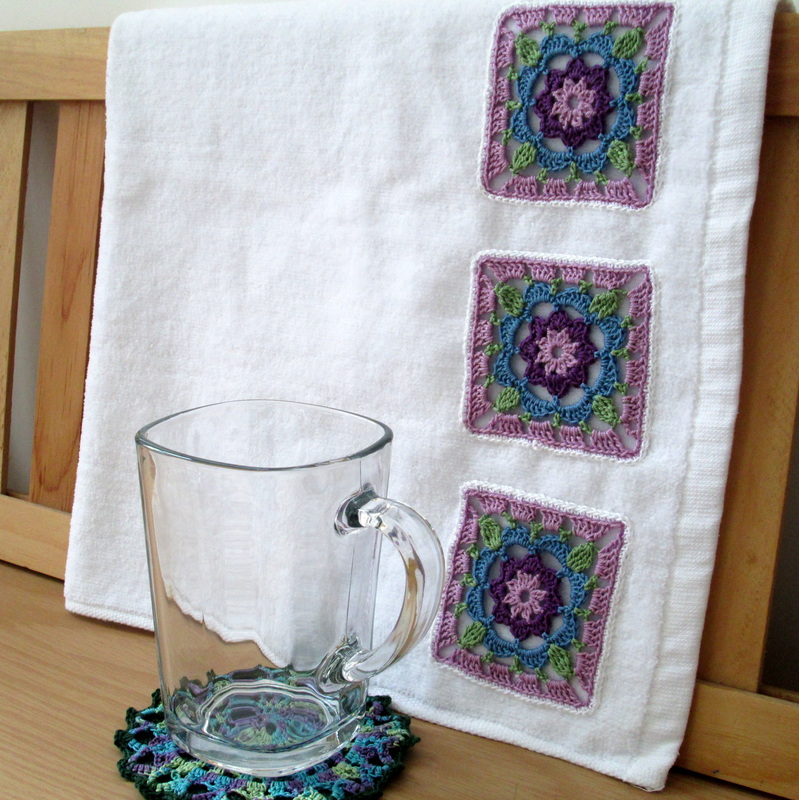
I hope that you enjoyed my little foray into size, swatching and squares! Thanks so much for stopping by and spending a bit of your day with me. Until next time friends, Be blessed and stitch & read with love! You can easily embellish plain towels and washcloths |

| 
|
Start with your favorite motif, crocheted in cotton thread.
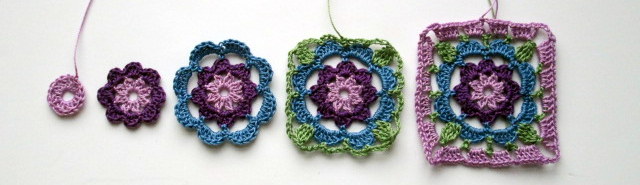
Then follow these easy steps...
1. Single Crochet around the motif using crochet thread that matches your "plain" item. 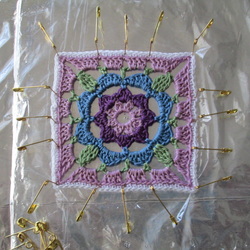
4. Spritz the motif with plain water to wet, then pin it to open up the stitches and straighten the edges. 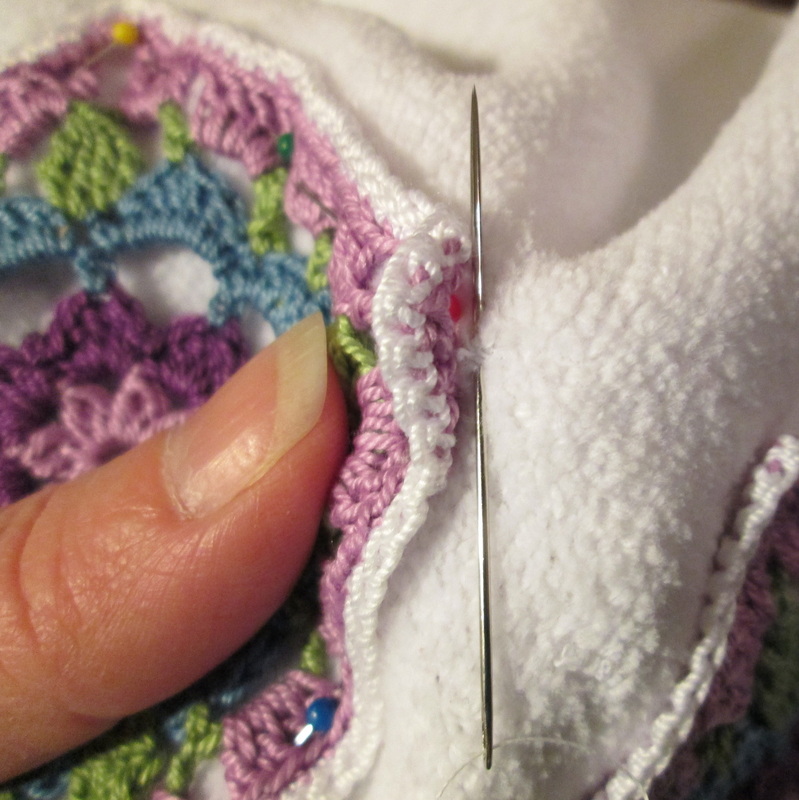
7. Fold up the edge a bit and take a small stitch under it to anchor the thread and hide the knot. | 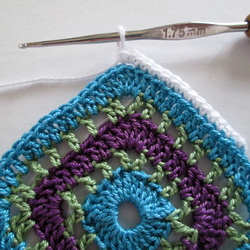
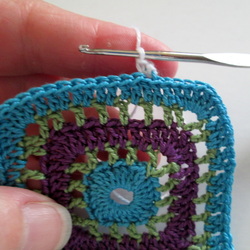
2. For square designs, work 3 SC stitches in each corner for a smooth border. 
5. Once the motif is dry, pin it in place. Where and how many is all up to you! 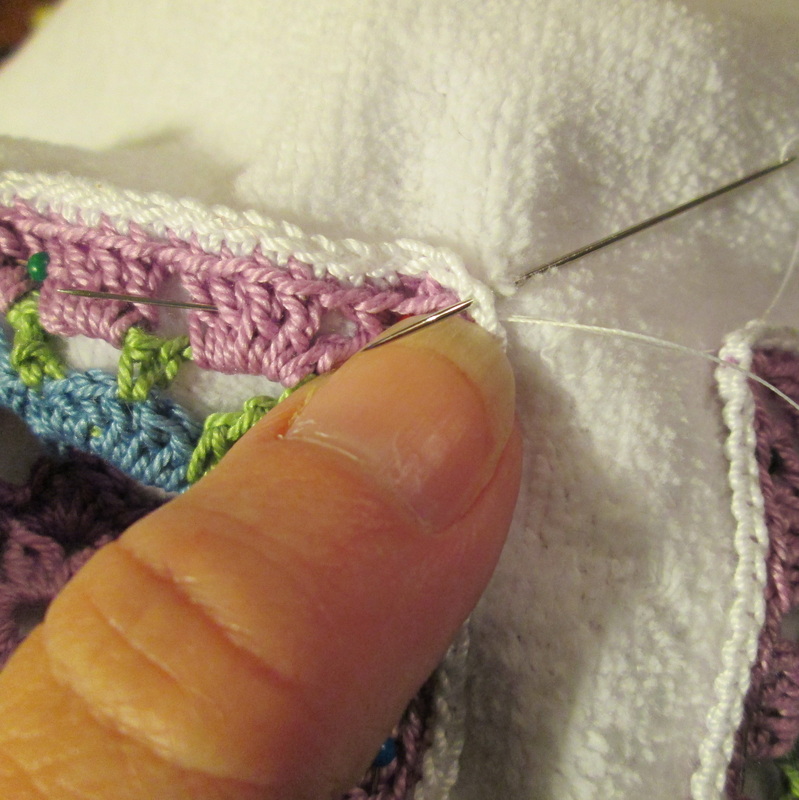
8. Now using small stitches, sew into the back loop of each SC stitch around the item. | 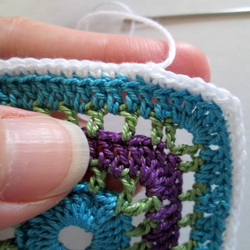
3. Finish the round using the invisible join. Not sure how? Click here! 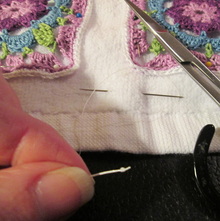
6. Using plain thread in the same color as your border, thread the needle and tie a knot. 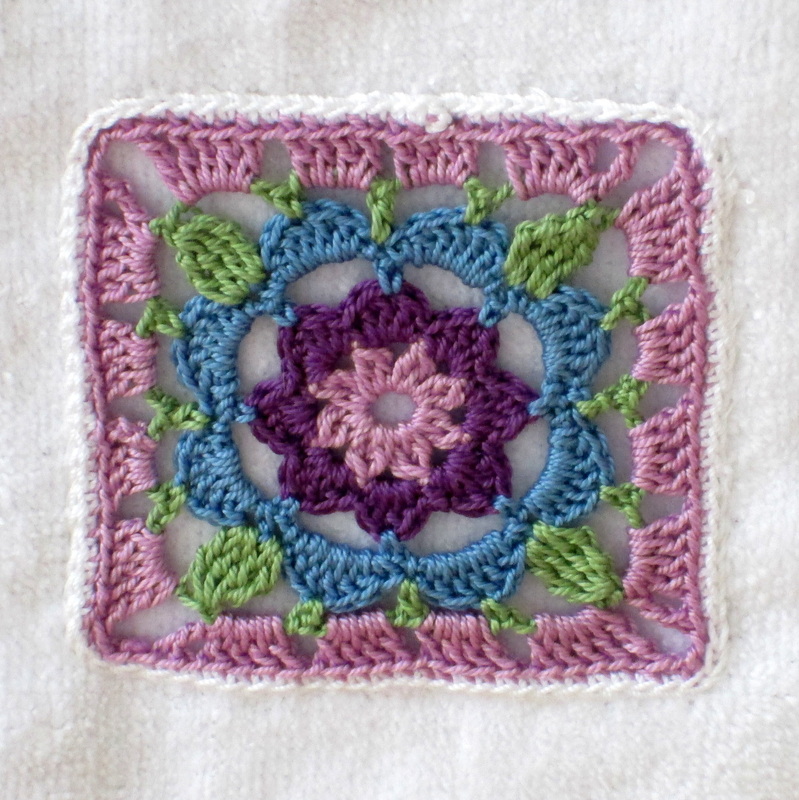
9. Finish off by tying a knot close to the fabric and then passing the needle under the motif and out the back to hide the knot. |
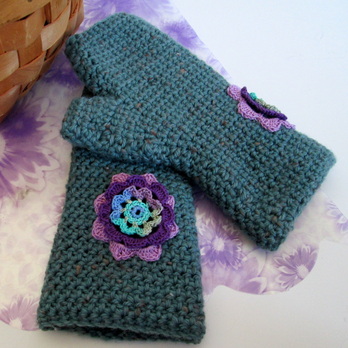
| That's it! That's all it takes to turn something plain and ordinary into something unique and extraordinary! If you think it's too hard, please don't be intimidated! The first time I tried it I was so worried that my stitches would be uneven and the motif would fall off! Believe me it's so much easier than it looks. And, it's a great way to put your thread creations to work. I don't know about you, but I have plenty of flowers and motifs that are just looking for a place to show off! I turned these simple fingerless mitts into something special by adding flowers to the outside of the wrist. |
For these I didn't bother to add a SC border, and since I didn't have matching lilac thread I used the crochet thread. I cut a piece to length and pulled it apart so I could use just one of the plies. It worked like a charm!
Well folks, I hope that today's tutorial has been helpful and that you might even be inspired to give this type of applique a try. You can use this technique on so many different things. On blue jeans, and denim jackets, shirt collars and pockets, pillow cases and sheets, curtains, tote bags - if you can imagine it, you can do it!
Thanks so much for stopping by and spending a bit of your day with me.
Until next time friends,
Be blessed and stitch & read with love!
- Greetings!
I'm Robin and this is
Crochet Nirvana, where
laughter is essential,
learning is supported,
creativity is nurtured, and sharing is encouraged.
Thanks for stopping by,
I hope you
enjoy your visit!

Click to see what's new on the Craftsy Crochet Blog!
Follow Along

Tutorials and Patterns


On Instagram


Look for me, I'm RobinBrz


Places I Post


Archives
July 2015
June 2015
February 2015
January 2015
December 2014
November 2014
October 2014
September 2014
July 2014
June 2014
April 2014
March 2014
January 2014
December 2013
October 2013
September 2013
August 2013
July 2013
June 2013
May 2013
April 2013
March 2013
February 2013
January 2013
December 2012
November 2012
October 2012
September 2012
August 2012
July 2012
June 2012
May 2012
April 2012
March 2012
Categories
All
4kcbwday1
4kcbwday2
4kcbwday3
4kcbwday4
4kcbwday5
4kcbwday6
5 Minute Friday
Accessories Home
Accessories - Home
Afghans
Amigurumi
Art
Bags
Beads & Beading
Blogging
Blog Reviews
Blogtoberfest 2012
Blog Week Iv
Book Reviews
Books
Cables
C A L
Cardigan
Chevron Lace
Class Review
Coasters
Cowl
Craftsy
Creative Friday
Crochet
Crochet Lace
Doily
Doodles
Downloadable Files
Earrings
Fabric
Fiber Arts Friday
Fingerless Gloves
Flowers
F O Friday
Giveaways
Granny Square Project
Granny Squares
Guest Post
Hats
Holiday Stashdown
How To
I Love Yarn Day
Inspired Crochet
Jewelry
Kcco
Knit Lace
Knitting
Library
Mittens
Nirvana Designs
Patterns
Pincushions
Projects
Recipes
Sewing
Shawl
Shrug
Socks
Socs
Stash
Stitch Markers
Thread Crochet
Tunisian Crochet
Tutorials
Videos
Watercolors
Wip Wed
Wrap
Wrist Warmers
Writing In The Raw
Yarn
Yarn Along
Year Of Projects


Thank you for visiting!
My name is Robin. I am a wife, mother and strong believer in the power of faith. I'm a maker, a crafter and an artist. I love exploring new mediums and sharing my adventures with you.
Did you enjoy your visit? Let me know by leaving a comment. I love knowing you dropped by, and hope to see you again soon!
Be Blessed and
Stitch & Read with Love!