|
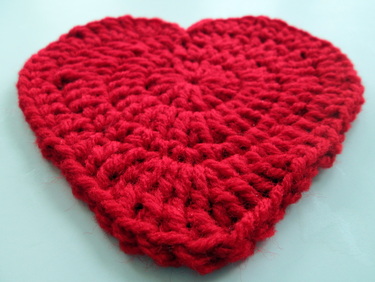
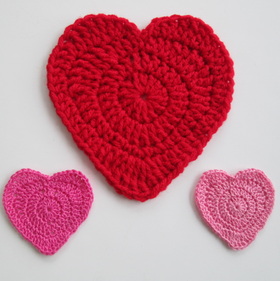
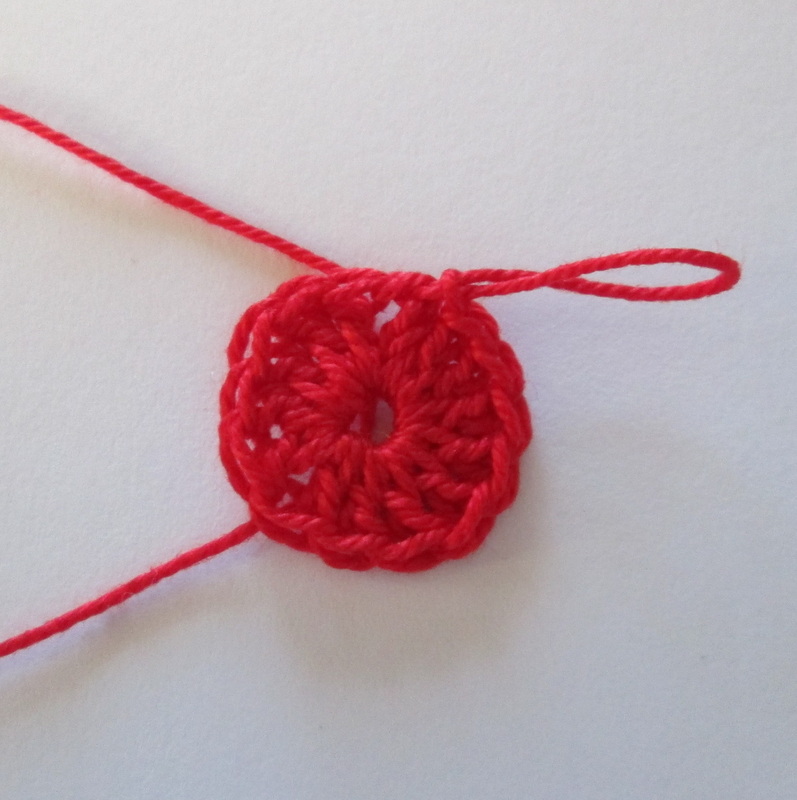
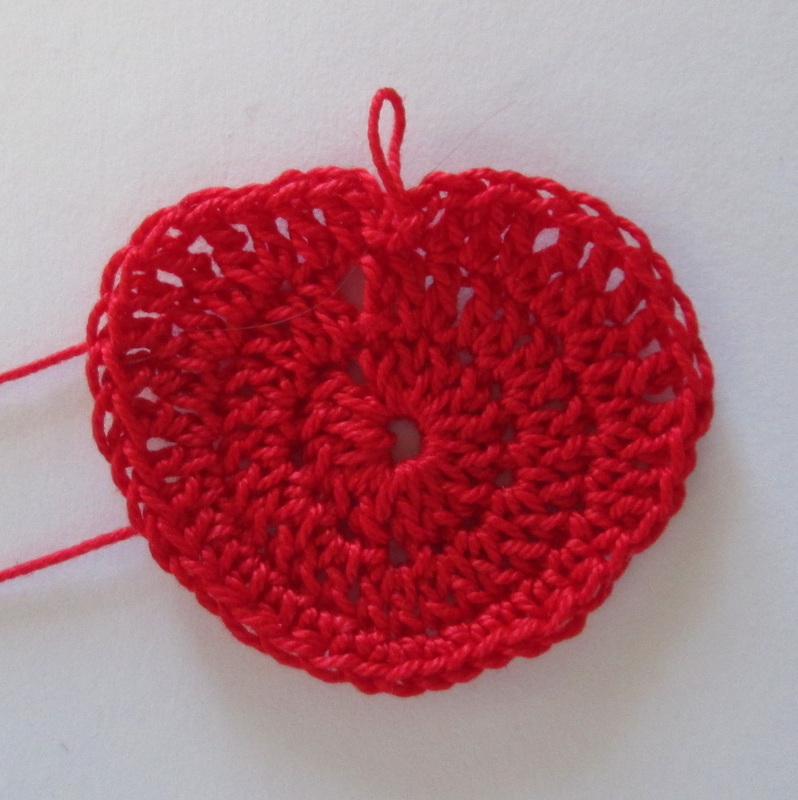
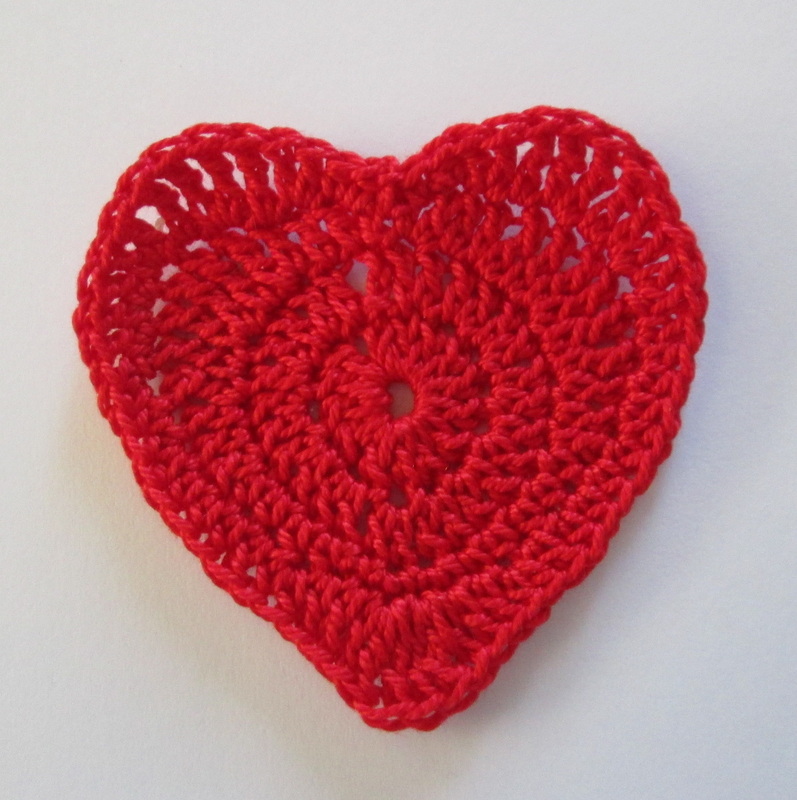
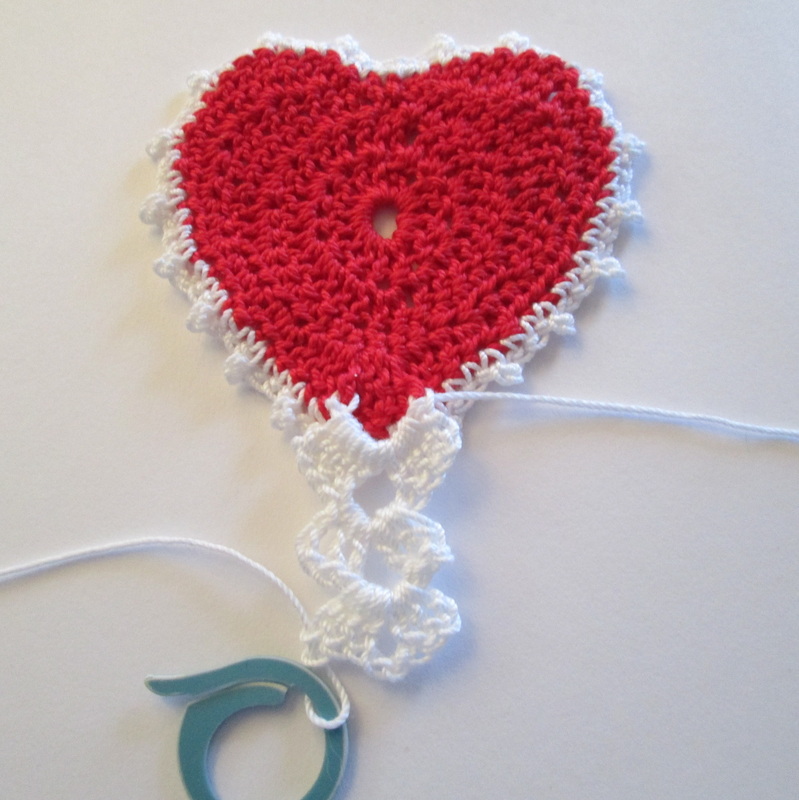
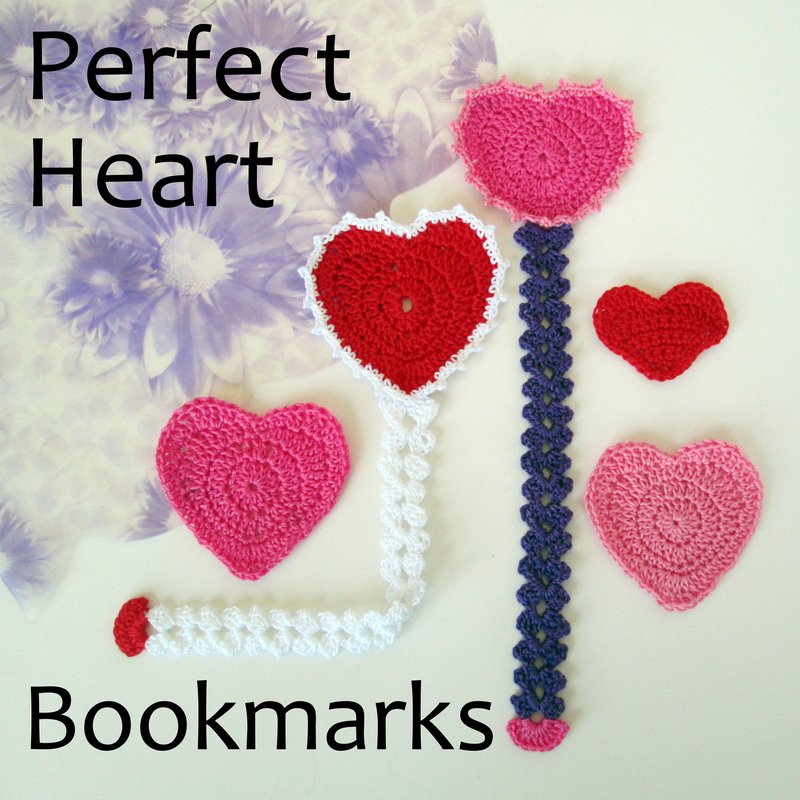
"A kind heart is a fountain of gladness, making everything in its vicinity freshen into smiles." ~ Washington Irving (1783-1859) Perfection. We strive towards it. We practice to achieve it. In matters of the heart it is often elusive. But in crochet, all things are possible. And so I set out to crochet a perfect heart. There are patterns that make them in the round and those that work them in rows. Some came close, but nothing gave me exactly what I was looking for. I knew that creating a perfectly symmetrical heart was a matter of diligence, patience, and little geometry. I learned a lot from all the different versions I made. Using the elements that worked the best from other patterns and through lots of trial and error this beauty came to life! I made my thread hearts into bookmarks, and I included the instructions here so you can make them too. If they're not your style there are lots of other things you can do. Thread hearts can be attached to a card with ribbon and given as a lovely Valentine. Sew them onto a shirt, hat, jacket or pants pocket. Sew 2 together and stuff for fluffy hearts. Add a little cat nip to make a treat for you favorite kitty. Attach one (or more) to a hair clip, barrette, or head band. Hearts made with worsted weight yarn and an H hook are the perfect size for a coaster. Add personalization by stitching you and your love's initials with embroidery floss. Embellish them with terms of endearment (like the Sweetheart's Conversation Heart candies). Or just make them because they're fun and easy!
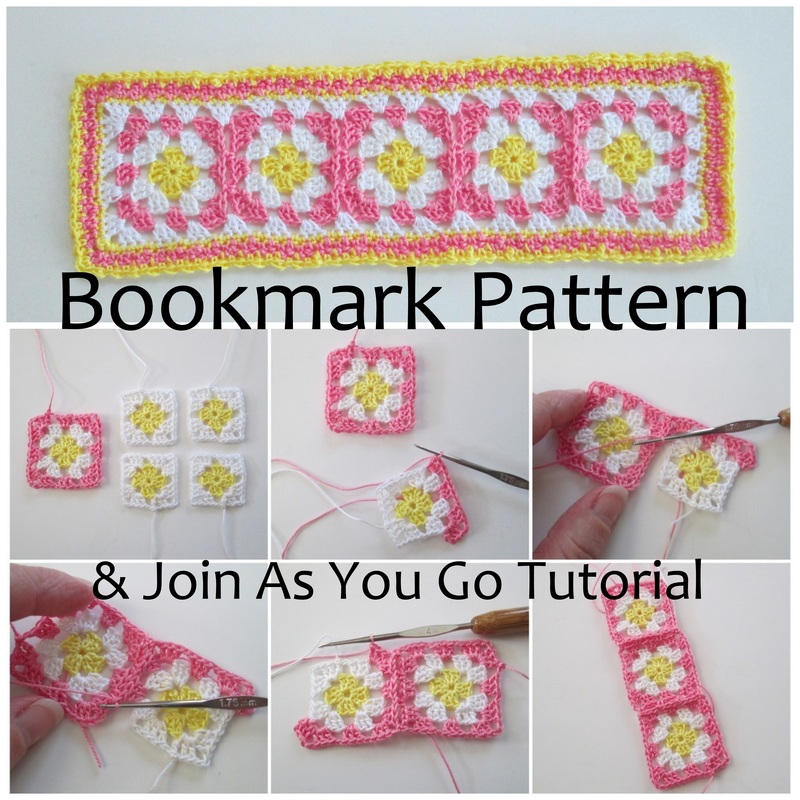
The heart in the pattern is made with #10 cotton thread and a #4/1.75 mm steel hook. It measures about 2.5 inches x 2.5 inches. The large heart in the picture above is made with worsted weight acrylic and an H/5.00 mm hook. It measures about 5.5 inches x 5.5 inches. You can make them with whatever yarn or thread and hook makes you happy.
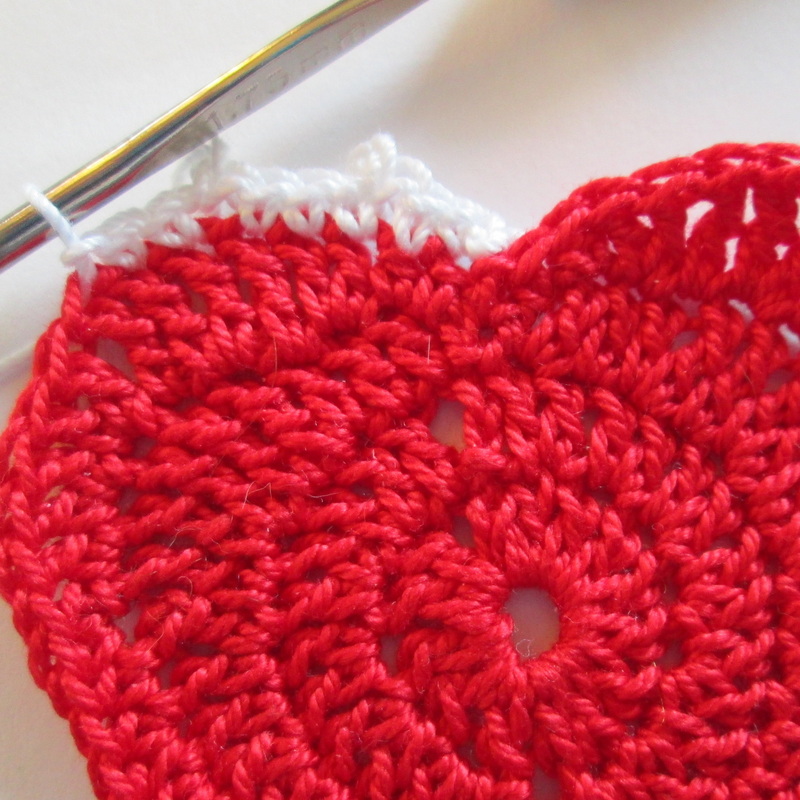
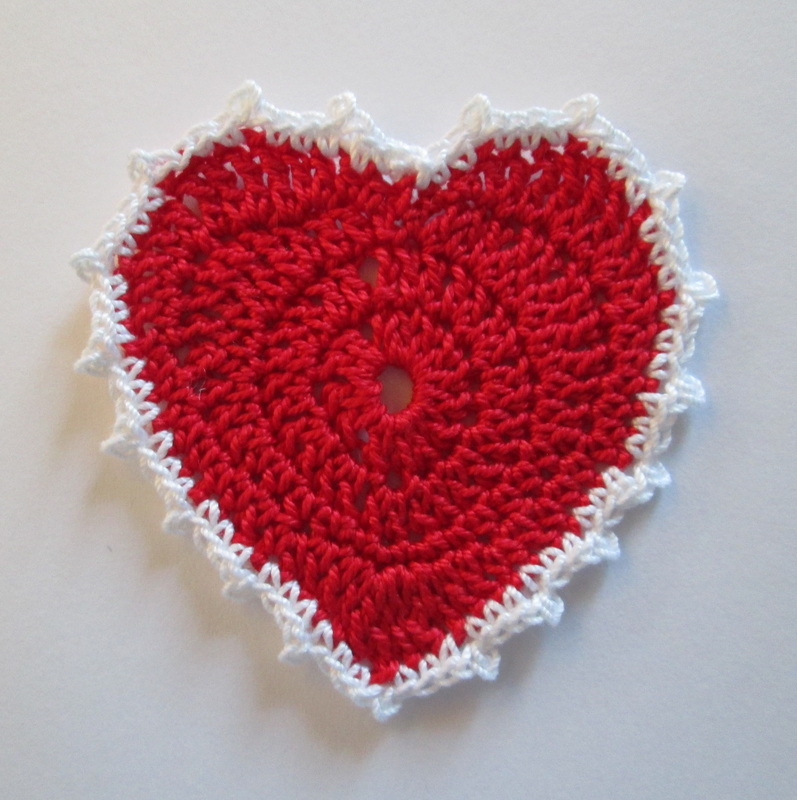
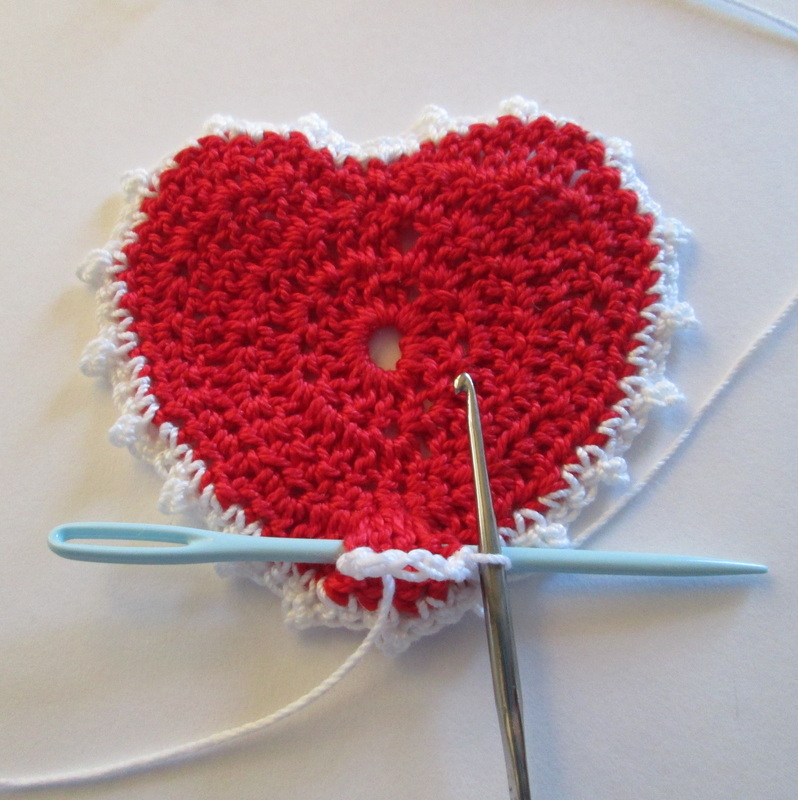
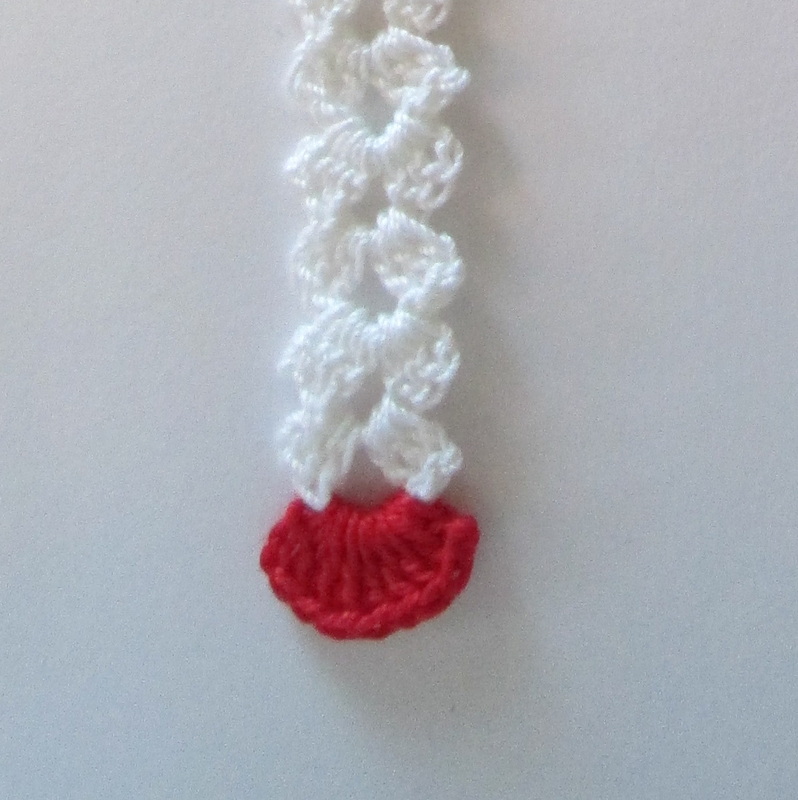
Now turn it into a bookmark...
No matter what you do with your heart, I hope it fills you with gladness and brings you a smile! It's easy to loose your place when working rounds 3 and 4 so I created a PDF that you can download. I point the corner of a sticky note at each step/stitch and move it to the next after working it. Then if I have to put my work down I know where to start! Thanks so much for spending a bit of your day with me. Until next time friends, Be blessed and stitch & read with love!
16 Comments
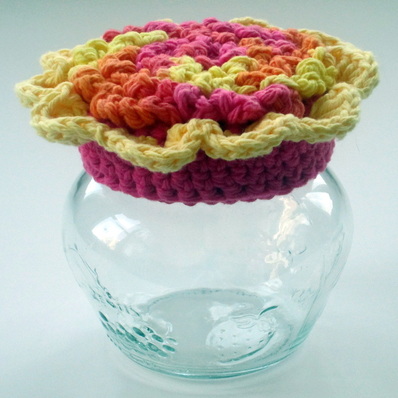
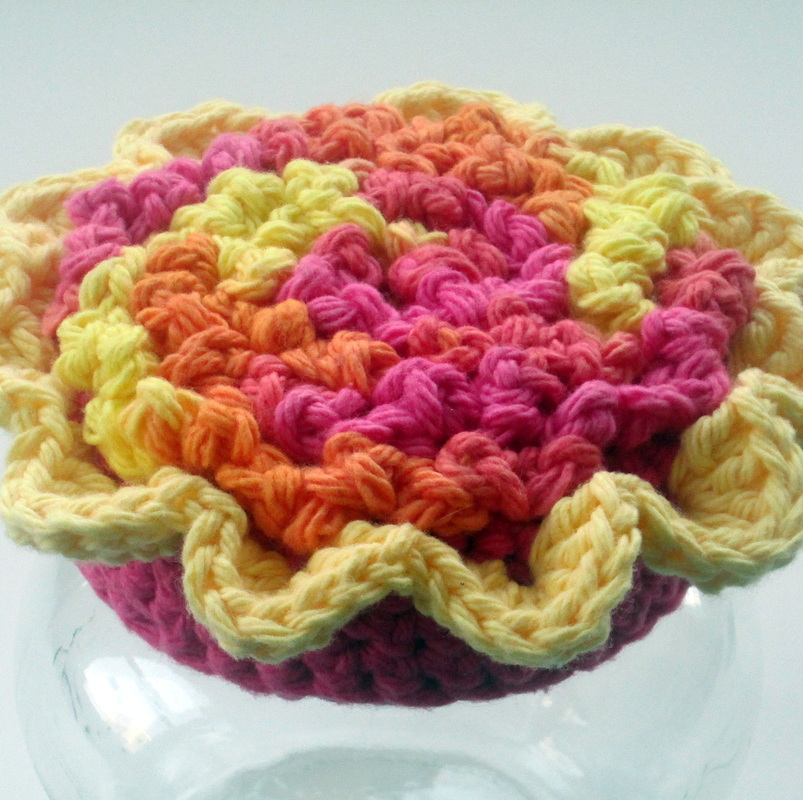
Greetings Friends! Let me just say that it is mighty cold in Massachusetts. The eye watering, face burning, toe numbing cold that grips us every winter. Our ability to endure must be coded into our DNA, because otherwise I fear after a week like this we would flee en masse leaving behind all but our most cherished valuables (yarn and books!) in search of a more hospitable climate! For months I've been focused on making things that keep you warm, like hats, mittens, and sweaters. As awesome (and important!) as they are I think we can use a splash of spring, and that's what this flowery jar topper reminds me of. This is the Flower Jewelry Keeper from the August 2012 issue of Crochet World magazine. I think the idea of crocheting a decorative topper for any type of jar is very clever, and I can imagine making them in a variety of different flowers, designs and yarns.
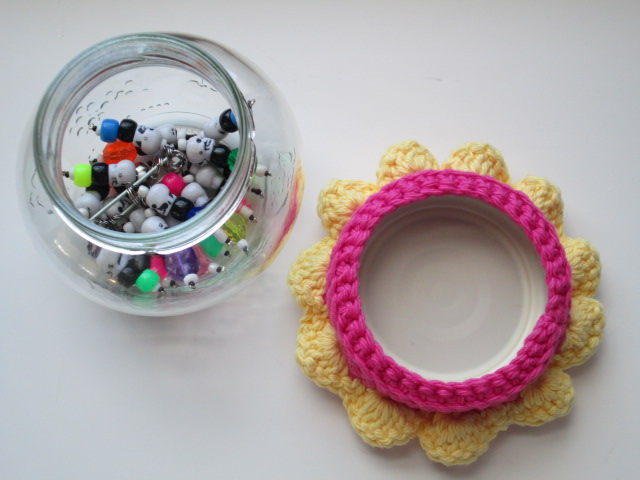
The pattern calls for a wide mouth half-pint canning jar. I didn't have one of those, but I did have this cutie languishing on the door of the refrigerator with a smidge of orange marmalade in it that no one was ever going to eat. After a hot soapy bath it was ready to be repurposed!
Finish by making the petals. My version looks identical to the one in the magazine, but is simpler because I skipped the part where you make a second circle, stitch them together and stuff it with fiber fill. They also secure the crocheted topper to the lid with hot glue. Since I ended up with a nice snug fit I didn't bother. The bright cotton makes a color saturated flower that is a welcome reminder of spring and the warmth it promises. I'm using my jar to hold a pile of stitch markers. With this technique you could decorate jars for the kitchen, bath, office, or studio - any room that needs organizing would benefit from one or even a set of coordinating storage containers. It's a great way to do something creative with all those uniquely shaped jars that would otherwise be destine for the recycle bin. Plus, it's a project you can easily finish in one sitting which I always find appealing! You can be sure that there are lots of toppers in my future! 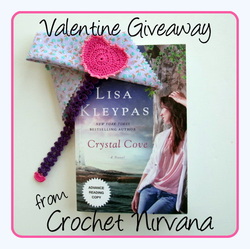 And finally today I want to tell you about the giveaway that I'm hosting on Robin Reads & Writes. Just in time for Valentine's Day I'm giving away an advance reader copy of Crystal Cove by Lisa Kleypas, and a heart shaped thread bookmark made by yours truly. Pop over and have a look at the review. I really enjoyed the book, and hope the lucky winner feels the same. After all, what could be better than a bit of romance and magic to round out your Valentine plans?
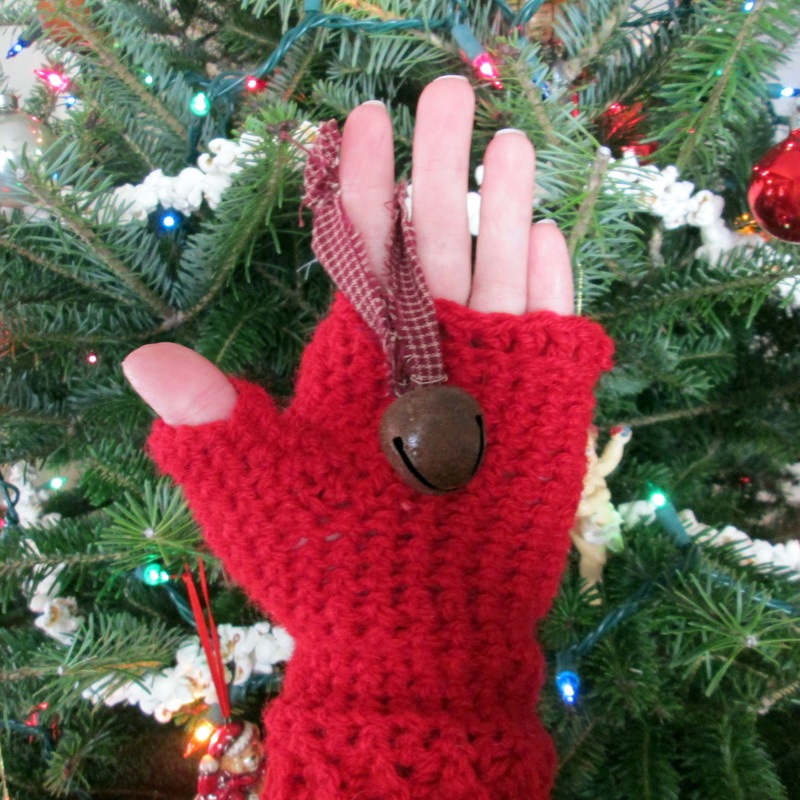
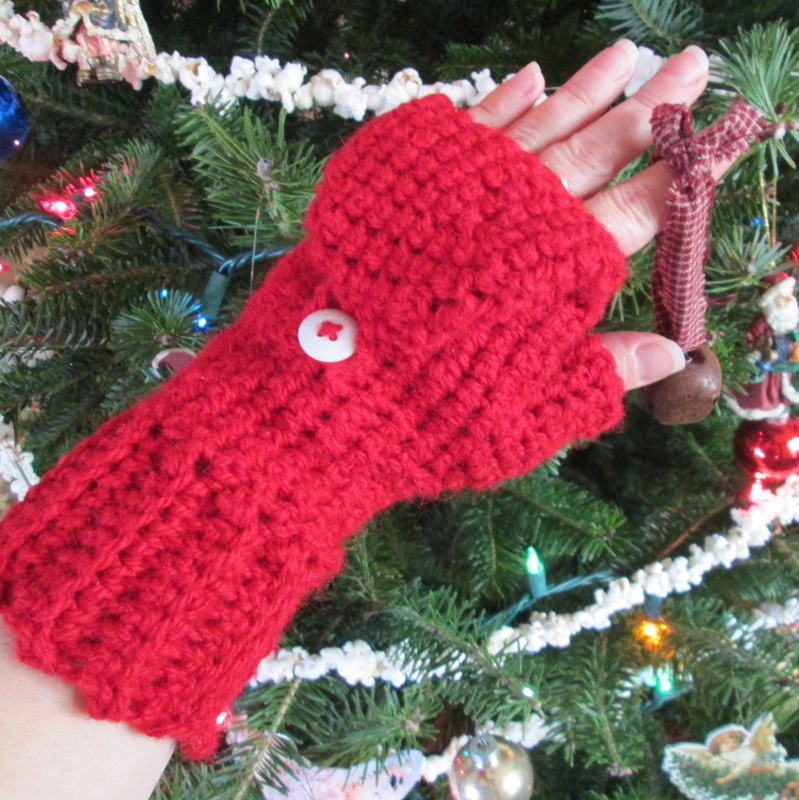
Thanks for stopping by and spending a bit of your day with me. Until next time friends, Be blessed and stitch & read with love! and overcoming my fear of pattern modification! 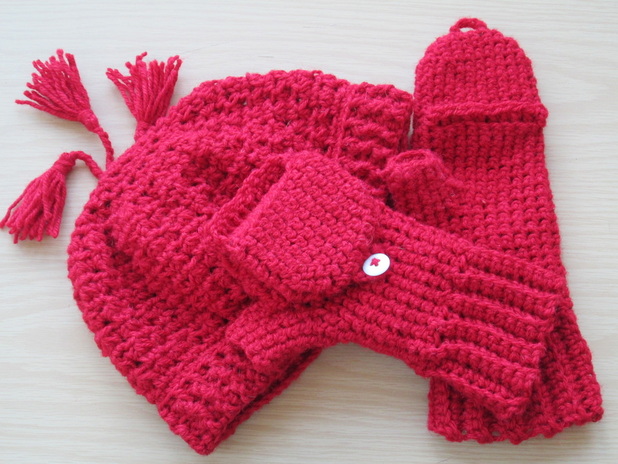 A wooly ensemble perfect on a snowy winter day! 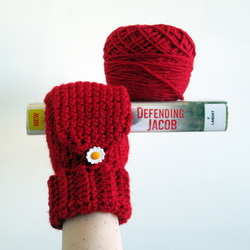 This is one of my favorite pictures. Greetings Friends! It's snowing in Massachusetts so it seems appropriate that today's post is about things that keep you warm! Do you remember this picture from back in November? After ripping the mitten apart several times for various reasons (like: it was too small in the cuff, too wide in the palm, too spacious in the thumb, too pointy at the top, the finger opening was off center, etc, etc, etc...) I finally had a mitten that I was happy with. Well, after I took off the daisy button and replaced it with one in plain white. Of course by the time I was done I was so tired of working on the mitten that I set it aside in lieu of something different.
As the weather became consistently cooler it was time to give my mitten the mate it had patiently been waiting for. I found my marked up December 2012 issue of Crochet World magazine still open to the Texting Mittens. This is first time that I actually made multiple changes to a pattern to make it fit better. I've done things like add rows to make something longer, or used a magic ring instead of joining a chain into a loop. But never anything like this. I've always been afraid that making one change would through things off later in the pattern. This time though I just went for it. I figured the worst that would happen is I'd rip it out and try again. Which I did many, many times before I got it right! Thankfully I was wise enough to take ample notes of the changes. One of the most important lessons I've learned is to ALWAYS write down everything in detail. No matter how much I like to think that I'll remember what I did, the truth is I have no hope whatsoever of that happening. I can't even remember what hook I used, let alone how many stitches I deleted or added! I was able to decipher my scribbles and diagrams and in relative short order I had a (matching) pair of mitts! I was so excited to wear them for the first time along with my coordinating Tassel Hat (from Voie de Vie's Accessories: Autumne 2012 Collection).
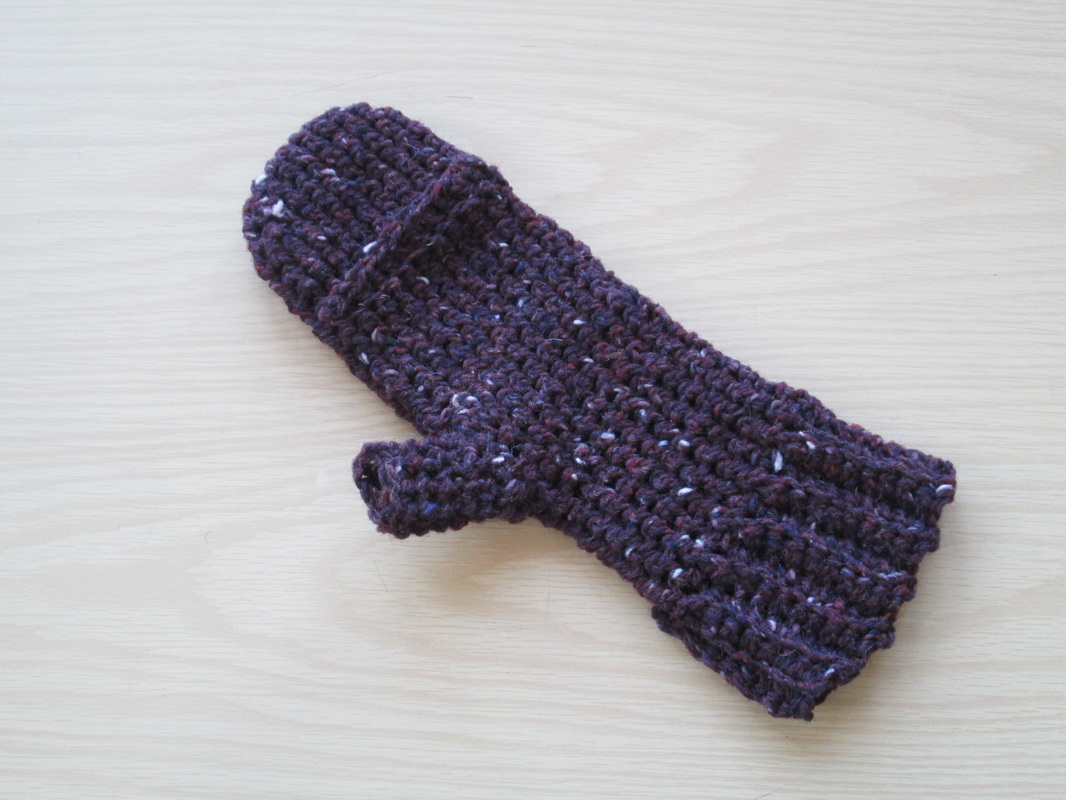
Does this sound familiar? If it does, I really encourage you to step outside your comfort zone and just go for it. Eventually you're sure to come up with changes that suit your needs. And even if you don't imagine all that you'll learn about what not to do!! Did you notice that there is only one purple mitten in the picture? Are you wondering where the other one is? It's the same old story. I spent so much time finishing the red one and then on the pattern mods and making sure it works that by the time I finished testing it out I was tired of making these mittens and moved onto something new!! Of course now it is in the basket next to the chair taunting me. Telling me I have no excuse and that I really should be able to whip it out in an evening or two. Will I listen and finally get it done, I'm sure I will. I just don't guarantee that there will still be snow on the ground when I do!!
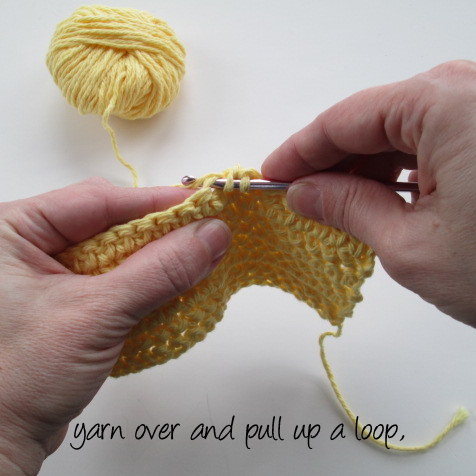
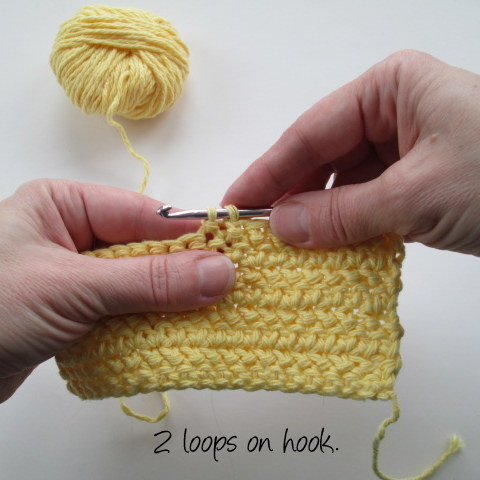
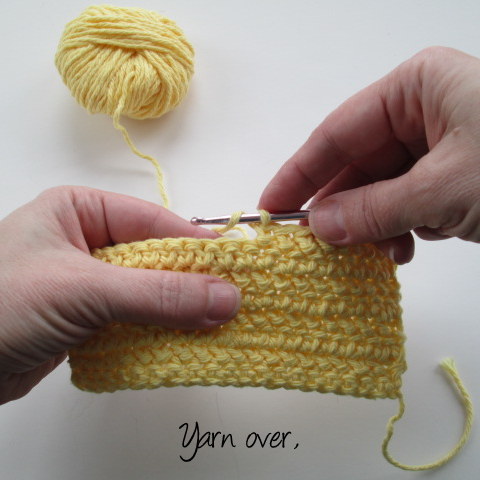
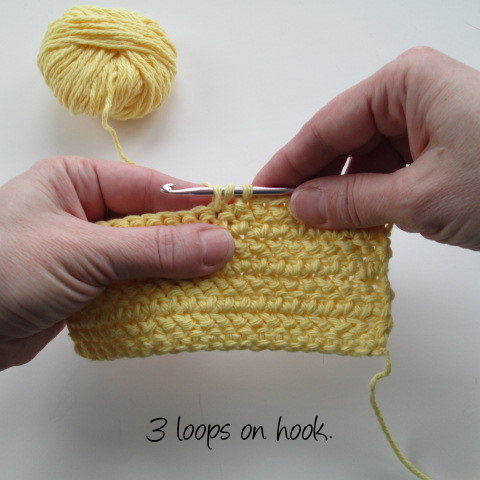
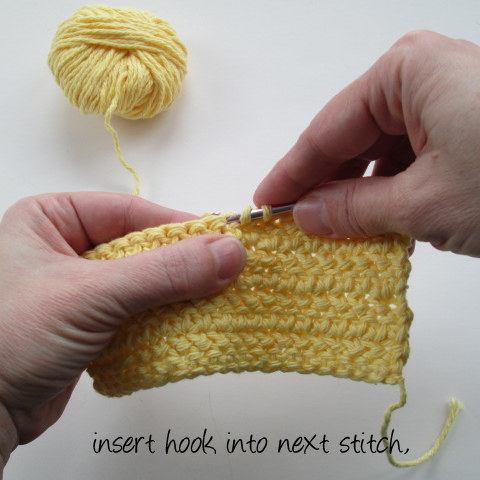
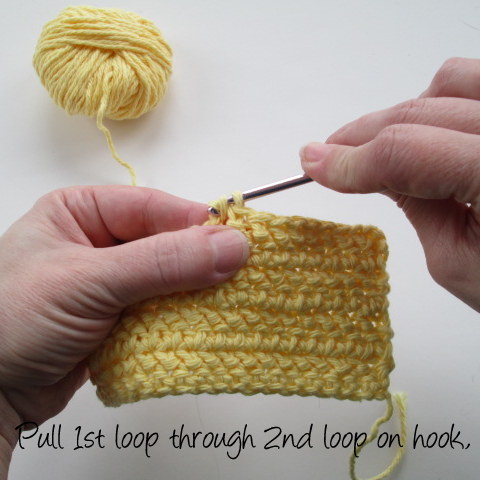
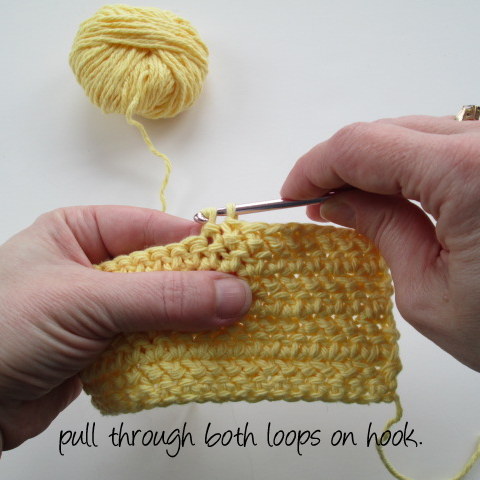
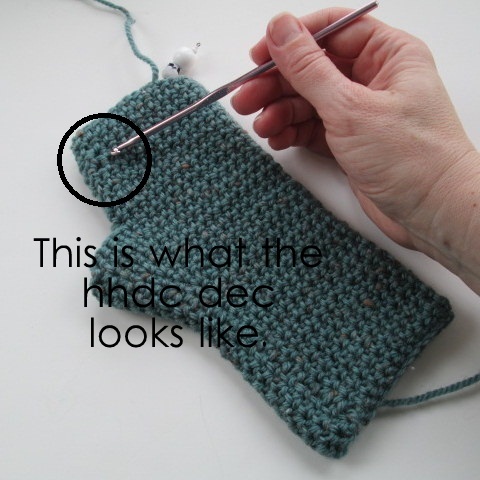
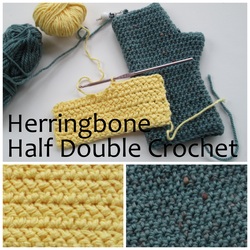
Well my friends, that's all for now. Thanks so much for stopping by and spending a bit of your day with me. Until next time, Be blessed and stitch & read with love! By the way, just in case you're interested here is a downloadable PDF file detailing my modifications. If you happen to give it a try please let me know. I'd love to hear how it goes. I'd also like to hear about how you handle modifications. Do you stick to the pattern or do you try different things and make it custom? Were you always brave or were you a fraidy cat like me? 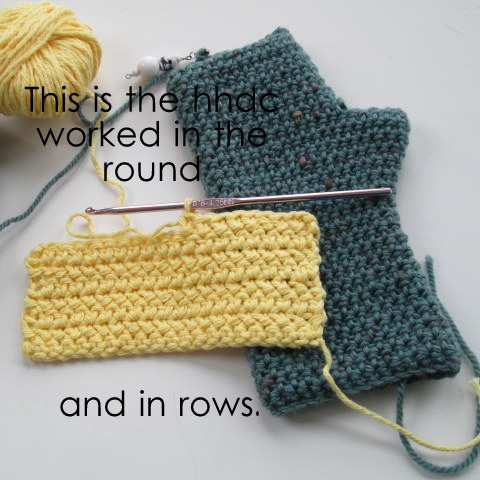 Greetings Friends! Today I want to tell you about an awesome crochet stitch called the Herringbone Half Double. I was introduced to it a while ago in a pattern for fingerless mitts (Firecracker Gloves). Truthfully at the time I was new to crochet and found the stitch awkward. I never finished the gloves, and the pattern was forgotten. Earlier this week a series of unrelated events led me to discover the pattern stashed in a pile of old papers. It was crochet serendipity since I wanted make a pair of fingerless gloves to help combat the cold at work. I got started and discovered the stitch that once seemed difficult was now fun and interesting. After a few rows I found my rhythm and the yarn was gliding off my hook. The fabric that it produces is smooth and dense, perfect for gloves. Worked in the round it reminds me a bit of the fabric that the basic Tunisian stitch produces. Worked in rows it creates the herringbone design. I think that it would look lovely in a cardigan and it can probably be used in any pattern that calls for a standard half double crochet without much (if any) adjustment. Learning new stitches is one of the things that keeps me interested in crochet. For anyone who might be new to this one, or in case you need a refresher I put together this picture tutorial to encourage you to give it a try. At the end of the post are links to PDF files that you can download demonstrating the basic stitch as well as the increase and decrease. Working the Herringbone Step-by-Step
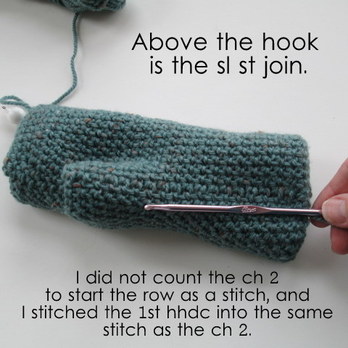
 I also want to show you how nicely this stitch seams together when working in the round. Typically I prefer working in a spiral to avoid the gaping, obvious seam that you get when joining rounds with a slip stitch.
The join blends in so well that it's hard to tell where it is unless you're looking for it. I've found that most patterns tell you to count the starting chain as a stitch. By working the first hhdc into the same stitch as the ch 2, and then joining the last stitch with a sl st to the first hhdc there's no gap. I will definitely try this technique on other patterns. There you have it! I sure hope that you give this versatile stitch a try. If you're a beginner, be patient and give yourself time to get used to the movement. It's not hard, it just feels different than what you might be used to. Let me know if you've ever made anything using this stitch. I'd also love to hear about other stitches that you think I should try.
Thanks so much for stopping by and spending a bit of your day with me.
Until next time friends, Be blessed and stitch & read with love! or why I found it necessary to relax, regroup and refocus for the new year...
Here's a sneak peek at some of the projects I've got in store for you!!
Greetings Friends!
How are you?! I've missed you all so much! I trust that you glided smoothly through the holidays enjoying all the good things and letting the rest slide? Things at our house were low-key and pleasant. I made a point of focusing on what's really important (like family and the true meaning of Christmas) instead of getting tricked into thinking I somehow had to create the perfect "TV Christmas" with tons of gifts, over the top decorations, mountains of food and a houseful of jovial guests. That we were all sick with the worst cold/flu/bug we've had in years made it even easier to adjust expectations! Happily we have all recovered and it feels terrific to be getting back into the blogging zone. My self imposed hiatus from blogging and computer use in general has allowed me to evaluate my goals for 2013. This is really important because as the title of the post indicates, by the end of the year I was feeling woefully unable to successfully navigate my world of crochet, books, family, and work. I was trying to do so many things it was inevitable that they would all suffer and so would I. Giving myself time to simply relax and enjoy the activities that fill my world turned out to be the best present ever. I worked on and completed all kinds of crochet projects (plus read several books!). Now I have lots great material for blogging. That was one of my biggest worries - that I was running out of interesting things to write about. I mean really, how many Wednesdays do you want to see the cardigan that I'm still working on?? The other significant change was the creation of my new book blog - Robin Reads and Writes. (RR&W) If you're a regular you know that I've been including book reviews (mainly fiction) in with my crochet posts for some time. When the library where I work approached me about making my reviews available on their website I knew that a change of format was in order. After trying several layouts the new blog was born. Having everything live together under one roof works well for me as far as maintenance goes. When I started Crochet Nirvana I knew that books would always be part of my site. Now I'm happy that they have their own special place where they can really shine. Of course a second blog means more work. But it's work that I love, and the response has been amazing. In fact, I have been approached by two different publishers and asked if I would like to be an "early" reviewer. You know that I said yes!! I mean honestly, how cool is that? (I'll tell you all about in an upcoming RR&W post!) Now that I've given myself time to regroup I feel energized and focused. Knowing that I have interesting projects, patterns and tutorials to share makes me feel confident about the future. I also am thrilled about the direction the book blog is headed. In addition to fiction I'll be reviewing new crochet/knitting (and other yarn/fiber/craft) books. With so many exciting things on tap the future looks bright indeed. Thanks so much for stopping by and spending a bit of your day with me. Until next time friends, Be blessed and stitch & read with love! |
I'm Robin and this is  
Click to see what's new on the Craftsy Crochet Blog!
Follow Along
 Tutorials and Patterns


On Instagram 
Look for me, I'm RobinBrz


Places I Post
 Archives
July 2015
Categories
All
 
Thank you for visiting!
My name is Robin. I am a wife, mother and strong believer in the power of faith. I'm a maker, a crafter and an artist. I love exploring new mediums and sharing my adventures with you. Did you enjoy your visit? Let me know by leaving a comment. I love knowing you dropped by, and hope to see you again soon! Be Blessed and Stitch & Read with Love! 
|
|||||||||||||||||||||||||||||||||||||||||||