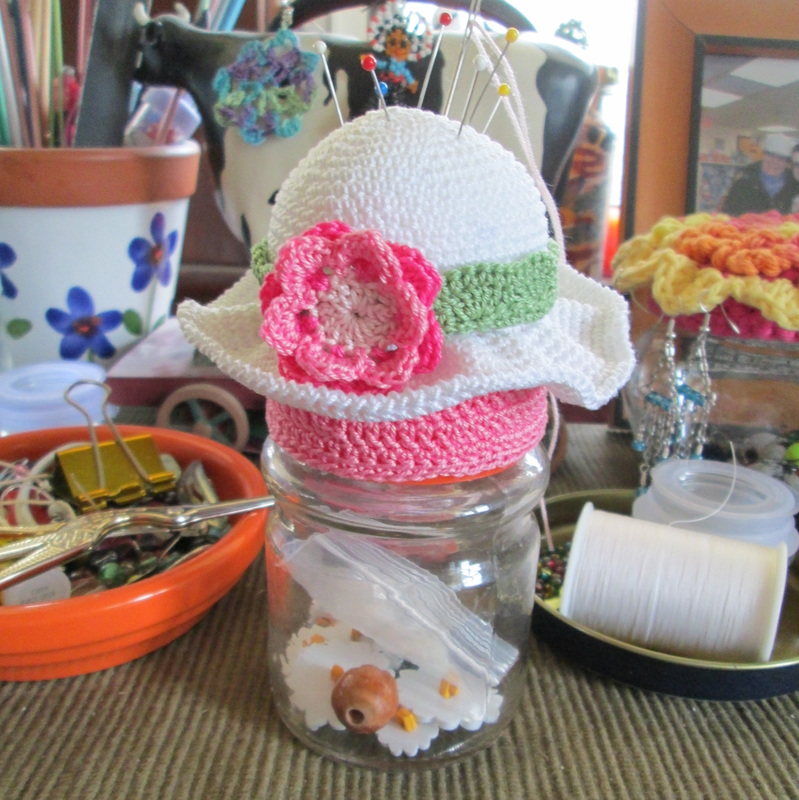
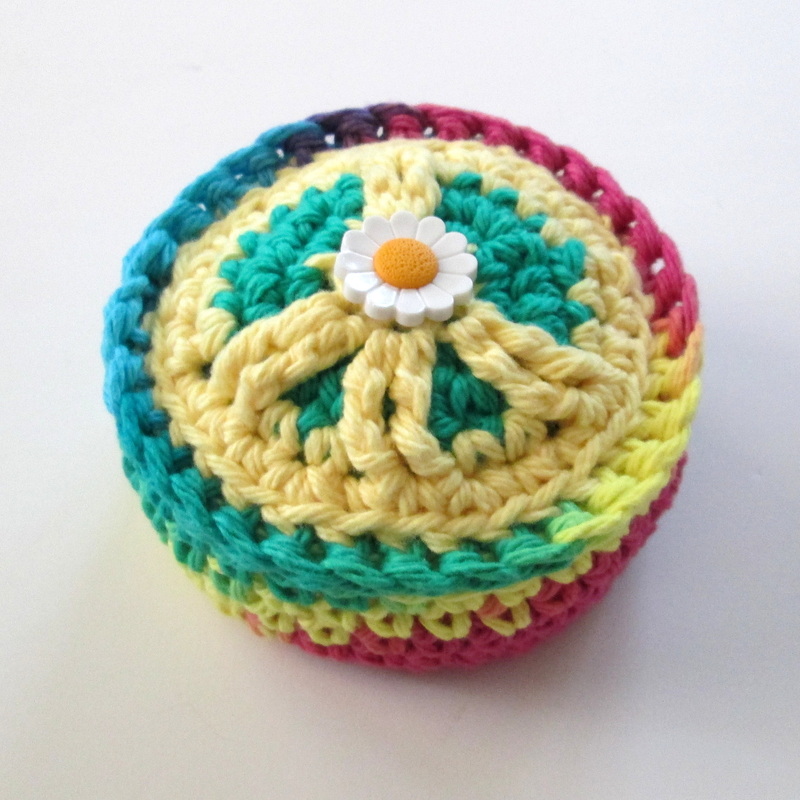
 Hello Friends! It's a beautiful day in the neighborhood and while we may be smack dab in the middle of summer Mother Nature is finally cutting us a break! When it's hot out I tend to lean towards small thread projects to keep me busy. Lately I've been focused on pincushions. When I came across this little gem in the April 2013 issue of Crochet World I knew I had to make it. The original pattern is for a tape measure holder/pincushion. Of course I didn't have the same kind of tape so I needed to find something to use in it's place. At first I thought about just stuffing the bottom, and then I remembered the little jar in my sewing box that I'd been keeping stray buttons in. 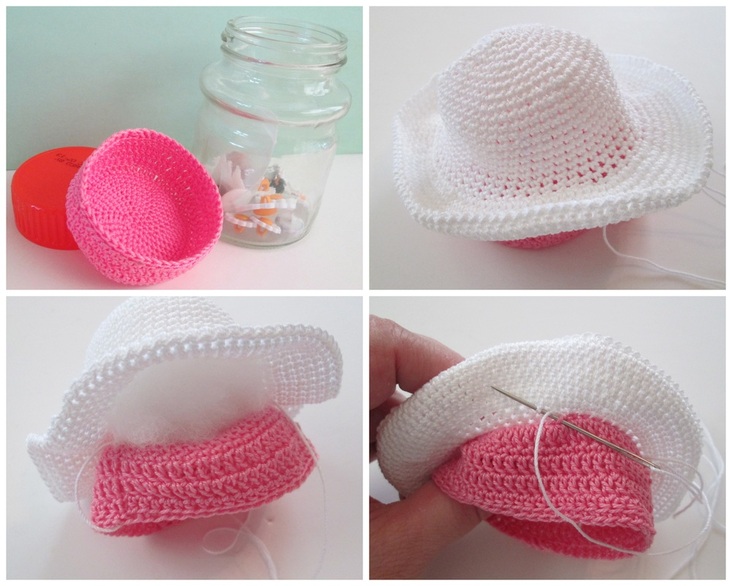 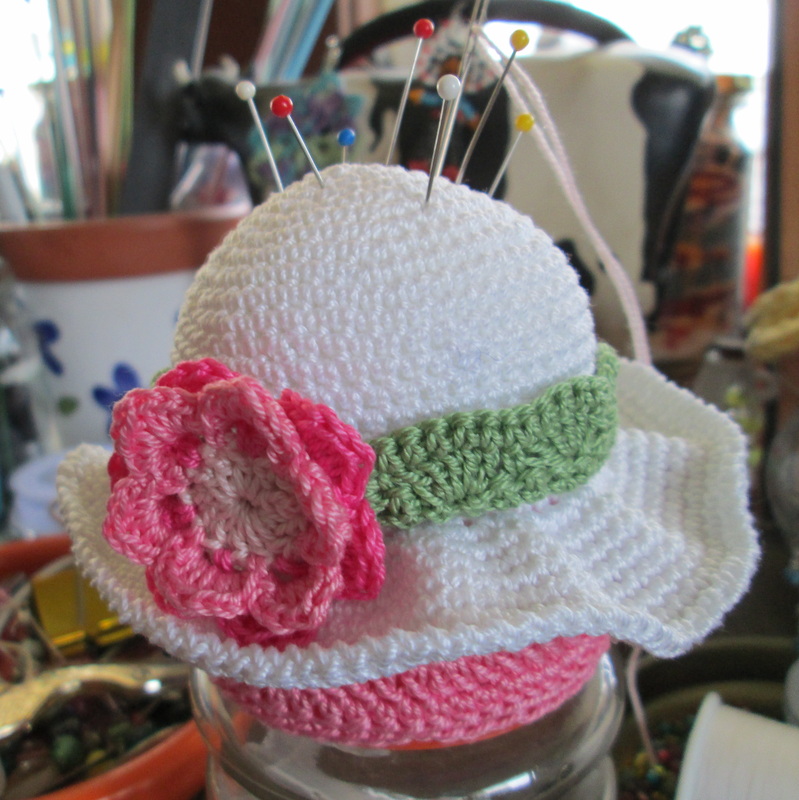 As it turns out it was just about the same size as the tape and minimal modifications were needed to make it work. I figured if I made the pincushion into a jar topper the bottom could be used to hold notions like a needle threader, safety pins, small spools of thread and even the stray buttons, making it into a handy sewing kit perfect for those little mending jobs. I followed the pattern through Rnd 8 of the Hat Bottom which is just a basic circle. I added one more round (following the established pattern) so that the circle was the same size as the top of the jar. Then I worked a round of sc in the front loops only. This give you the edge and you can start working down the sides. I worked 4 rounds of dc in both loops until it covered the top. I finished with a round of sc worked into the front loops to form a small lip. For the hat I followed the pattern again through Rnd 8, adding one more round just like I did for the base. This way I knew that when I sewed them together I'd have the same number of stitches on both pieces (54, I think). I did make one more modification. I used a different flower than the one indicated. I'm a fan of the traditional crochet roses so that's what I made using 3 different shades of pink.
It's a fairly easy project - the magazine says "Confident Beginner" and I'd agree. Even with the modifications it only took a few sittings. I almost forgot. I used a bit of fabric glue to secure the pincushion to the jar top. That way when it stays put when you open and close the jar. I'm quite pleased with the whole thing. It's quite charming and will certainly make a lovely gift. Well folks that's all for now! Thanks so much for stopping by and spending a bit of your day with me. Until next time friends, Be blessed and stitch & read with love!
5 Comments
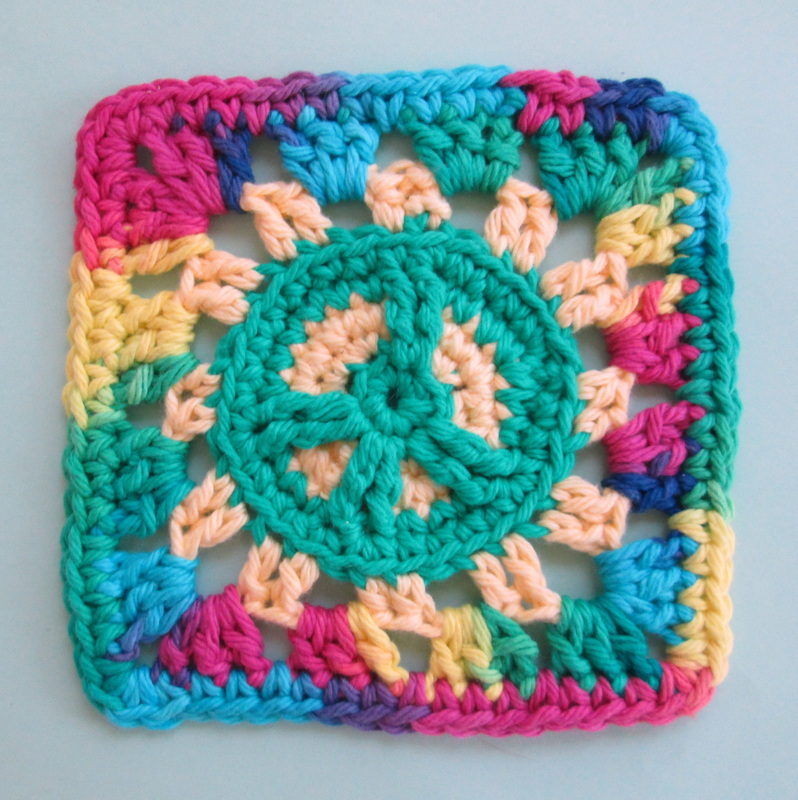
Greetings Friends! Last week one of the projects that I showed you was the totally groovy peace sign granny square from Petals to Picots. My mission was to turn it into a pincushion for lovely young lady named Phoenix who volunteers at our library. As you can see it was a terrific success and I'm overjoyed with the results. It's a simple project that came together in just a few hours. I made mine using Sugar 'n Cream Cotton in Sunshine, Hot Green and Psychedelic and a G hook. Here's how: 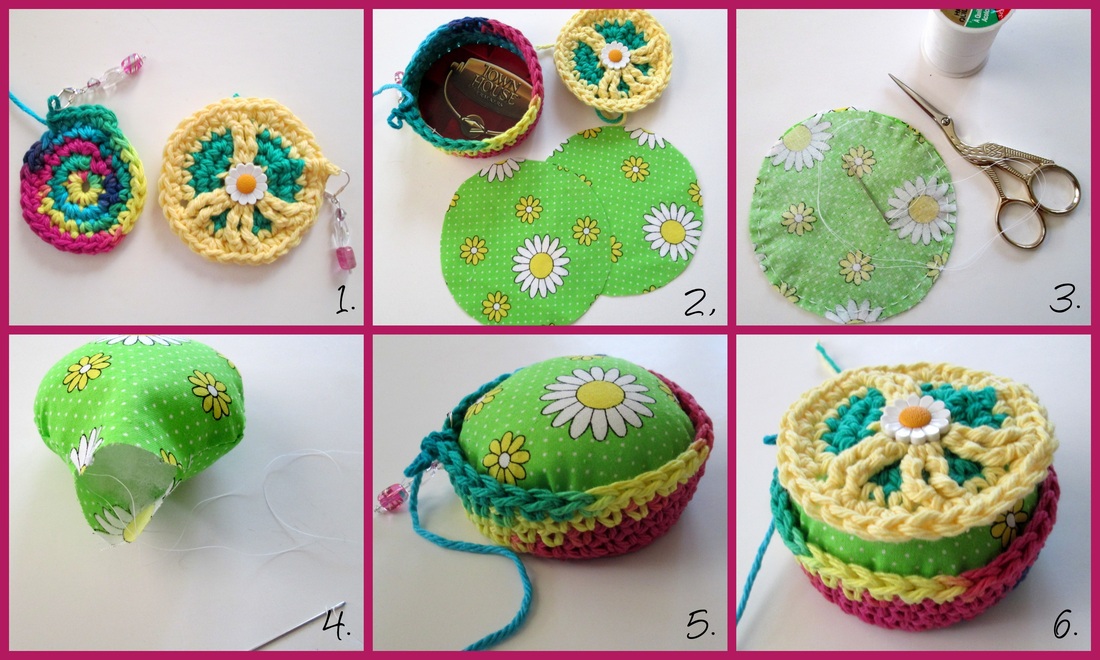
1. Using the granny square pattern, make just the peace sign. For the base make a basic circle working in continuous rounds moving the stitch marker after each round. 2. When it's the same size as the peace sign work one round into the front loops only. That forms the little edge and allows you to start working up. Work 4 more continuous rounds making it about an inch and a half tall. Don't finish off. To give it a bit more structure using the peace sign as a template, cut a piece of cardboard to fit snugly in the bottom. To make the cushion, using the cardboard circle as a guide, cut 2 pieces of fabric about a 1/2 to 3/4 of an inch larger than the cardboard. 3. Put the wrong sides of the fabric together and using a basting stitch sew around the circle. Leave 1/4 inch seam allowance and an 1 1/2 - 2 inch opening. Leave the needle and thread attached. 4. Turn the circle right side out and stuff with fiber fill. Over stuff so it's nice and firm and puffy. Fold the edges of the opening in and stitch closed. 5. Plump up your cushion and stuff it into the base. It should fit snugly. You could stop right here and have yourself a great little pincushion. In fact, that's exactly what we're going to be making at the next YA craft class at the library! 6. To finish, attach the peace sign to the base by single crocheting through the back loops of the base and the front loops of the peace sign. Fasten off and weave in the end.
Well that it'll do it for me today. I have all kinds of projects to share with you so please stop back and visit again. Thanks so much for spending a bit of your day with me,
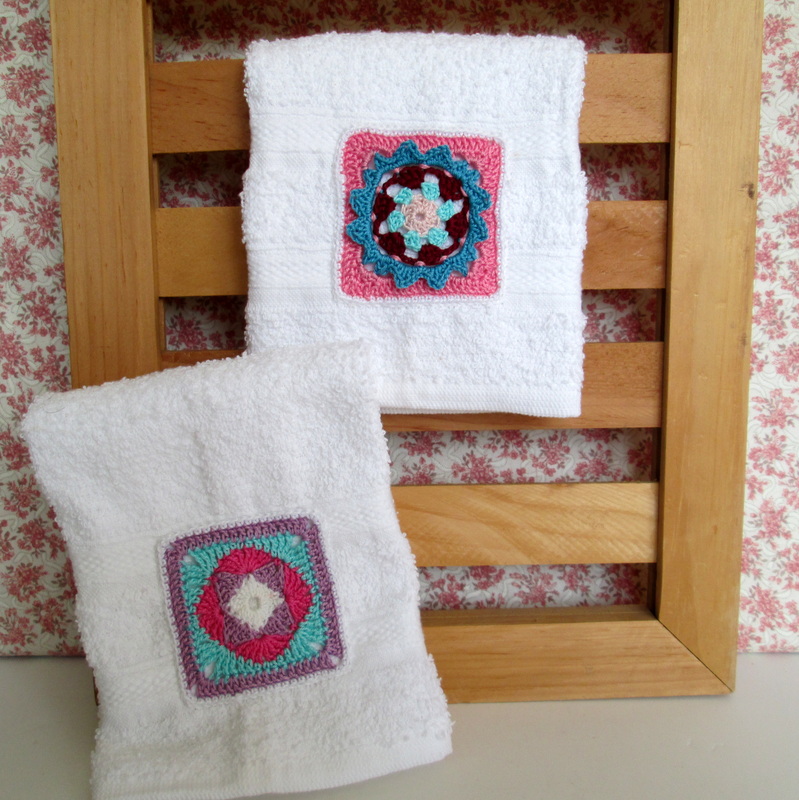
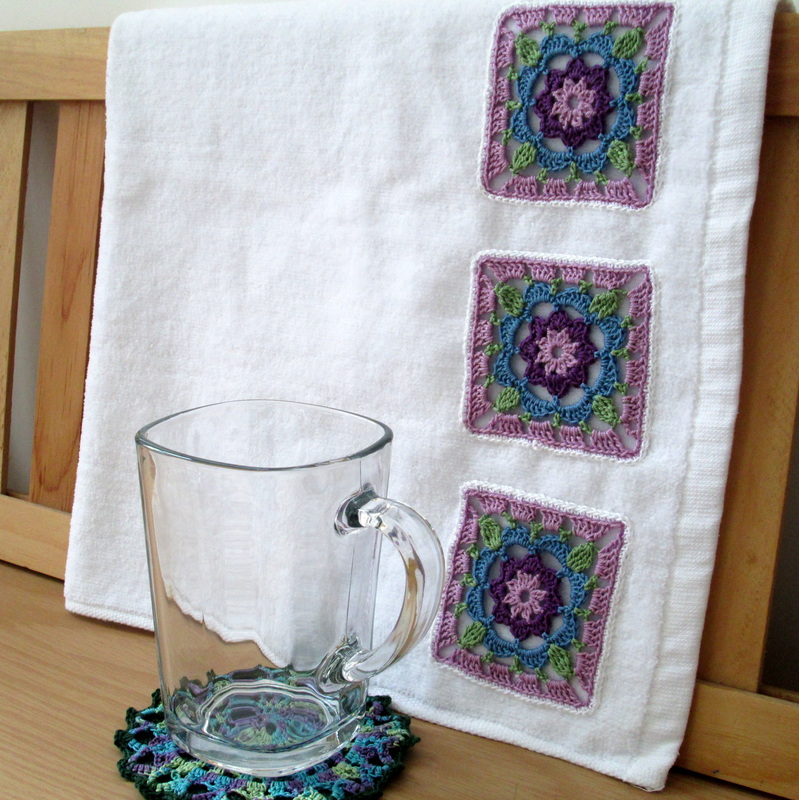
Until next time friends, Be blessed and stitch & read with love! You can easily embellish plain towels and washcloths |
| 
|
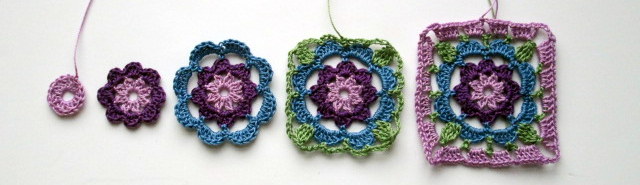
Start with your favorite motif, crocheted in cotton thread.
Then follow these easy steps...
1. Single Crochet around the motif using crochet thread that matches your "plain" item. 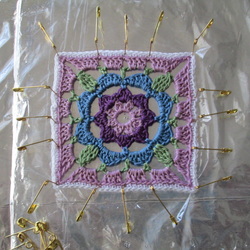
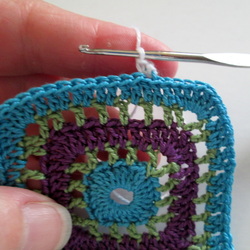
4. Spritz the motif with plain water to wet, then pin it to open up the stitches and straighten the edges. 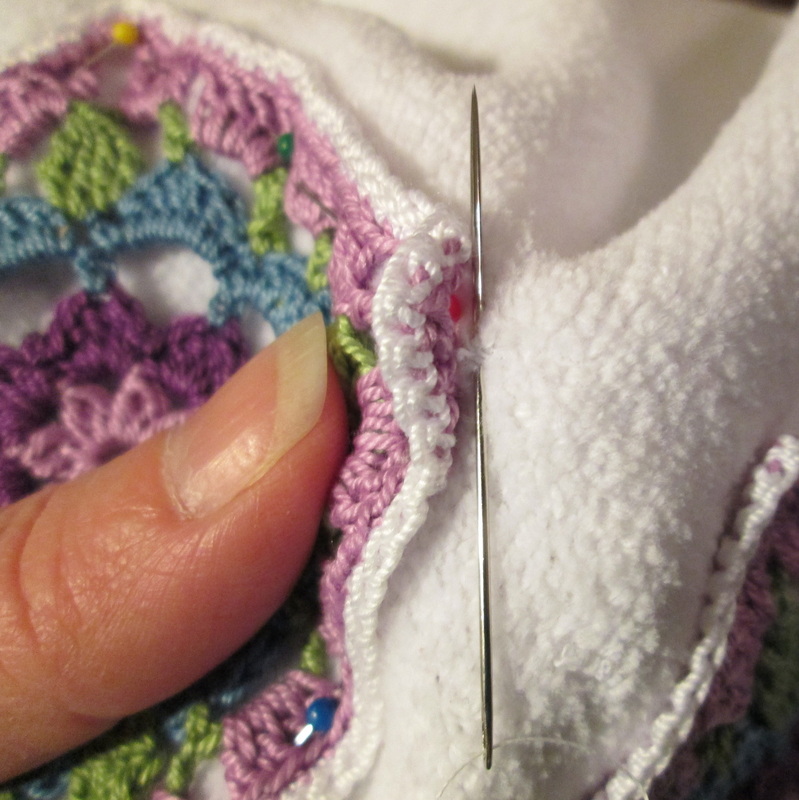
7. Fold up the edge a bit and take a small stitch under it to anchor the thread and hide the knot. | 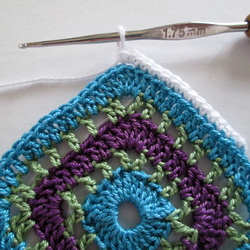
2. For square designs, work 3 SC stitches in each corner for a smooth border. 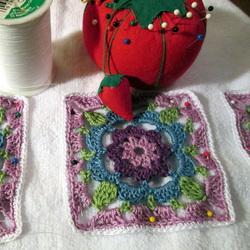
5. Once the motif is dry, pin it in place. Where and how many is all up to you! 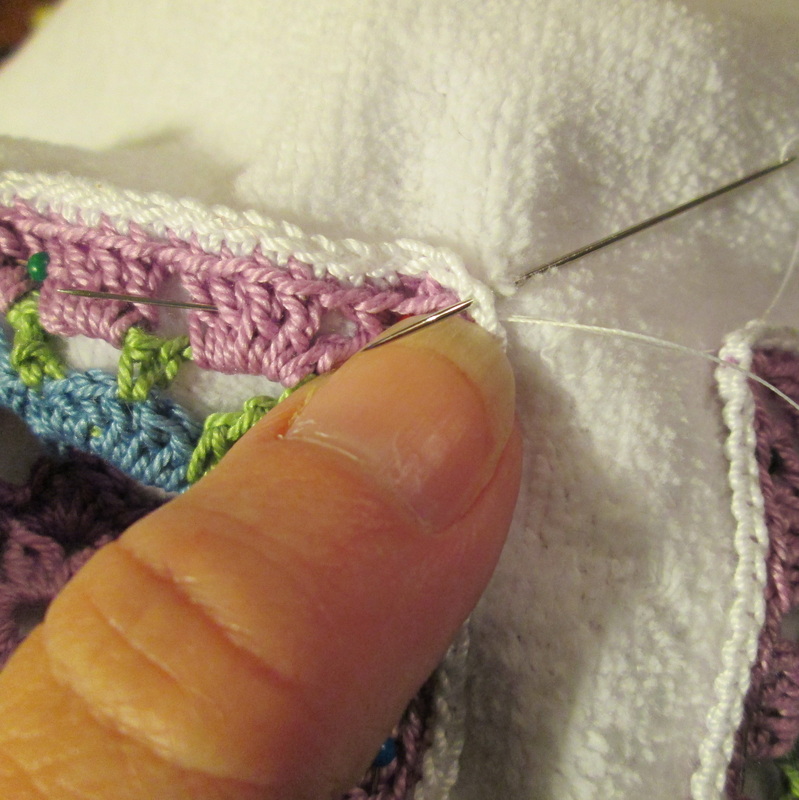
8. Now using small stitches, sew into the back loop of each SC stitch around the item. | 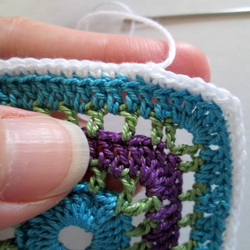
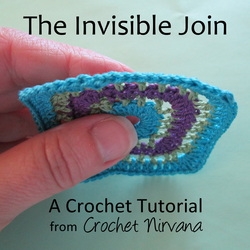
3. Finish the round using the invisible join. Not sure how? Click here! 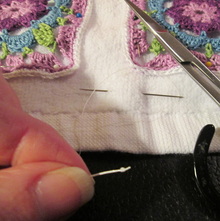
6. Using plain thread in the same color as your border, thread the needle and tie a knot. 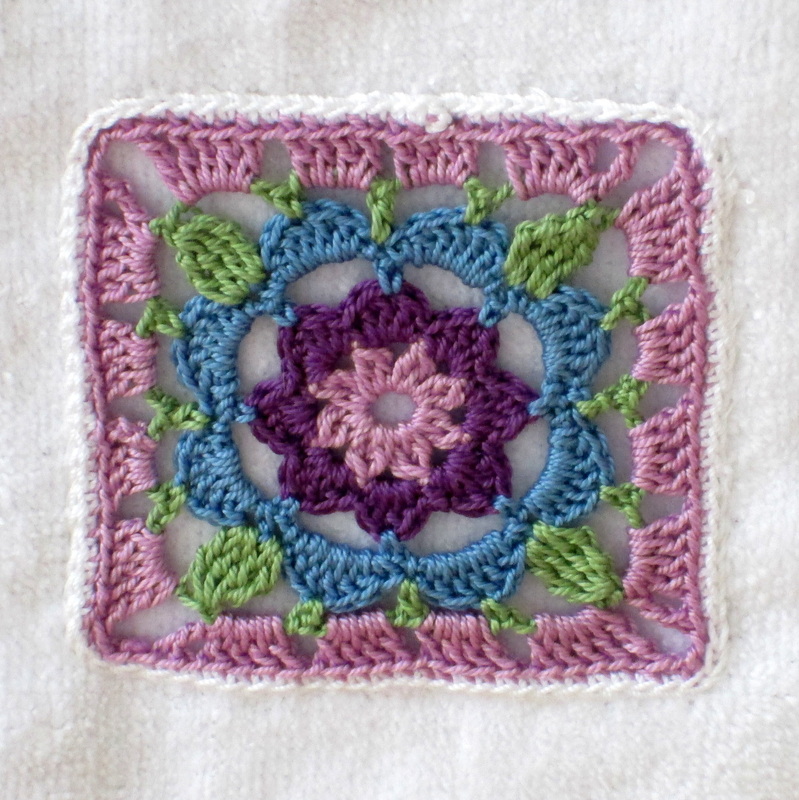
9. Finish off by tying a knot close to the fabric and then passing the needle under the motif and out the back to hide the knot. |
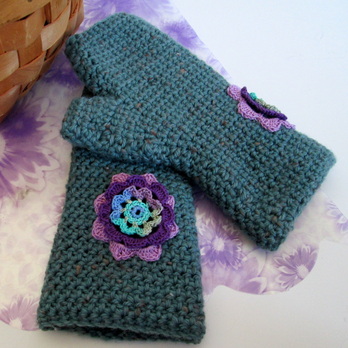
| That's it! That's all it takes to turn something plain and ordinary into something unique and extraordinary! If you think it's too hard, please don't be intimidated! The first time I tried it I was so worried that my stitches would be uneven and the motif would fall off! Believe me it's so much easier than it looks. And, it's a great way to put your thread creations to work. I don't know about you, but I have plenty of flowers and motifs that are just looking for a place to show off! I turned these simple fingerless mitts into something special by adding flowers to the outside of the wrist. |
For these I didn't bother to add a SC border, and since I didn't have matching lilac thread I used the crochet thread. I cut a piece to length and pulled it apart so I could use just one of the plies. It worked like a charm!
Well folks, I hope that today's tutorial has been helpful and that you might even be inspired to give this type of applique a try. You can use this technique on so many different things. On blue jeans, and denim jackets, shirt collars and pockets, pillow cases and sheets, curtains, tote bags - if you can imagine it, you can do it!
Thanks so much for stopping by and spending a bit of your day with me.
Until next time friends,
Be blessed and stitch & read with love!
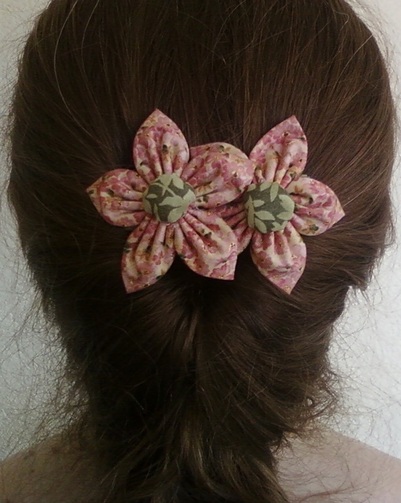
It's been a fabulously productive week. As I began pulling things together for today's post I was surprised by all that I (we) accomplished, and with the variety of mediums that I've been using. Fabric and sewing have been prominent. I figured out a way to combine cloth and crochet and used it to make these handy hair ties/elastics. I'm always looking for something pretty and unique to keep my mop of hair out of my face. These hit the mark and are easy to whip up. I've been having a blast making flowers. Along with attaching them to barrettes, I wanted to make them into pins. I know you can buy the pin backs, but I decided to upcycle and pulled apart an old promotional pin and stitched the pin part to one of my flowers. Now it's ready for my denim jacket!

Single crochet with fabric strips.
| 
A pin for my denim jacket.
| 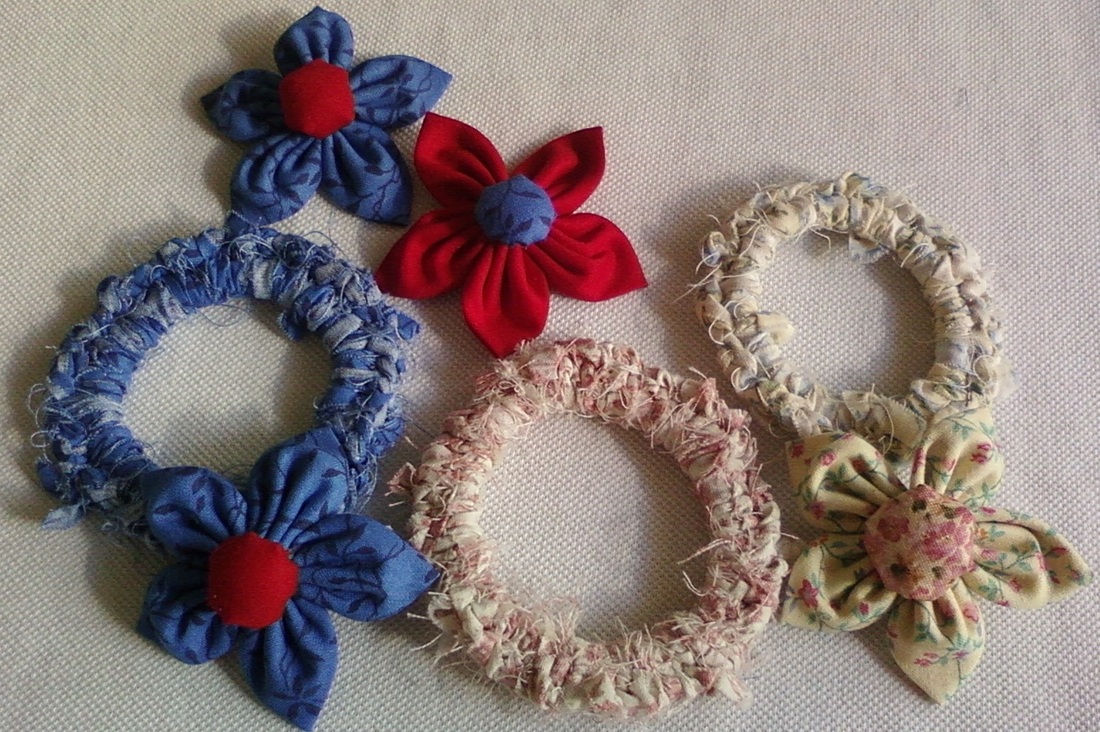
Pretty things for my hair.
|
Stitch markers and earrings were on the agenda yesterday. It's been a while since John and I have done this. Like anything creative I have to be in the right mood to want to do it - and for it to be successful. Let me tell you, I was in the zone! I know the pictures don't show them off, but they were coming together so easily! I've had days that no matter what combinations I tried, nothing looked right. Yesterday I could do no wrong! In about an hour and a half I had laid out at least 8 sets of markers and maybe 10 pairs of earrings. John is finishing up the last of them as I'm write this!
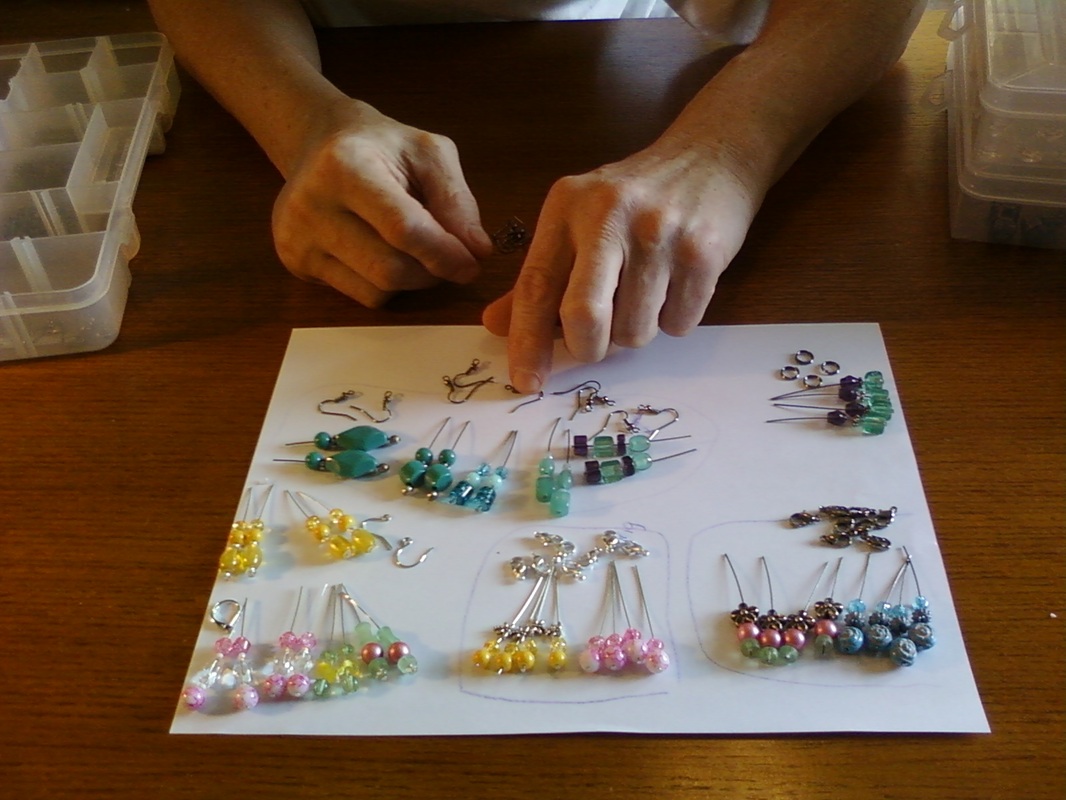
John, getting ready to do his thing!
| 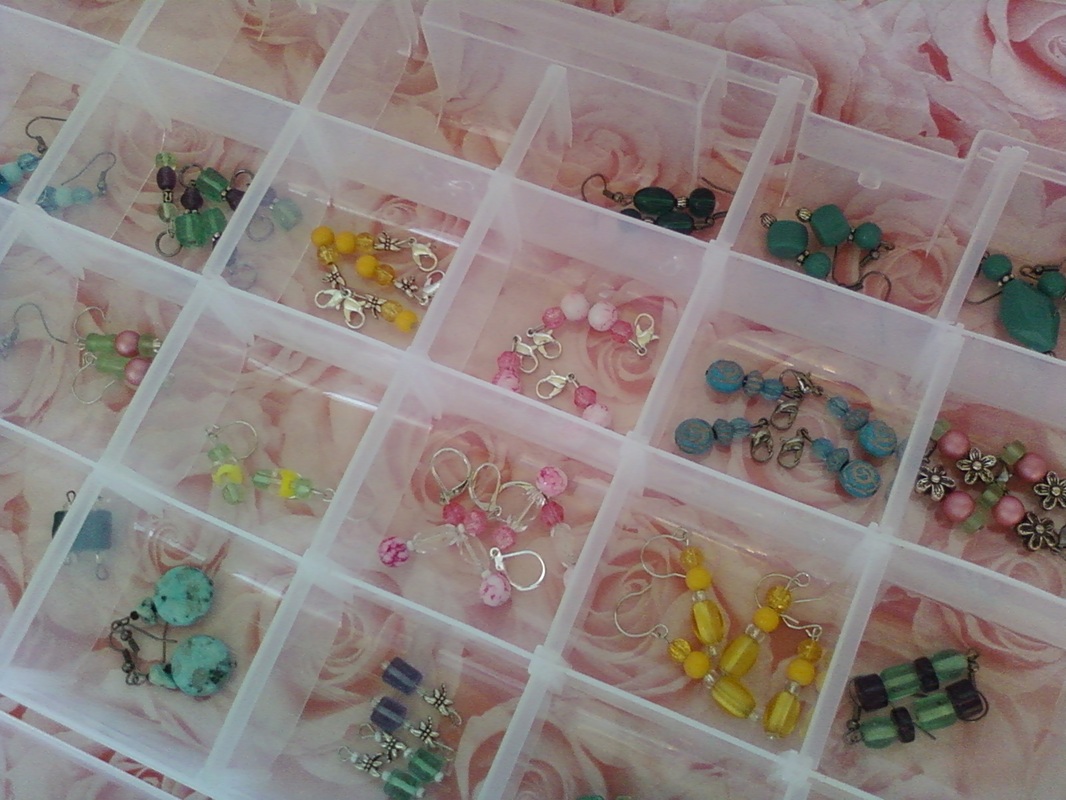
Look at all those little beauties!
|
The sewing seed was planted a few weeks ago, when a class to make a tote bag was held at the library. I couldn't attend because I had to work, but Jean set my up with a tasty stack of fabric squares and the pattern. I keep my sewing machine in the corner of the dining room for easy access. Truthfully, I haven't used it since I hemmed a pair of pants for John last winter, but it was ready to go. I chose 4 complimentary prints and had at it! You begin by making 4 strips of 4 squares (easy). Then you lay them out in a kind of windmill pattern and sew them together (still pretty easy). Now the fun begins because you have to somehow sew the sides together in the right order to create a very awkward looking bag (not easy anymore). I did alright for the first three, then managed to sew the top together instead of side three to four. That's why I have seam rippers! I made the lining (really easy) and pressed and pinned it all together. I had to reattach the handles a couple of times to get them to end up between the lining and the main part of the bag, and because once I pinned it so the handles would have ended up sewn into the lining! All things considered, it was a lot of fun and now I have this adorable little tote!
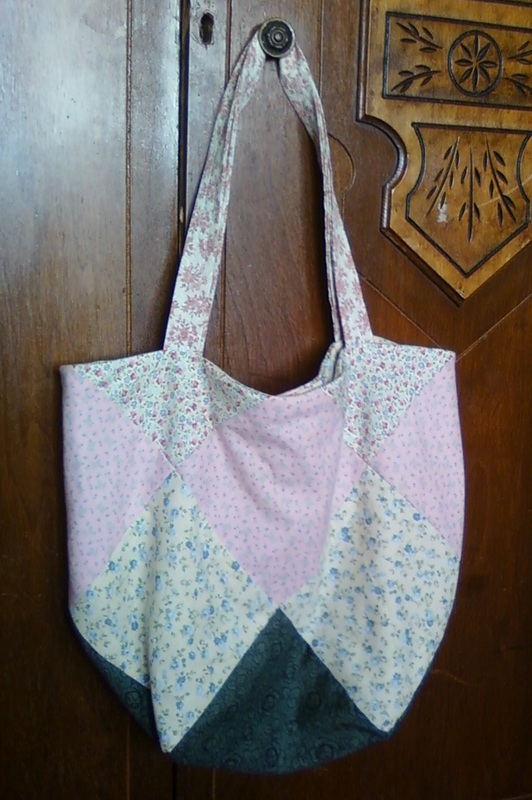
I'm pretty proud of this little tote. I wonder what I should make next?
In addition to my fiber offerings on Friday, I like to participate in Five Minute Friday over at Lisa-Jo Bakers place. It's writing in the raw and if you've never done why don't you give it a try? It's really easy - you just:
1. Write for 5 minutes flat on this week's prompt: “Story” with no editing, no over thinking, no backtracking - then post it just as it is!
2. Link back here and invite others to join in.
3. And then absolutely, no ifs, ands or buts about it, you need to visit the person who linked up before you & encourage them in their comments. Seriously. That is, like, the rule. And the fun. And the heart of this community..
Here's what happened when I spent five minutes writing on the prompt "Story"
Fact, fiction, fantasy, fable there are so many stories out there. And I want to read them all!
When I think about stories I begin with the story of my life. As interesting as that may be, it’s not where I want to spend my time – after all I’m here every day! I’d much rather hear a good story about something I know nothing about. Mermaids, knights in shining armor, being a wealthy celebrity, the possibilities are endless! I suppose that’s why I love the library. Because it’s a building bursting with stories. Every kind imaginable.
I can loose myself in the stacks. Pulling book after book, looking at the cover and wondering what it holds inside. Will I be transported to Italy or maybe to the desert of New Mexico. I travel and meet new people. I learn and explore and immerse myself in the world the author creates for me.
I remember reading stories to my son – every night until he was too old to let me. And then, once in a while he would allow me to snuggle with his near pre-teen self and share an adventure before bed. Those were magic stories.
Perhaps not my most inspired five minutes. I honestly contemplated not posting it. Only for a secondthough. Because it's about giving yourself an opportunity for free flowing thoughts, and letting them be just as they are. And how often to do you let yourself do that?
On Friday's there's always lots to do. I'll be heading out to visit my linky friends to see and be inspired by the wonderful things you all are working on this weekend. I'd love it if you came along.
| 
| 
|
Thanks for stopping by and enjoy your weekend.
Until next time friends,
Be blesses and stitch & read with love!
Until next time friends,
Be blesses and stitch & read with love!
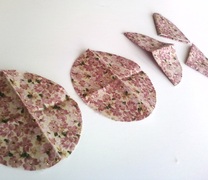
First, I marked and cut circles for flowers.
| 
Then, I pressed the circles into quarters and cut the strips in no time with my rotary cutter.
|
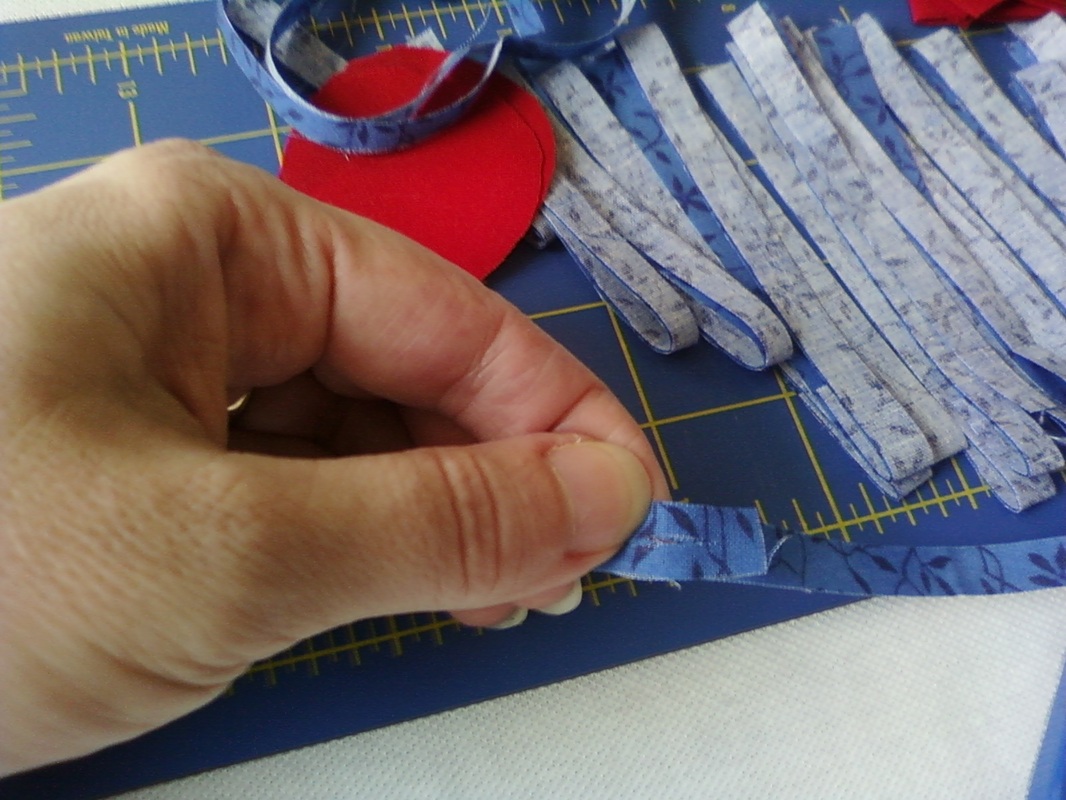
Last week I had such fun making flowers that I decided to whip up a few more. In my stash I found this solid red and patterned blue fabric. (The colors on the right are what they really look like.) To go along with the flowers I decided to make a coordinated hair tie by crocheting fabric around an elastic. Here's an easy way to attach fabric strips together without sewing. It's like ribbon yarn!
| 
| 
|
| Fold the end of the strip over about a 1/2 inch and make a 1/4 inch snip on the fold. With the right sides up, overlap the ends, matching the slits. | 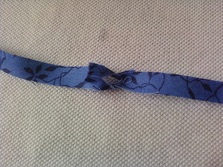
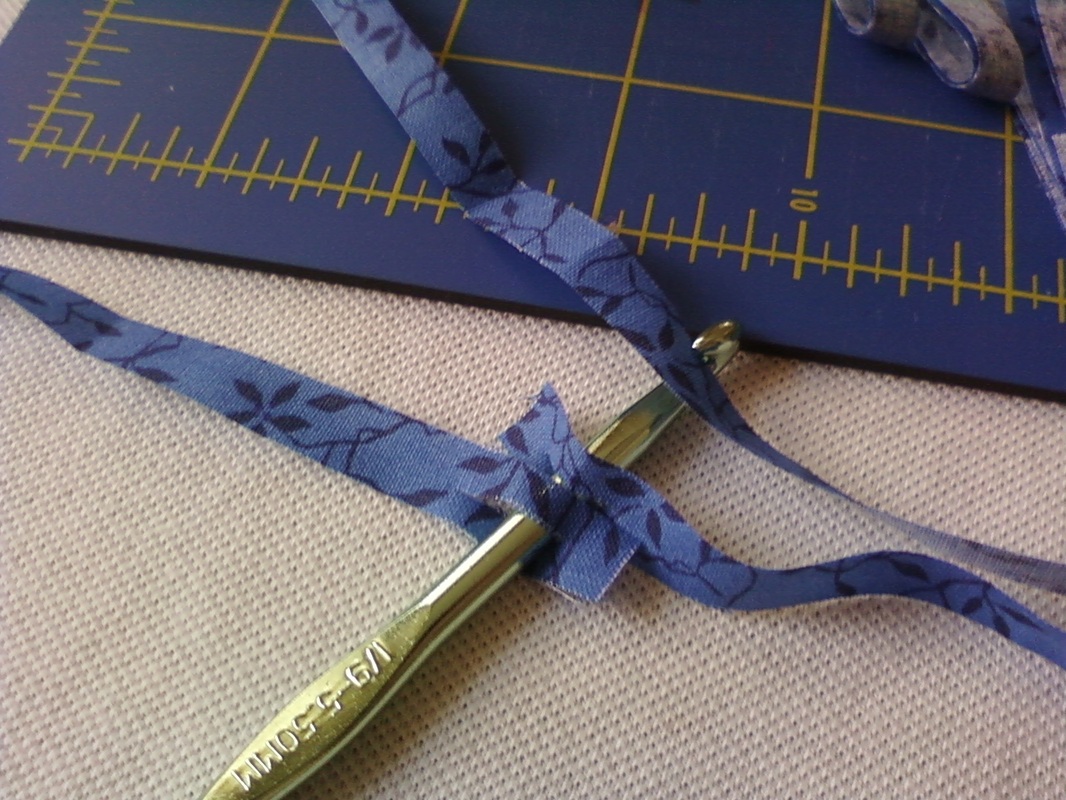
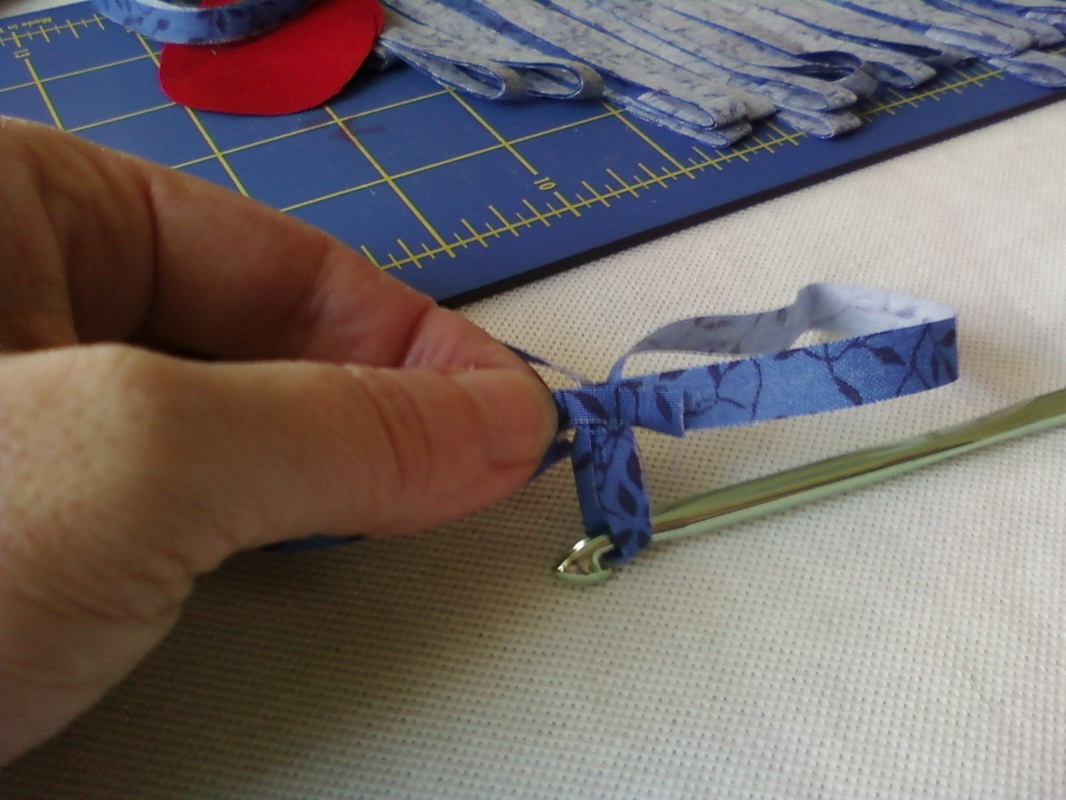
| Using a crochet hook, pull the free end of the new strip through both slits from bottom to top. Pull firmly to form a nifty small knot. |
You can attach the strips as you go or do a bunch at the same time (that's what I like to do). Then I just take a I/9-5.50mm hook and single crochet the fabric around a plain hair tie/elastic. While working around, keep smooshing the stitches together. You want to fit on as many as you can. Slip stitch into the first stitch, fasten off and you're all done! This afternoon I'll be adding more of these easy hair accessories to my ever growing collection!
Even though it's been hazy, hot and humid all week, I've gotten a few (okay one and a half) more rows added on to Juliana Mod. She's coming along, slow and steady. The pattern continues to be a pleasure. The yarn (Bernat Baby Sport from the stash) is nothing to write home about, but it's washable and durable without being too stiff. With the bead work I plan to add to the end, I think this will be a pretty, functional piece.
Even though it's been hazy, hot and humid all week, I've gotten a few (okay one and a half) more rows added on to Juliana Mod. She's coming along, slow and steady. The pattern continues to be a pleasure. The yarn (Bernat Baby Sport from the stash) is nothing to write home about, but it's washable and durable without being too stiff. With the bead work I plan to add to the end, I think this will be a pretty, functional piece.
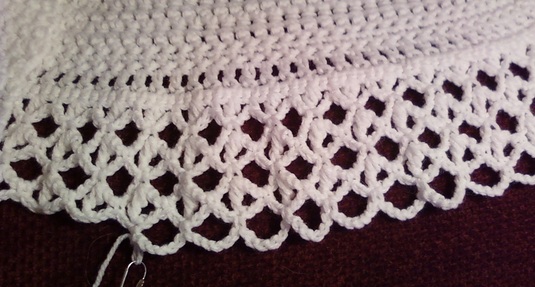
Juliana Mod is making slow and steady progress!
No matter what else is going on in my world, I always, always make time for books. Before I tell you about today's pick, let's talk about a few of the others. Catching Fire, the second in the Hunger Games Trilogy, kept me interested and entertained straight through to the end. I've been pleasantly surprised by this set of Young Adult books and have the final installment, MockingJay, on CD and ready to go. Next, I read Nora Roberts' The Last Boyfriend. This is also a second in a trilogy called The Inn Boonsboro. It's light and easy with beautiful people living beautiful lives. I'd say it's a good one for the beach or a weekend escape.
Last week it was finally my turn with Fifty Shades of Grey. There has been so much hype and media attention surrounding this trilogy of books I wanted to take a look for myself. I read the first two chapters and was not impressed with the dialog or story telling. If I hadn't waited for two months I would have stopped there. I pressed on cringing at the way Anastasia spoke and behaved. It was a strange blend of hip college student and spinster great aunt. And then it turned into smut. Pages and pages of it. I blushed and was embarrassed - even though my husband had no idea what I was reading. I'm not a prude, but I couldn't do it. I know lots of people love it, but it's not for me. I look for something different in the books I read, and I can't say I'm surprised by my reaction. I returned it to the library so the next person in line can decide for themselves if it's worth the wait!
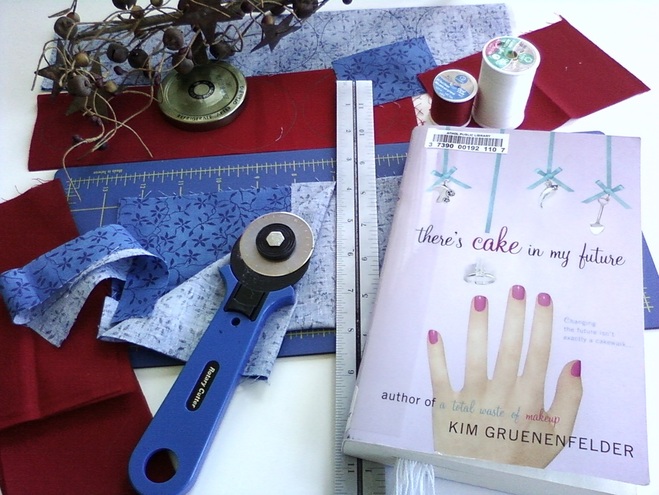
After that I was happy to start There's Cake in My Future by Kim Gruenenfelder. I'm more than halfway through and enjoying this light and breezy slice of chic lit. Funny dialog, devoted friends, love, marriage and a cake pull that shows some very unexpected things will soon be happening. This one is much more my cup of tea!
There you have it. We're laying low and staying cool on this Independence Day. Before I get back to work on my patriotic hair accessories I'll be stopping by to visit Ginny, Tami and Sue. I'd love it you came with me.
Last week it was finally my turn with Fifty Shades of Grey. There has been so much hype and media attention surrounding this trilogy of books I wanted to take a look for myself. I read the first two chapters and was not impressed with the dialog or story telling. If I hadn't waited for two months I would have stopped there. I pressed on cringing at the way Anastasia spoke and behaved. It was a strange blend of hip college student and spinster great aunt. And then it turned into smut. Pages and pages of it. I blushed and was embarrassed - even though my husband had no idea what I was reading. I'm not a prude, but I couldn't do it. I know lots of people love it, but it's not for me. I look for something different in the books I read, and I can't say I'm surprised by my reaction. I returned it to the library so the next person in line can decide for themselves if it's worth the wait!
After that I was happy to start There's Cake in My Future by Kim Gruenenfelder. I'm more than halfway through and enjoying this light and breezy slice of chic lit. Funny dialog, devoted friends, love, marriage and a cake pull that shows some very unexpected things will soon be happening. This one is much more my cup of tea!
There you have it. We're laying low and staying cool on this Independence Day. Before I get back to work on my patriotic hair accessories I'll be stopping by to visit Ginny, Tami and Sue. I'd love it you came with me.
| 
| 
|
Until next time friends,
Be blessed and stitch & read with love!
Be blessed and stitch & read with love!
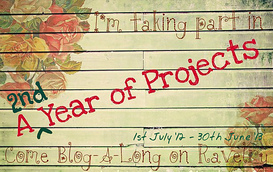
Planning ahead for a year of projects is a daunting task for me. Typically, I avoid trying to anticipate today what I will want or be able to do that far in the future. This comes after many years of planning, scheduling and otherwise attempting to manipulate my life into submission with disastrous results! These days I’m much more of a “be here now” kinda gal! Why then have I chosen (yes, this is a choice) to participate in a YoP? The best I can figure is because I like to learn new things and I especially like the community of bloggers and the support they offer each other. After reading through most of the threads in the Ravelry Group Come Blog-A-Long I thought, “What a great group of people. I’d like to hang out with them and give this thing a try!”
But how am I going to make a list that I have any hope of sticking to for a whole year? Last year, many people strayed quickly and often from their original lists. This year more folks are leaning towards broader goals (I’ll crochet 10 hats for charity). This, (I think) I can do! Now I have to decide what I want to learn and how I’m going to do it. So I started where I usually do, at the library with a big old pile of books! This is a sample of the roughly two dozen books I’ve looked at over the past few weeks!
But how am I going to make a list that I have any hope of sticking to for a whole year? Last year, many people strayed quickly and often from their original lists. This year more folks are leaning towards broader goals (I’ll crochet 10 hats for charity). This, (I think) I can do! Now I have to decide what I want to learn and how I’m going to do it. So I started where I usually do, at the library with a big old pile of books! This is a sample of the roughly two dozen books I’ve looked at over the past few weeks!
After oohing and aahing over many, many beautiful projects (and plenty that flops), I knew that I didn’t want to commit to one book for the whole year. I decided to come up with 10 things that I want to learn about or improve upon. The books were so important in helping me choose. Here is my list, in no particular order:
- Make a sweater (that really fits!) from Custom Crochet Sweaters by Dora Ohrenstein
- Improve my sock skills
- Explore the world of Granny Squares
- Learn Painted Crochet
- Dye my own yarn
- Make something with up-cycled materials
- Crochet a rug
- Design my own wrap
- Learn a new lace technique (ie: Hairpin, Bruges, or Filet)
- Make at least one sewing project from 101 One Yard Wonders
- Give double ended hooks a try
- Learn Tunisian Crochet
Okay, so that’s 12 things! But it’s exciting, and I’m feeling good about my list. I took my time and really gave a lot of thought to what I want to learn and what’s realistic for me. Many of these things have been flittering about in my head for a while. The difference is now they’re written down. I’m hopeful that a YoP will help motivate me to get busy with my Holiday Stashdown projects. A few months ago I joined up with Marie at Underground Crafter because I wanted to keep ahead of my holiday gift making, instead of having it turn into the last minute nightmare it usually becomes. To date my progress has been less than stellar. Now I’ve gone ahead and made my second public declaration of things I want to accomplish in a finite amount of time! That means it’s time to stop procrastinating and start crocheting!
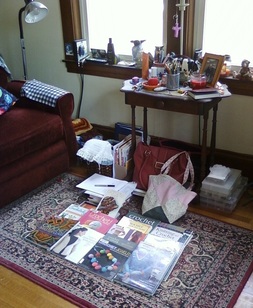
I had books everywhere!!
I hope that you’ll stop in now and again and see how I’m doing. I’m looking forward to meeting lots of new people and having great adventures trying new things! You can pop into the group to see what everyone else is doing. Also, why not stop by Marie’s and see what’s happing in the Stashdown world.
There you have it friends! The beginning of something wonderful.
Until next time,
Be blessed and stitch & read with love!
There you have it friends! The beginning of something wonderful.
Until next time,
Be blessed and stitch & read with love!
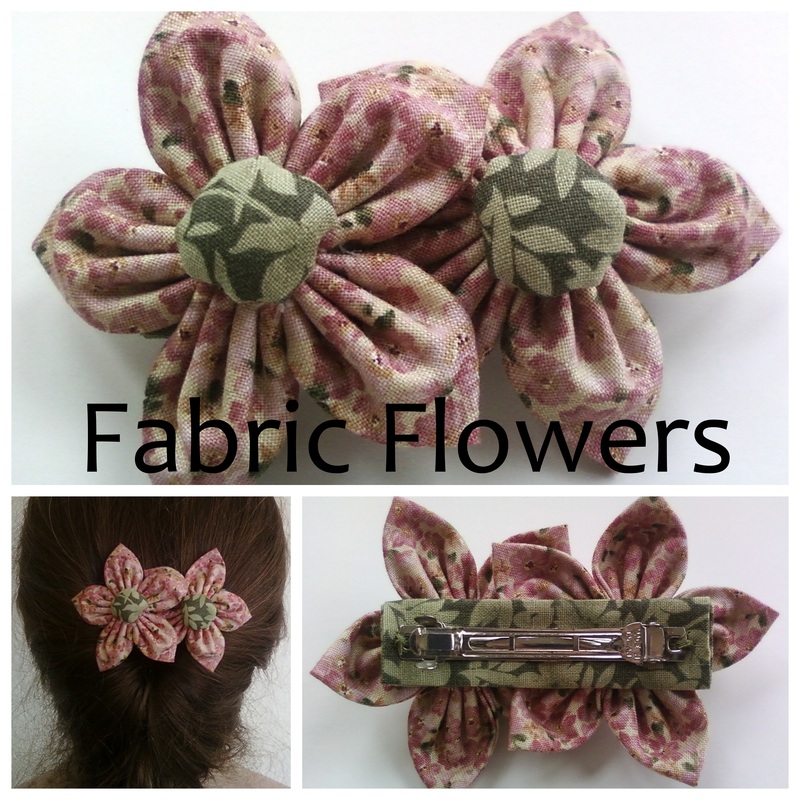
I've been inspired by fabric this week. Today I'm finishing up a tote bag and yesterday in just a few hours I made this sweet barrette. I owe thanks to Libby (Truly Myrtle) who showed me how in her pincushion tutorial. I knew when I saw it that I'd be wearing flowers in my hair! Here's what I did:
 I started with (5) 2 1/2" circles, pressed in quarters. | 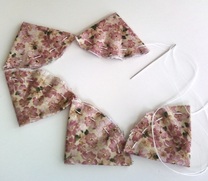 Sew a running stitch along the raw edge of each using one piece of thread. | 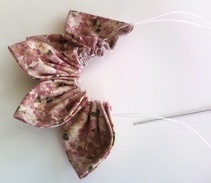 Pull firmly and attach the first petal to the last petal. |
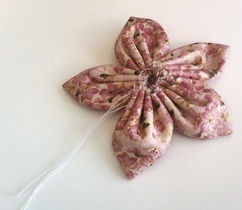 Voila! A flower blooms! I made the center using a 1 1/2" fabric circle. Running stitch around, a little fiber fill, pull and stitch to secure. 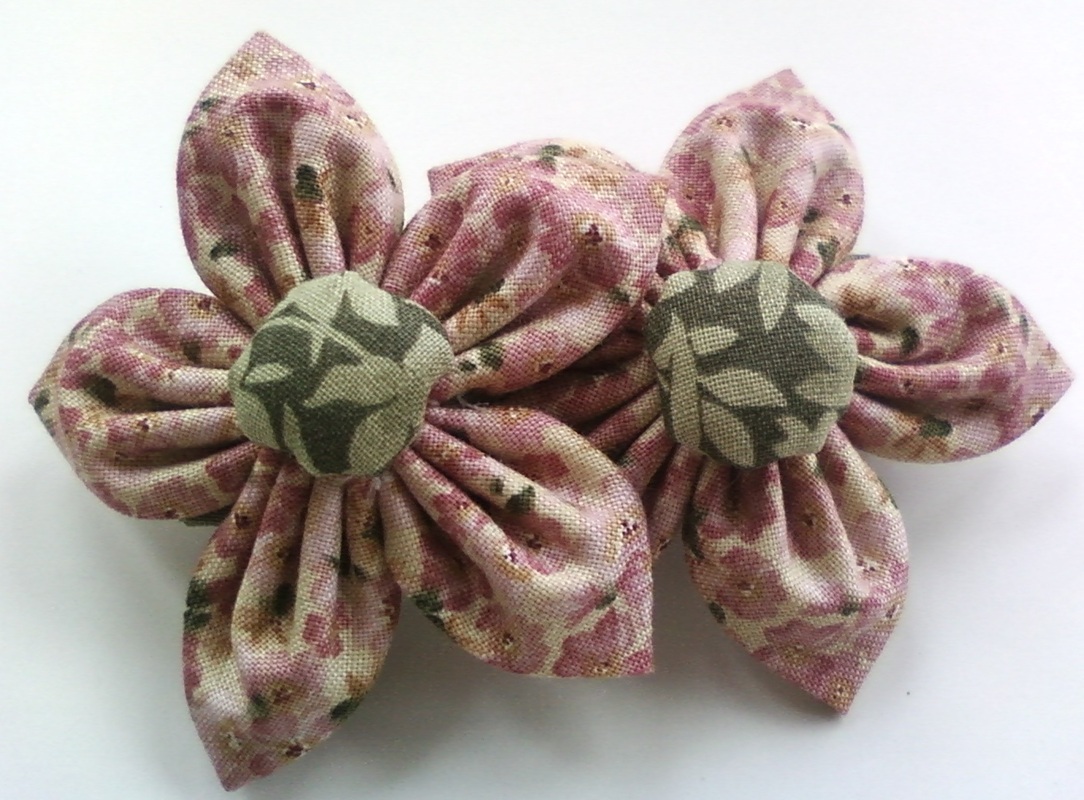 They're fun and easy to make. I can imagine them on hairbands, pins, hats, bags and more! | 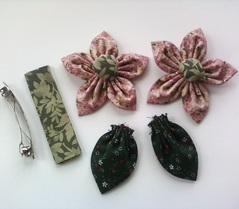 I stitched each flower to the 2 3/4" x 3/4" fabric strip, and stitched that to my barrette. The leaves were too bulky to include. 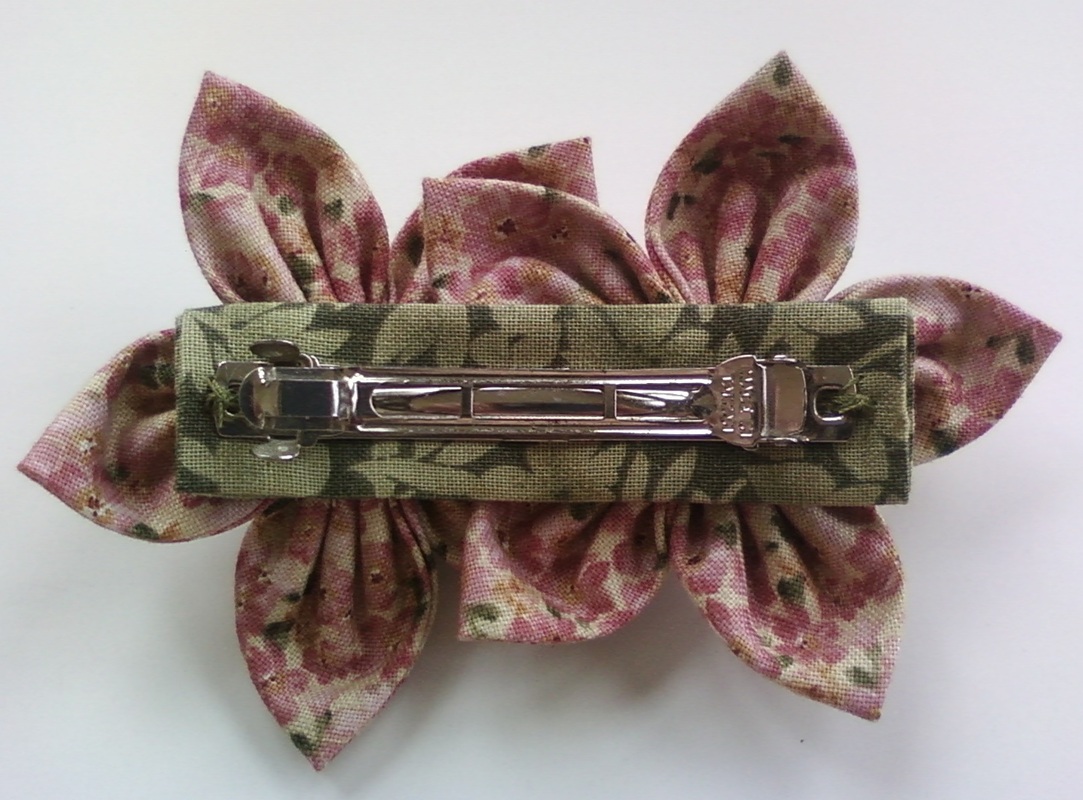 It's important to me that the back looks as good as the front. The base strip is for function and style. |
Aren't they lovely? I'm so happy with the way they turned out!

I know that this doesn't really "go" with my flowers, but I'd like to share it with you just the same. Only recently I discovered SoCS. A weekly prompt for five minutes of writing in the raw (like Five Minute Friday). I've been doing them both, but it feels awkward since they're only a few days apart and so similar. It turns out that I don't have to worry about it anymore because Fadra, our host has decided after two years it's time to move on and today is the last SoCS. I wish her well as I've enjoyed the Sundays we've spent together. There is a bit of serendipity at work here because I was facing another Sunday conflict. I've decided to participate in the Ravelry Group - Come Blog-A-Long. The Second Year of Projects kicks off today, July 1 and weekly updates are posted on - you guessed it - Sunday! With SocS ending I don't have to choose where I want to do my weekly writing exercise or worry about overextending myself on Sundays! I love it when things just fall into place like that.
So without further ado, here is my five minutes of writing on today's prompt:
What does it mean to reinvent yourself?
Recently I reinvented myself – well not entirely. I think it’s more like I found my true self and I’m letting her out.
I used to worry about fitting in, what people think, keeping up with the Jonses all that kind of stuff, and then a few years ago after some very bad things happened I decided it was time to let go and move on.
To find out who I really am and to be true to her I had to do a lot of soul searching and praying and meditating and simply letting go of all the old ways that were not working.
I started to believe in myself. I began to do things just for me. Because I wanted to and because I need to take care of myself.
I stopped trying to control everything and everybody in my life.
It has been so liberating! So freeing.
I think differently and respond differently and I’m happy. I face difficult situations with faith and optimism that I can and will get through. I enjoy my life. I appreciate little things and little events. I work on being in the moment and being happy now. There’s no reason to wait for the big long list of things to be done and then be happy when I can just do it now.
I hope you enjoy the small things that make up your day! I'll be linking up this week with the lovely Nicole and her family on the farm at Frontier Dreams: Keep Calm and Craft On. There are always lots of wonderful works to see. Why don't you join me? Until next time friends,
Be blessed and stitch & read with love!
Be blessed and stitch & read with love!
- Greetings!
I'm Robin and this is
Crochet Nirvana, where
laughter is essential,
learning is supported,
creativity is nurtured, and sharing is encouraged.
Thanks for stopping by,
I hope you
enjoy your visit!

Click to see what's new on the Craftsy Crochet Blog!
Follow Along

Tutorials and Patterns


On Instagram


Look for me, I'm RobinBrz


Places I Post


Archives
July 2015
June 2015
February 2015
January 2015
December 2014
November 2014
October 2014
September 2014
July 2014
June 2014
April 2014
March 2014
January 2014
December 2013
October 2013
September 2013
August 2013
July 2013
June 2013
May 2013
April 2013
March 2013
February 2013
January 2013
December 2012
November 2012
October 2012
September 2012
August 2012
July 2012
June 2012
May 2012
April 2012
March 2012
Categories
All
4kcbwday1
4kcbwday2
4kcbwday3
4kcbwday4
4kcbwday5
4kcbwday6
5 Minute Friday
Accessories Home
Accessories - Home
Afghans
Amigurumi
Art
Bags
Beads & Beading
Blogging
Blog Reviews
Blogtoberfest 2012
Blog Week Iv
Book Reviews
Books
Cables
C A L
Cardigan
Chevron Lace
Class Review
Coasters
Cowl
Craftsy
Creative Friday
Crochet
Crochet Lace
Doily
Doodles
Downloadable Files
Earrings
Fabric
Fiber Arts Friday
Fingerless Gloves
Flowers
F O Friday
Giveaways
Granny Square Project
Granny Squares
Guest Post
Hats
Holiday Stashdown
How To
I Love Yarn Day
Inspired Crochet
Jewelry
Kcco
Knit Lace
Knitting
Library
Mittens
Nirvana Designs
Patterns
Pincushions
Projects
Recipes
Sewing
Shawl
Shrug
Socks
Socs
Stash
Stitch Markers
Thread Crochet
Tunisian Crochet
Tutorials
Videos
Watercolors
Wip Wed
Wrap
Wrist Warmers
Writing In The Raw
Yarn
Yarn Along
Year Of Projects


Thank you for visiting!
My name is Robin. I am a wife, mother and strong believer in the power of faith. I'm a maker, a crafter and an artist. I love exploring new mediums and sharing my adventures with you.
Did you enjoy your visit? Let me know by leaving a comment. I love knowing you dropped by, and hope to see you again soon!
Be Blessed and
Stitch & Read with Love!