|
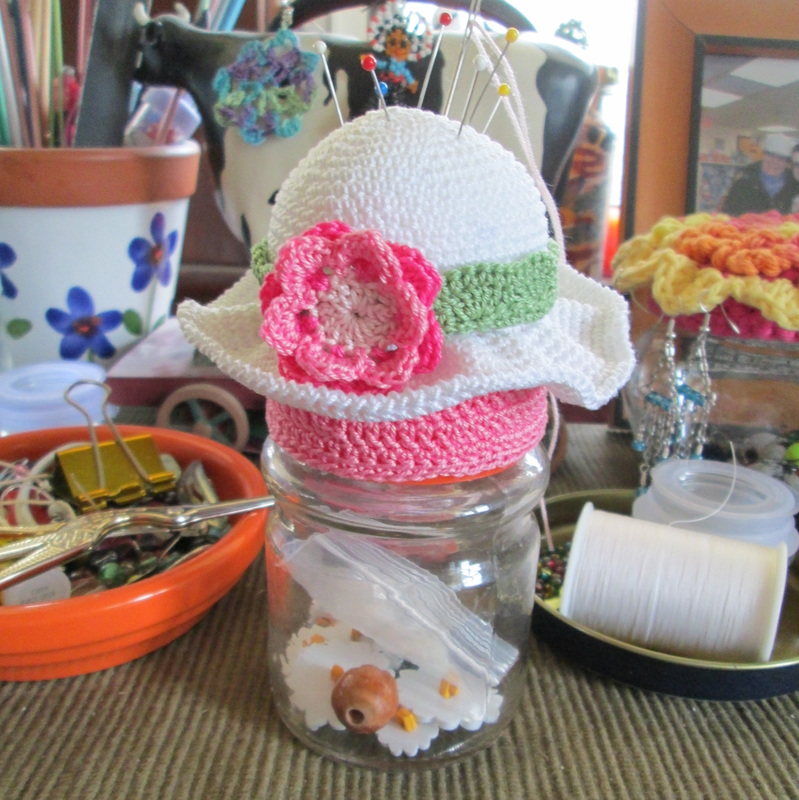
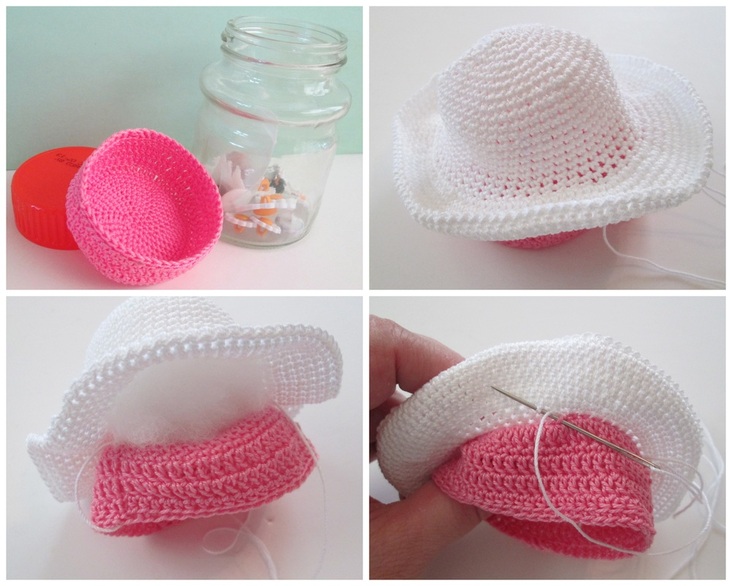
Hello Friends! It's a beautiful day in the neighborhood and while we may be smack dab in the middle of summer Mother Nature is finally cutting us a break! When it's hot out I tend to lean towards small thread projects to keep me busy. Lately I've been focused on pincushions. When I came across this little gem in the April 2013 issue of Crochet World I knew I had to make it. The original pattern is for a tape measure holder/pincushion. Of course I didn't have the same kind of tape so I needed to find something to use in it's place. At first I thought about just stuffing the bottom, and then I remembered the little jar in my sewing box that I'd been keeping stray buttons in. 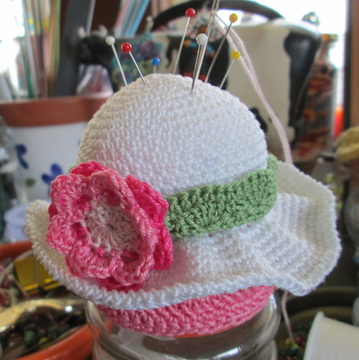 As it turns out it was just about the same size as the tape and minimal modifications were needed to make it work. I figured if I made the pincushion into a jar topper the bottom could be used to hold notions like a needle threader, safety pins, small spools of thread and even the stray buttons, making it into a handy sewing kit perfect for those little mending jobs. I followed the pattern through Rnd 8 of the Hat Bottom which is just a basic circle. I added one more round (following the established pattern) so that the circle was the same size as the top of the jar. Then I worked a round of sc in the front loops only. This give you the edge and you can start working down the sides. I worked 4 rounds of dc in both loops until it covered the top. I finished with a round of sc worked into the front loops to form a small lip. For the hat I followed the pattern again through Rnd 8, adding one more round just like I did for the base. This way I knew that when I sewed them together I'd have the same number of stitches on both pieces (54, I think). I did make one more modification. I used a different flower than the one indicated. I'm a fan of the traditional crochet roses so that's what I made using 3 different shades of pink.
It's a fairly easy project - the magazine says "Confident Beginner" and I'd agree. Even with the modifications it only took a few sittings. I almost forgot. I used a bit of fabric glue to secure the pincushion to the jar top. That way when it stays put when you open and close the jar. I'm quite pleased with the whole thing. It's quite charming and will certainly make a lovely gift. Well folks that's all for now! Thanks so much for stopping by and spending a bit of your day with me. Until next time friends, Be blessed and stitch & read with love!
5 Comments
pat ritchie
1/6/2015 06:36:30 am
I am soooo glad you were able to adapt my pattern for your personal usage. I know if you give this to someone as a gift they will love it...
Ana Lopes
9/7/2013 09:23:25 pm
Adorable! I love your pincushion! Thanks so much for sharing the great tutorial! Would love to have you visit my blog sometime.
Reply
Leave a Reply. |
I'm Robin and this is Click to see what's new on the Craftsy Crochet Blog!
Follow Along
Tutorials and Patterns
On InstagramPlaces I Post
Archives
July 2015
Categories
All
Thank you for visiting!
My name is Robin. I am a wife, mother and strong believer in the power of faith. I'm a maker, a crafter and an artist. I love exploring new mediums and sharing my adventures with you. Did you enjoy your visit? Let me know by leaving a comment. I love knowing you dropped by, and hope to see you again soon! Be Blessed and Stitch & Read with Love! |
