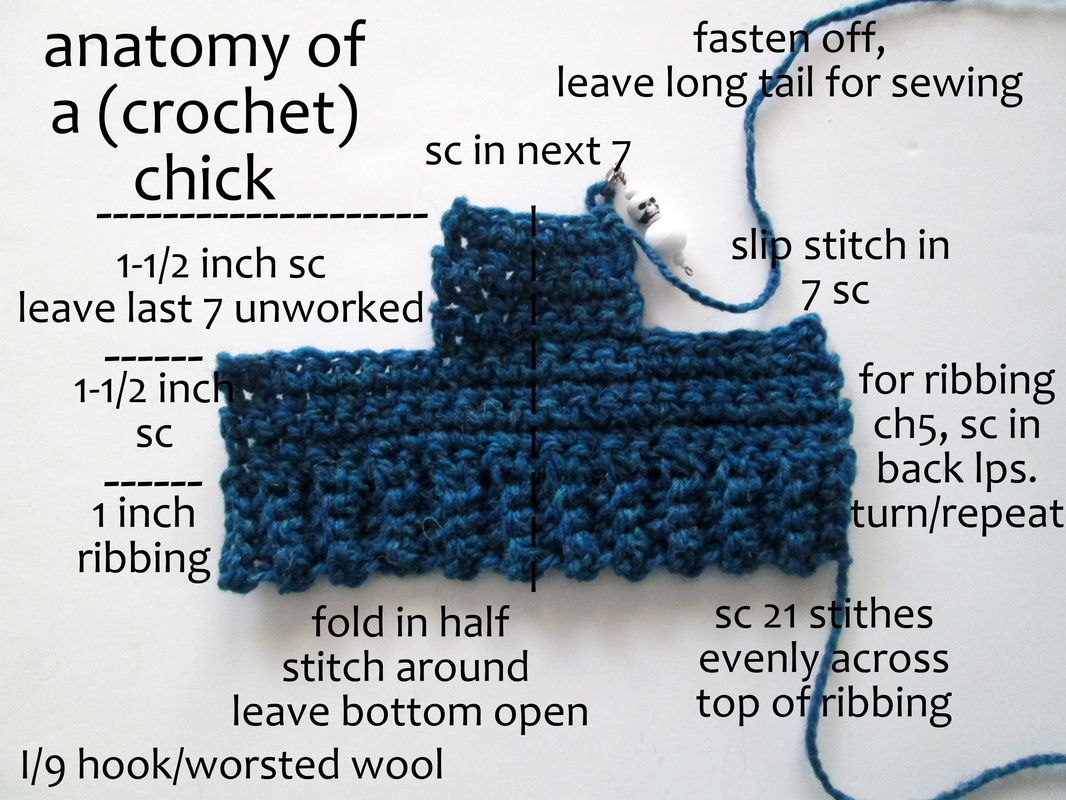
After looking over the pattern I realized that it would be a snap to covert to crochet. Isn't it something what a difference a year makes? How cool that I would be able to make these available to anyone who wants to make them!! Now no one has to be left out! As it happens, they are very easy to make no matter which technique you use. I made both of these and the egg in one evening. The ribbing on the knit version is snugger (is that a word?) so, to make the crochet ribbing tighter I ran a basting stitch around the bottom and pulled it in a little. Problem solved!
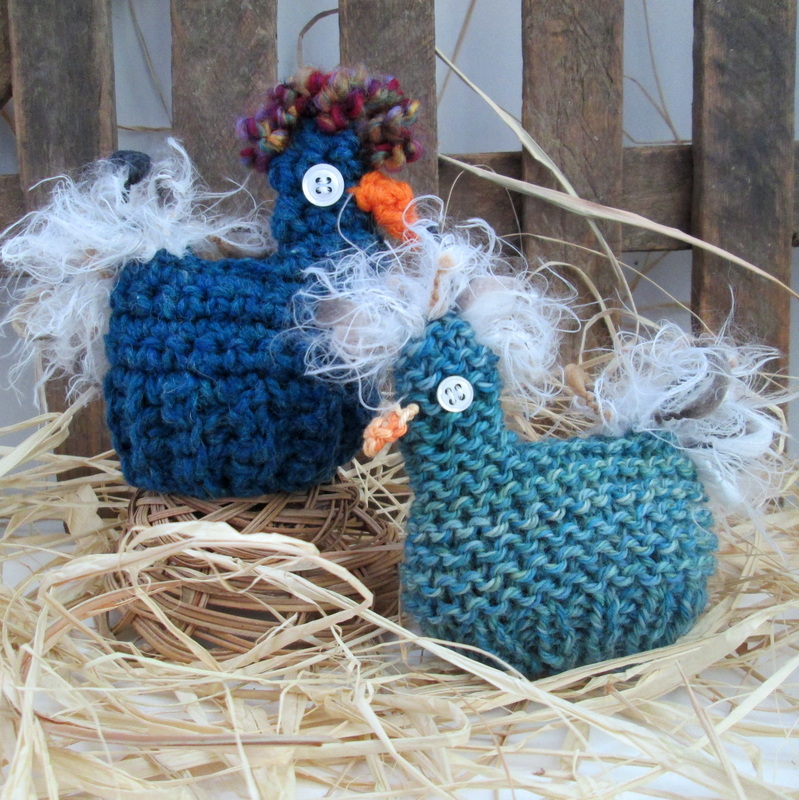
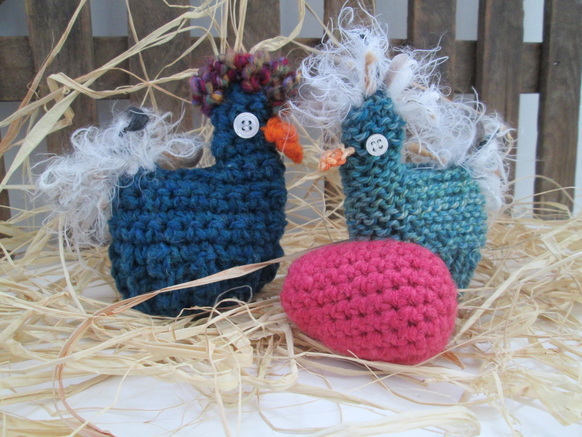
Embellishing them was fun too. At first I wasn't sure what to do. Since I don't have chickens the picture that came to mind was Fog Horn Leg Horn (we're big Looney Tunes fans here!) Anyway, I found this fuzzy, furry yarn (which I've could never figure out what to do with), and sort of stitched it in loops. I think the effect is great! I'm not crazy about the beaks though. In fact the knit chick had a "beak job" because the original one made her look like some sort of prehistoric monster chick, okay I'm overreacting a bit but it did look funny. Next time I might try a piece of felt instead. You really can let your imagination run wild or go for the simple look and make them in your favorite colors. No matter what you do, I'm sure that they will look terrific. 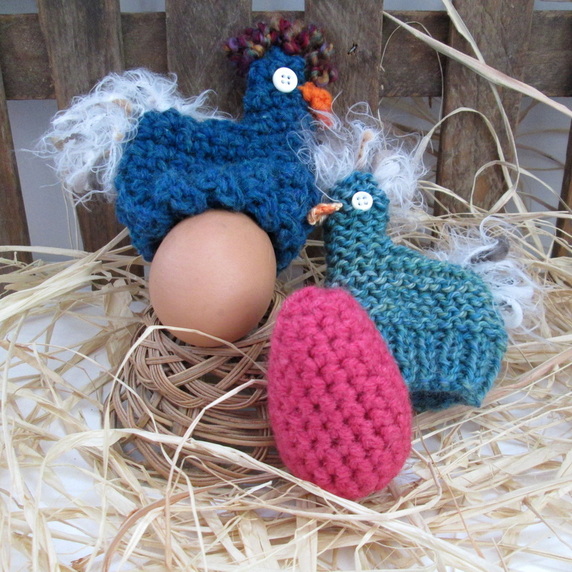
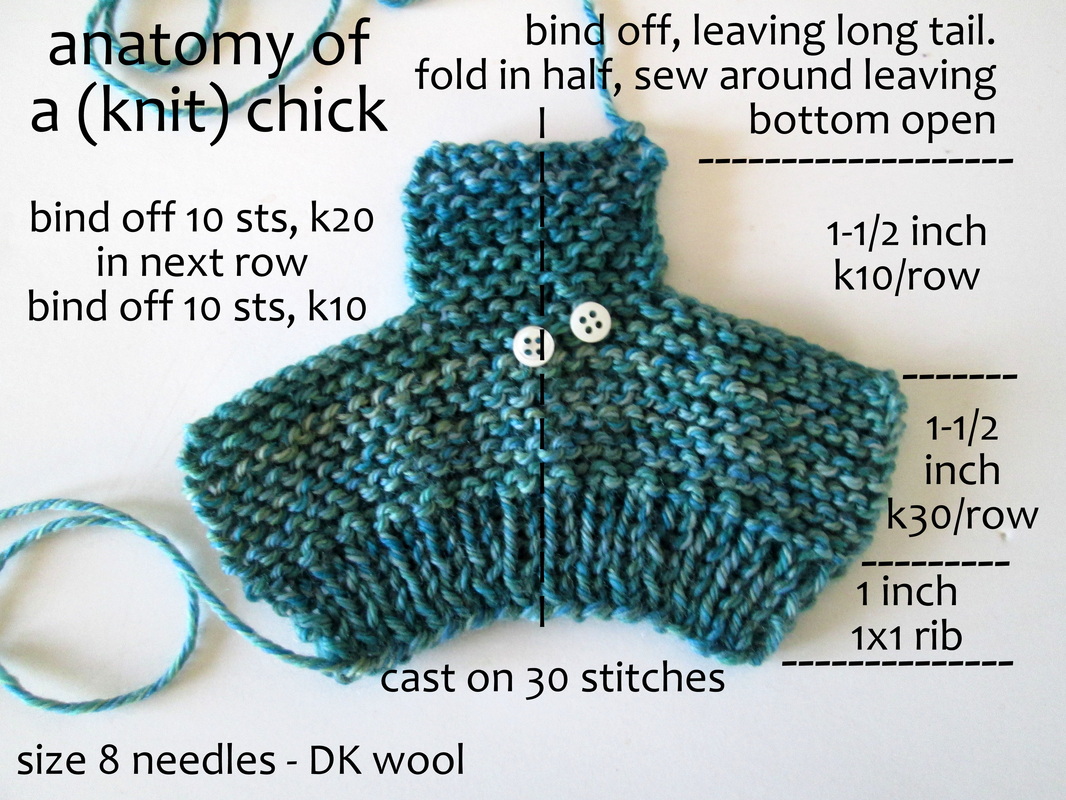
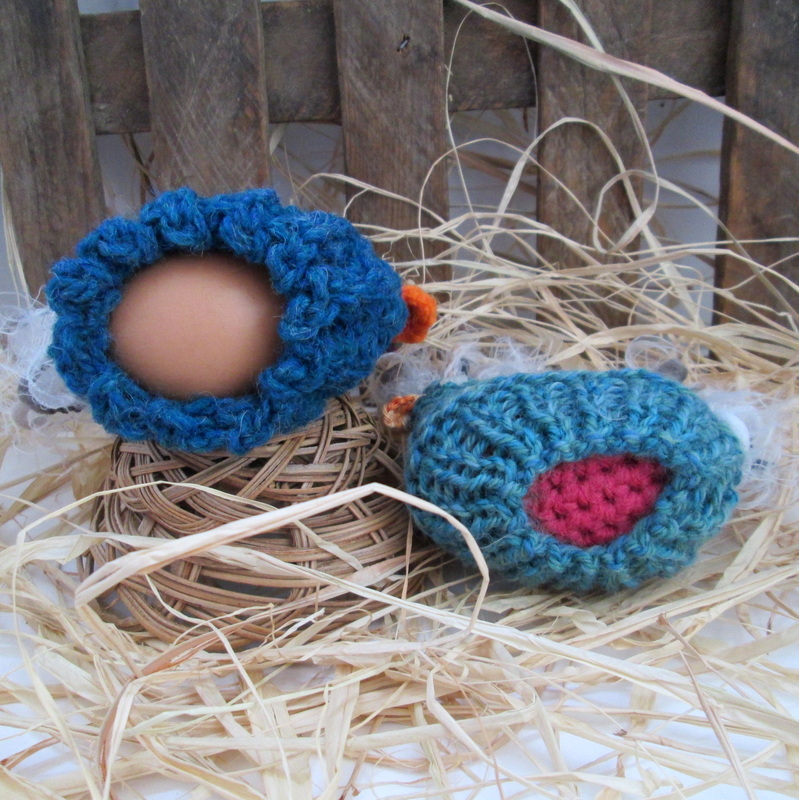
I love that they sit atop the eggs. For me that's why I found them so endearing. I'm not sure what it is about little "surprises" like that make me say, "aaawwwhh", but I can't help myself! They're a perfect fit for the crochet eggs, or you can fill a plastic egg with candy for a super sweet treat. I'm including a downloadable PDF of the crochet pattern that you might find useful as well as the egg pattern. I didn't bother to write out the knit pattern. I was able to follow the diagram, and I'm sure you can too. With any of them, please let me know if you have questions. I'm new to pattern writing, and apologize in advance for any mistakes or confusing instructions! Well my friends that's all for today. Have fun with your creations! I'd love to see pictures of your lil' chickies. You can post them on my Facebook page and we can all "aaawwwhh" them together.
Thanks so much for stopping by and spending a bit of your day with me. Until next time, Be blessed and stitch & read with love!
5 Comments
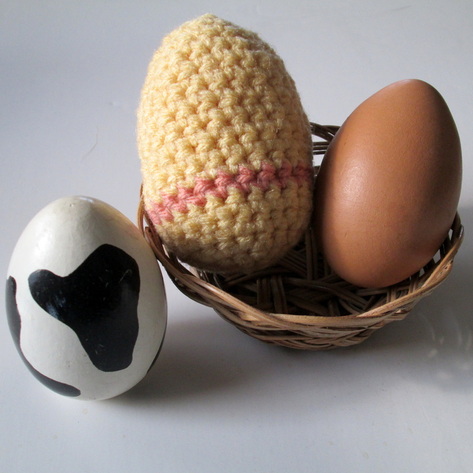 Greetings Friends! I hope that this first day of the vernal equinox finds you with a spring in your step! It's cold and blustery in New England with the remnants of the most recent snow storm visible at every turn. I'm optimistic though that the sun will soon shine brilliantly and before long it will only be a memory (the snow, not the sun!). Enough of the weather chat and onto the eggs. What about them you ask? Well, this morning I realized that while I had been thinking about Easter and the Resurrection I hadn't given much thought to the other side of Easter. With the bunny, jelly beans, chocolate and of course eggs. Since our son is a teenager the days of pastel baskets, shinny cellophane grass and copious amounts of candy for breakfast are (sadly) behind us. I wanted to do something though, so I decided to crochet myself an egg. I also thought it would be fun to share the pattern with the knitting/crochet group who meet at the library on Wednesdays. And if I'm going to share with them, of course I'm going to share with you! It's quite easy and took about half an hour to finish. Without further ado here you go: An Easy Crochet Egg Pattern 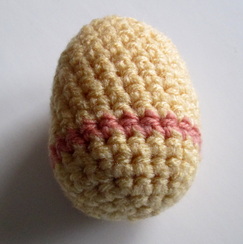 Gauge isn’t important so feel free to use whatever you have handy. For this extra-large egg I used: F/5 – 3.75 (US) hook Bits of worsted acrylic from the stash Left over fiber fill for the stuffing, but most anything soft will work (cotton balls, bits of yarn etc.) Stitches and Stuff: Single Crochet (sc) Single Crochet 2 Together (sc2tog) – Insert hook in stitch and pull up a loop, insert hook into next stitch and pull up another loop (3 loops on hook). Yarn over, and pull through all 3 loops. One stitch decreased. Eggs are worked in continuous rounds – do not join. Use a marker at beginning of the round and move it up as each round is completed. To Make the Egg: With color of your choice – ch 2. Rnd 1: 6 sc in first ch. Place marker in 1st st to mark beg of rnd; move marker up as rnd is completed. Rnd 2: 2 sc in each sc around. (12 sc) Rnd 3: *2 sc in next sc, sc in next sc; repeat from * around. (18 sc) Rnd 4: *2 sc in nxt sc, sc in next 2 sc; repeat from * around. (24 sc) Rnd 5 – 12: Sc in each sc around. Rnd 13: *Sc2tog, sc in nxt 4 sc; repeat from * around (20 sc). Pull tail from starting chain into the egg, and begin stuffing. Continue stuffing as you go until it’s firm and holds its eggy shape. Rnd 14: *Sc2tog, sc in nxt 3 sc; repeat from * around. (16 sc) Rnd 15: *Sc2tog, sc in nxt 2 sc; repeat from * around. (12 sc) Rnd 16: *Sc2tog, sc in next sc; repeat from * around (8 sc). Keep stuffing! Rnd 17: (Sc2tog) around. (4 sc) Fasten off, leaving a long tail. Weave the tail through the stitches on top to close the opening. Knot the end and the weave into the egg to hide. If you make stripes, make sure to pull the ends into the egg before stuffing (it’s easier that way!) There you are! A great way to use up some stash scraps. Imagine how cool they'll look in variegated yarns. I was also thinking that you could embroider designs on then too. I created a PDF if you want to download it for later. Well friends, that's all for now!
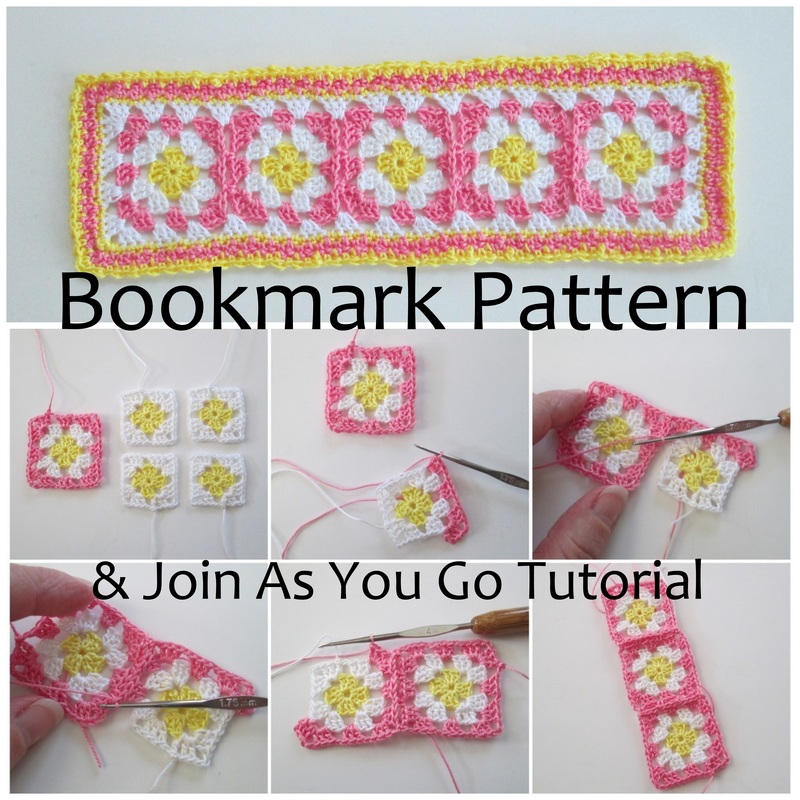
Thanks so much for stopping by and spending a bit of your day with me. Until next time, Be Blessed and Stitch & Read with Love! PS: There's still time to enter the book raffles. Check the links on the side bar if you haven't already!! Quick, Easy and Awesome Bookmarks! 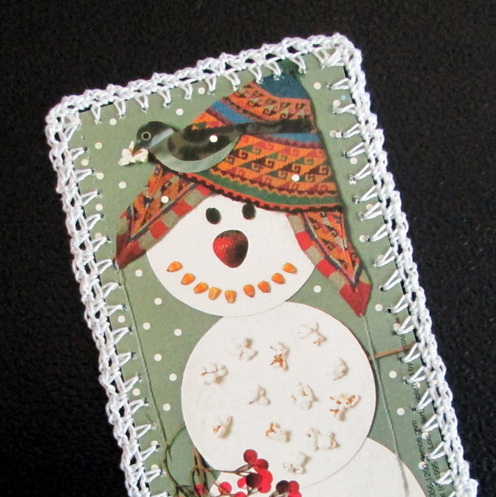
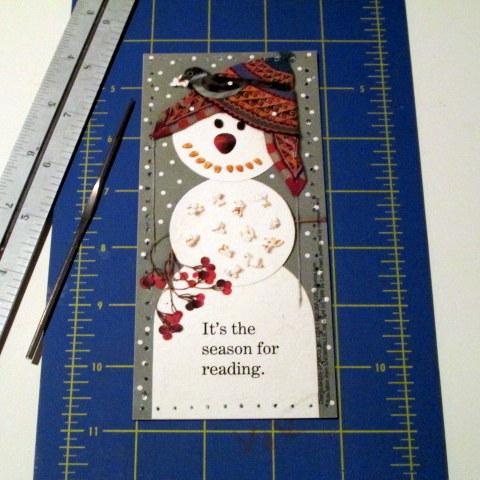
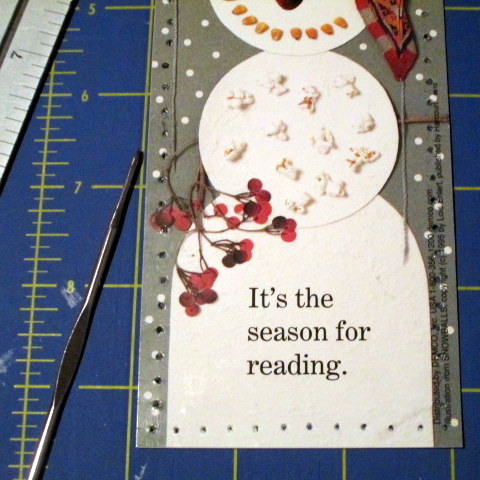
Greetings Friends! Isn't this country snowman just adorable? I knew when I saw this bookmark at the library that it was the perfect candidate for a little paper crochet. Back in December I tried out the Sharp Hook (here's the post), and I knew that it would be just right for this project. One of the advantages of the SH is that most of the time you don't have to pre-poke your holes. While this can be convenient, I was having difficulty getting the holes in the right spot. In order to come up with the same number of evenly spaced holes I had to use a ruler. I tried to poke the holes as I went, but that didn't work very well. I ended up marking them 1/4 inch apart first and then doing the poking. It was a little painful for the finger on the "other" side until I remembered my leather thimble! With appropriate protection I was able to move along quickly!
The bookmark is made of card stock and only printed on one side. I glued two together because I thought it would look better being double sided. Even with the two, I'm sure you would be able to make the holes using any small steel hook. Just get them started first, and definitely use (finger) protection!!
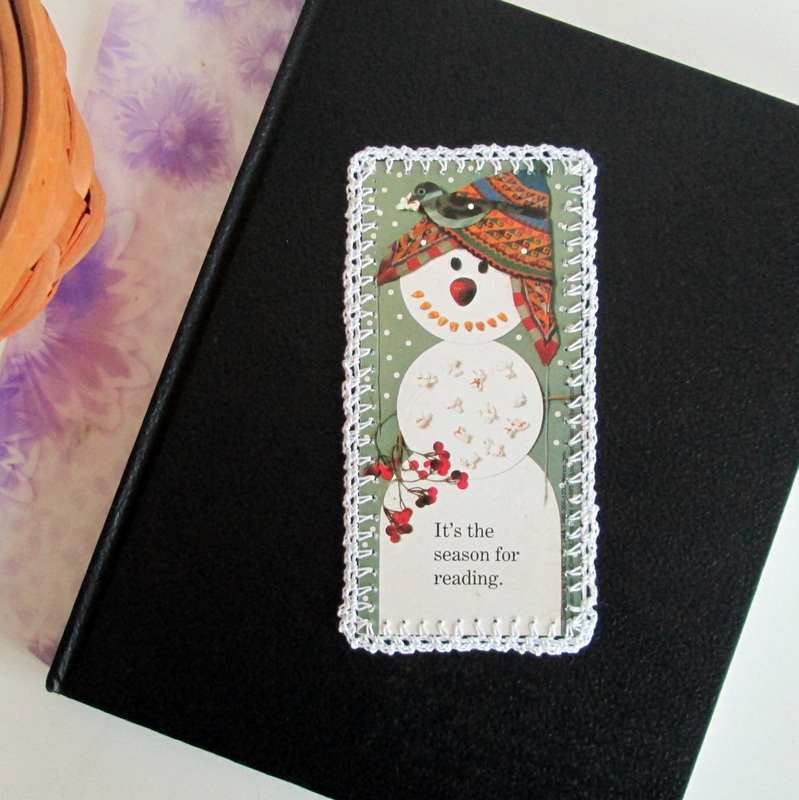
This is the first time that I combined paper and crochet. It really is an easy project, and I'm sure there are more bookmarks in my future. The hardest part is marking where the holes go, and that's more tedious than anything. I can see using this technique to embellish handmade cards, or holiday ornaments. To add a border to a wall calendar. Or, even use it on photographs to create a unique frame. Like anything in crochet, the possibilities are only limited by the imagination!
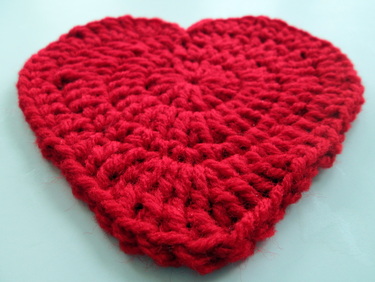
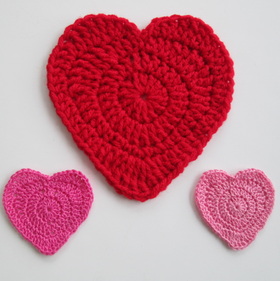
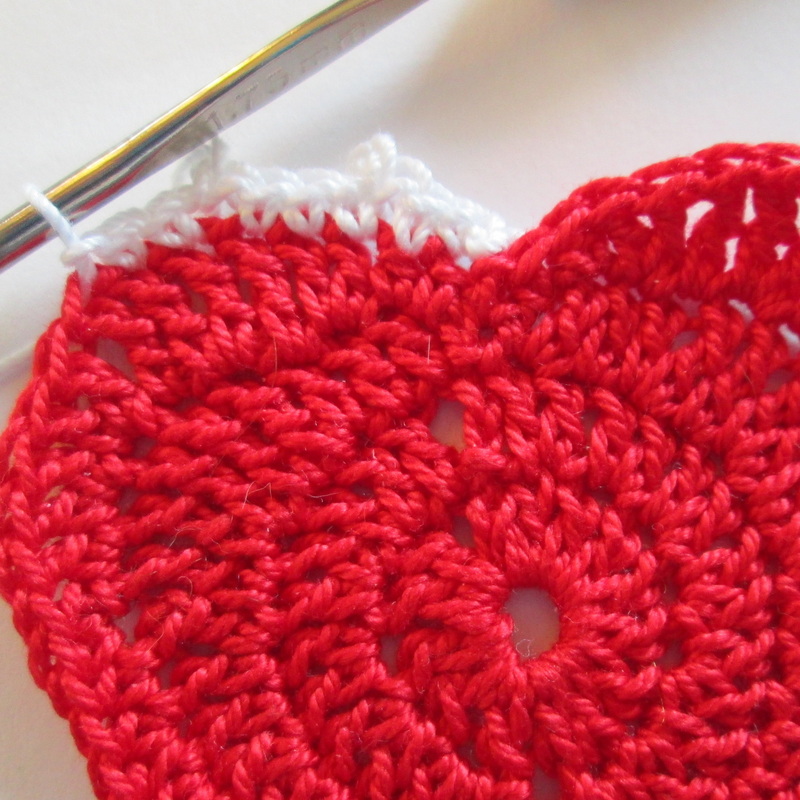
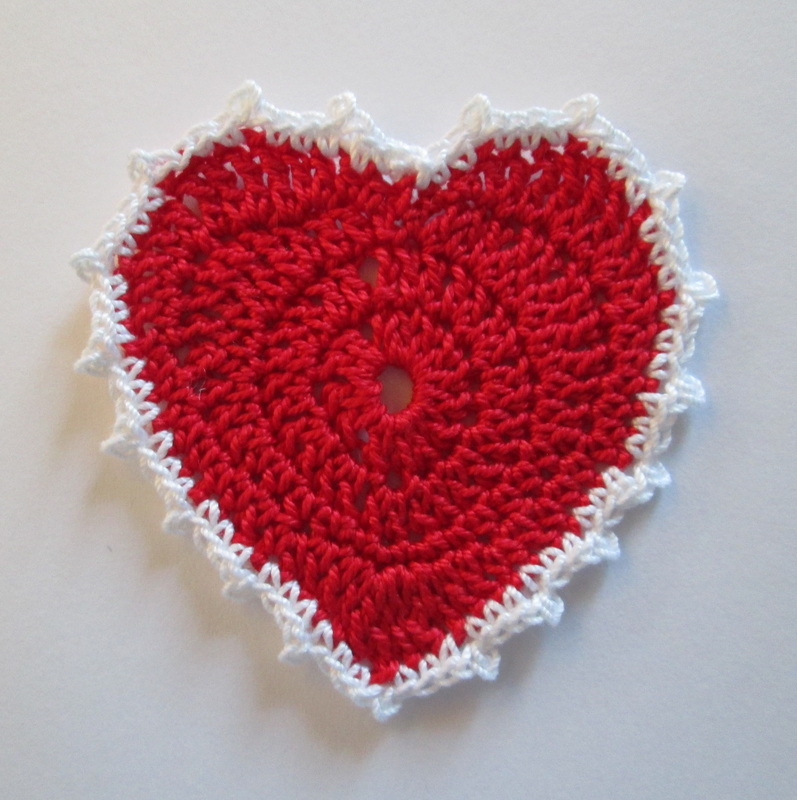
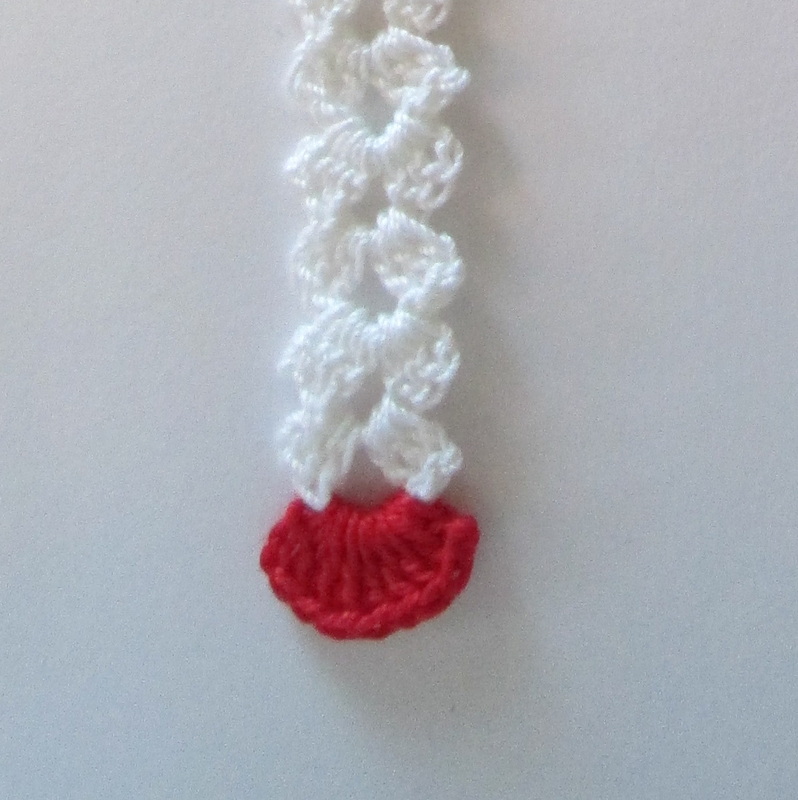
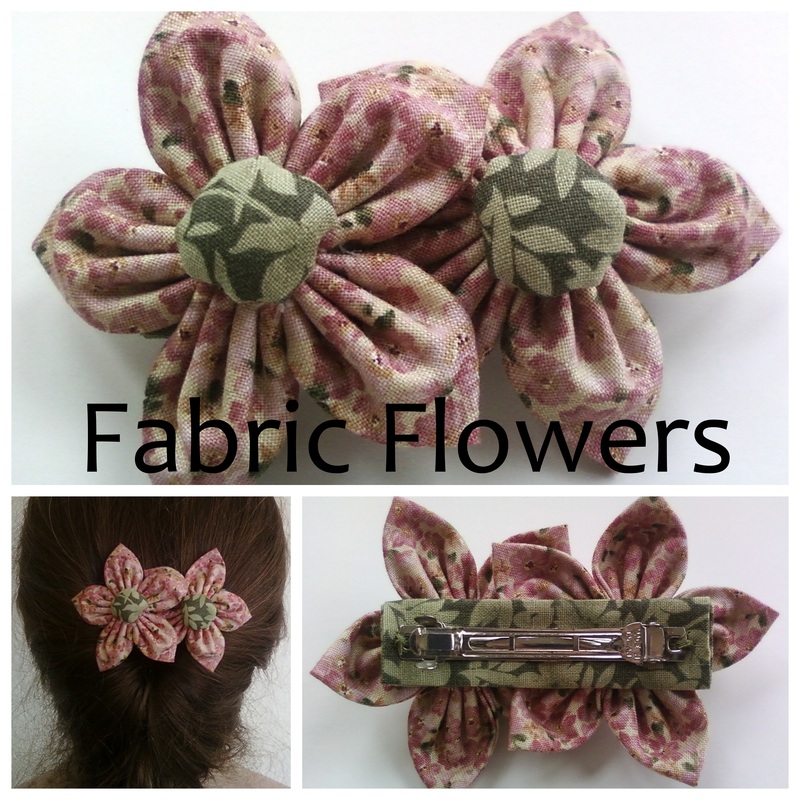
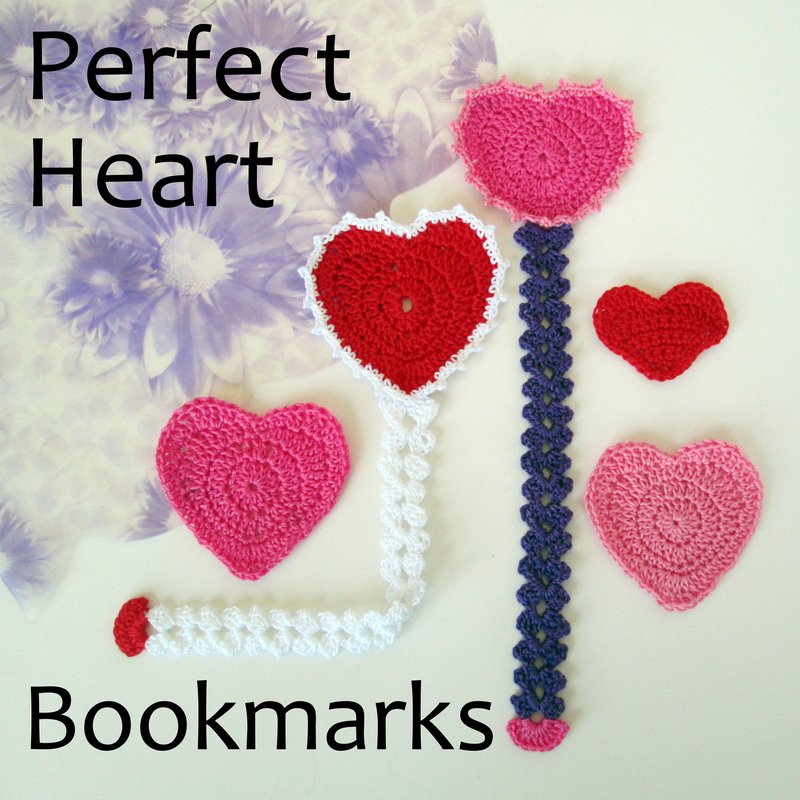
Where will your imagination take you? I'd love to hear your ideas for combining paper and lace! Thanks so much for stopping by and spending a bit of your day with me. Until next time friends, Be blessed and stitch & read with love! "A kind heart is a fountain of gladness, making everything in its vicinity freshen into smiles." ~ Washington Irving (1783-1859) Perfection. We strive towards it. We practice to achieve it. In matters of the heart it is often elusive. But in crochet, all things are possible. And so I set out to crochet a perfect heart. There are patterns that make them in the round and those that work them in rows. Some came close, but nothing gave me exactly what I was looking for. I knew that creating a perfectly symmetrical heart was a matter of diligence, patience, and little geometry. I learned a lot from all the different versions I made. Using the elements that worked the best from other patterns and through lots of trial and error this beauty came to life! I made my thread hearts into bookmarks, and I included the instructions here so you can make them too. If they're not your style there are lots of other things you can do. Thread hearts can be attached to a card with ribbon and given as a lovely Valentine. Sew them onto a shirt, hat, jacket or pants pocket. Sew 2 together and stuff for fluffy hearts. Add a little cat nip to make a treat for you favorite kitty. Attach one (or more) to a hair clip, barrette, or head band. Hearts made with worsted weight yarn and an H hook are the perfect size for a coaster. Add personalization by stitching you and your love's initials with embroidery floss. Embellish them with terms of endearment (like the Sweetheart's Conversation Heart candies). Or just make them because they're fun and easy!
The heart in the pattern is made with #10 cotton thread and a #4/1.75 mm steel hook. It measures about 2.5 inches x 2.5 inches. The large heart in the picture above is made with worsted weight acrylic and an H/5.00 mm hook. It measures about 5.5 inches x 5.5 inches. You can make them with whatever yarn or thread and hook makes you happy.
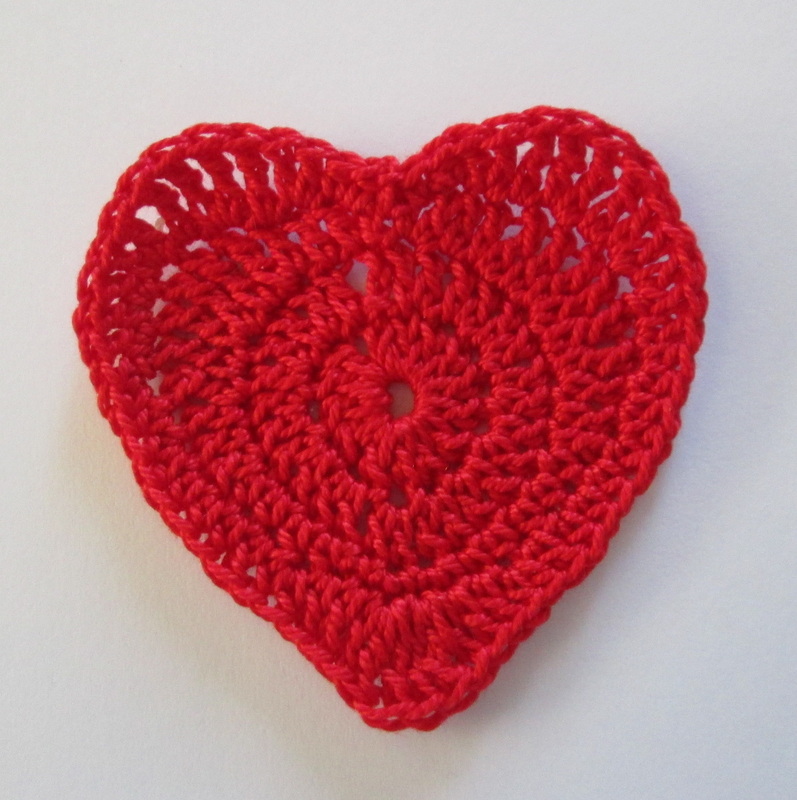
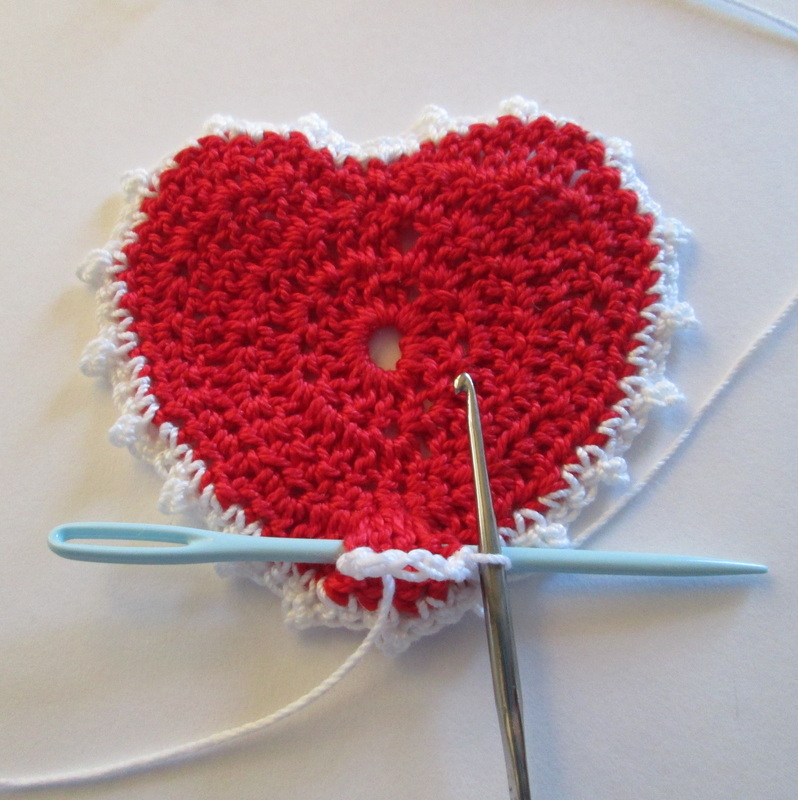
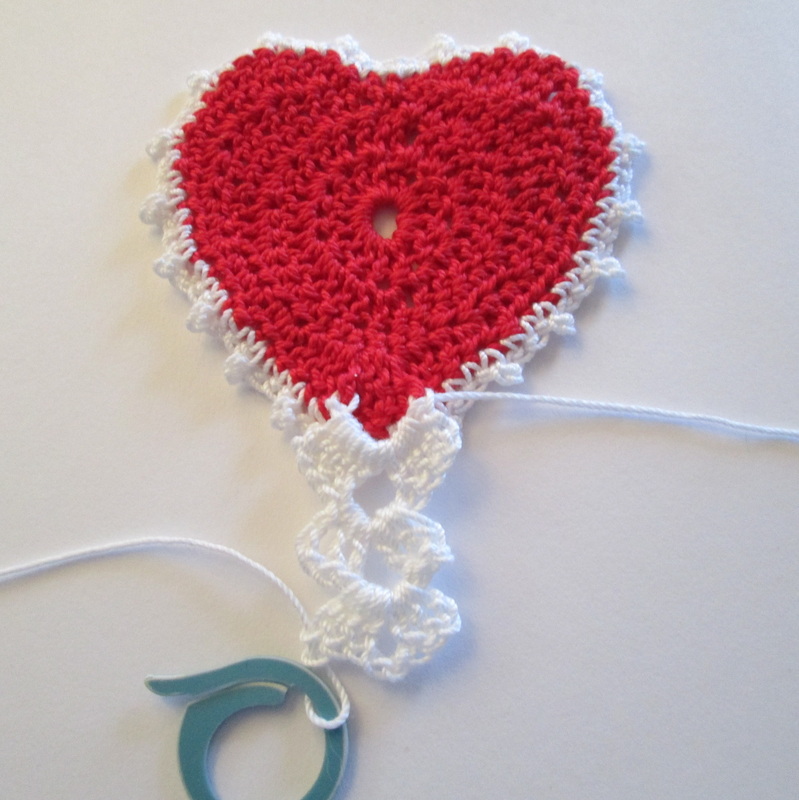
Now turn it into a bookmark...
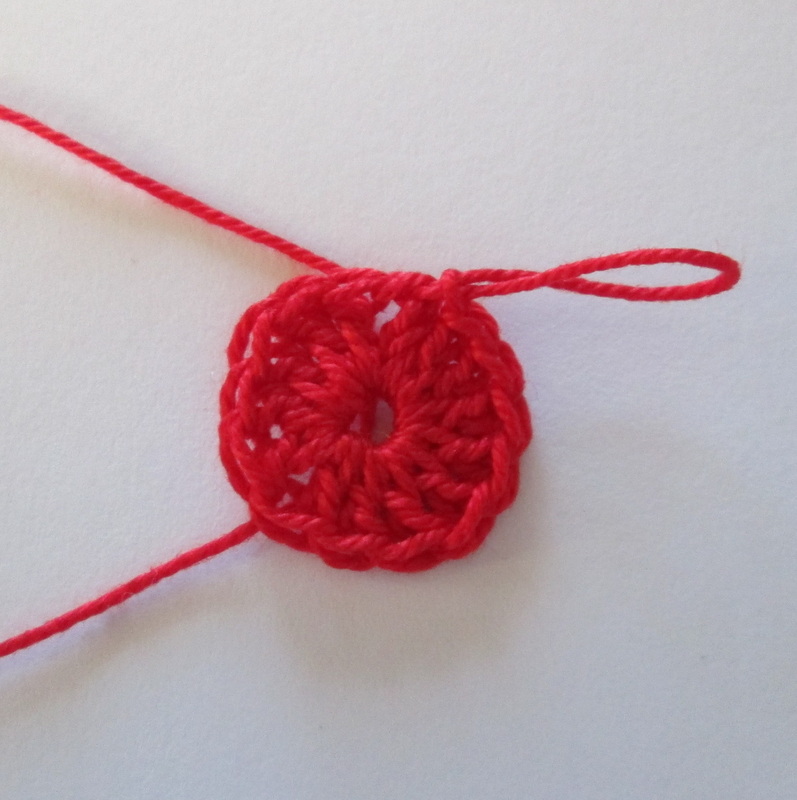
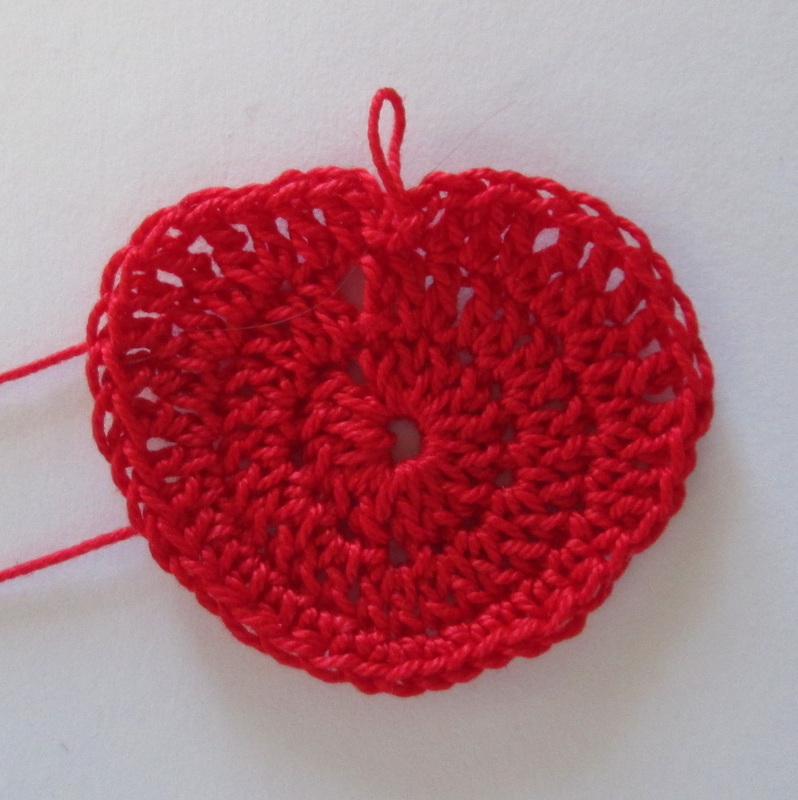
No matter what you do with your heart, I hope it fills you with gladness and brings you a smile! It's easy to loose your place when working rounds 3 and 4 so I created a PDF that you can download. I point the corner of a sticky note at each step/stitch and move it to the next after working it. Then if I have to put my work down I know where to start! Thanks so much for spending a bit of your day with me. Until next time friends, Be blessed and stitch & read with love!
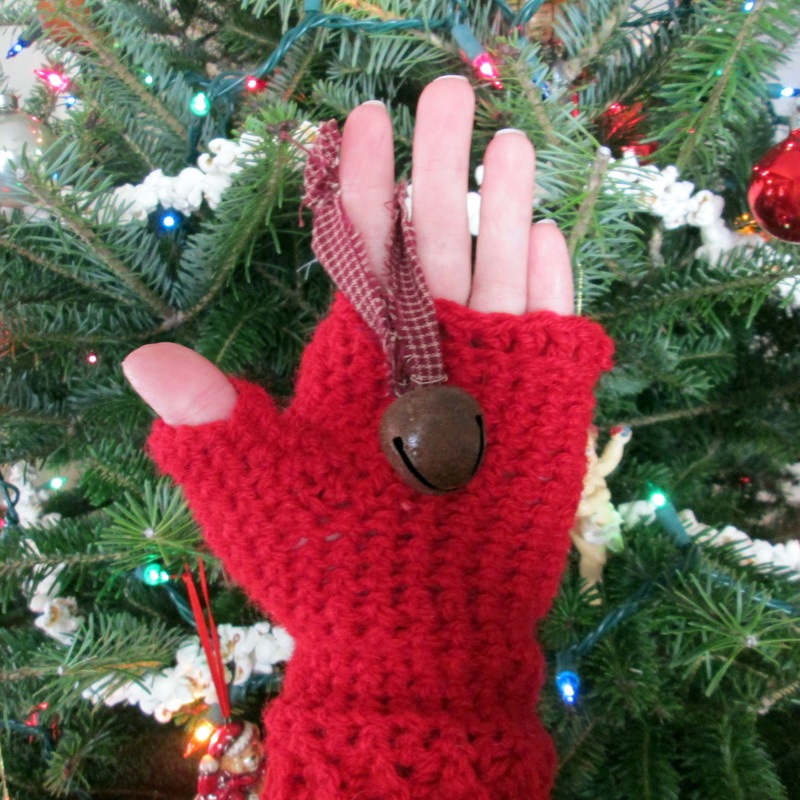
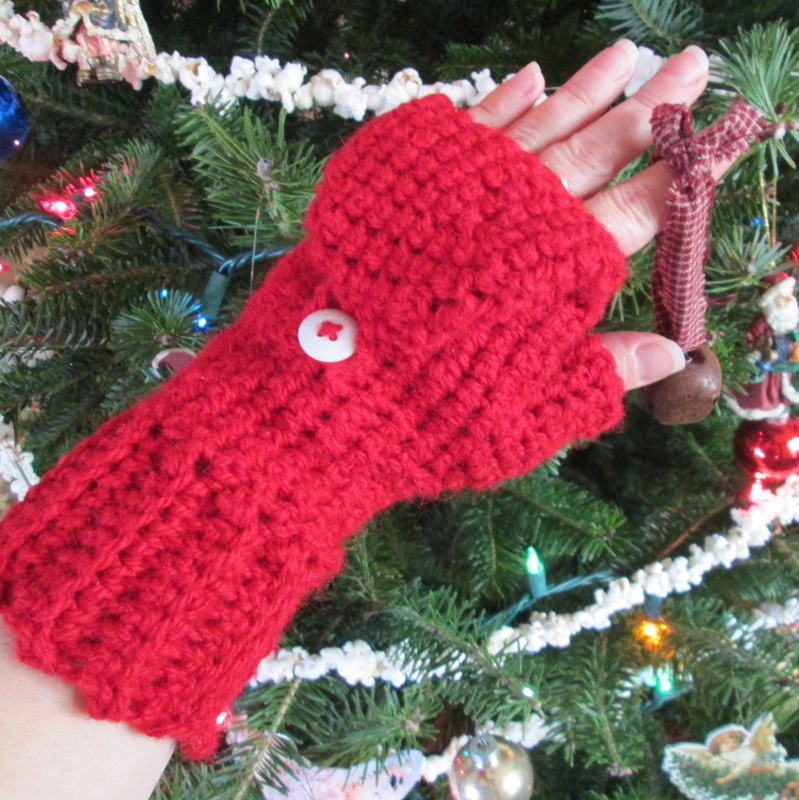
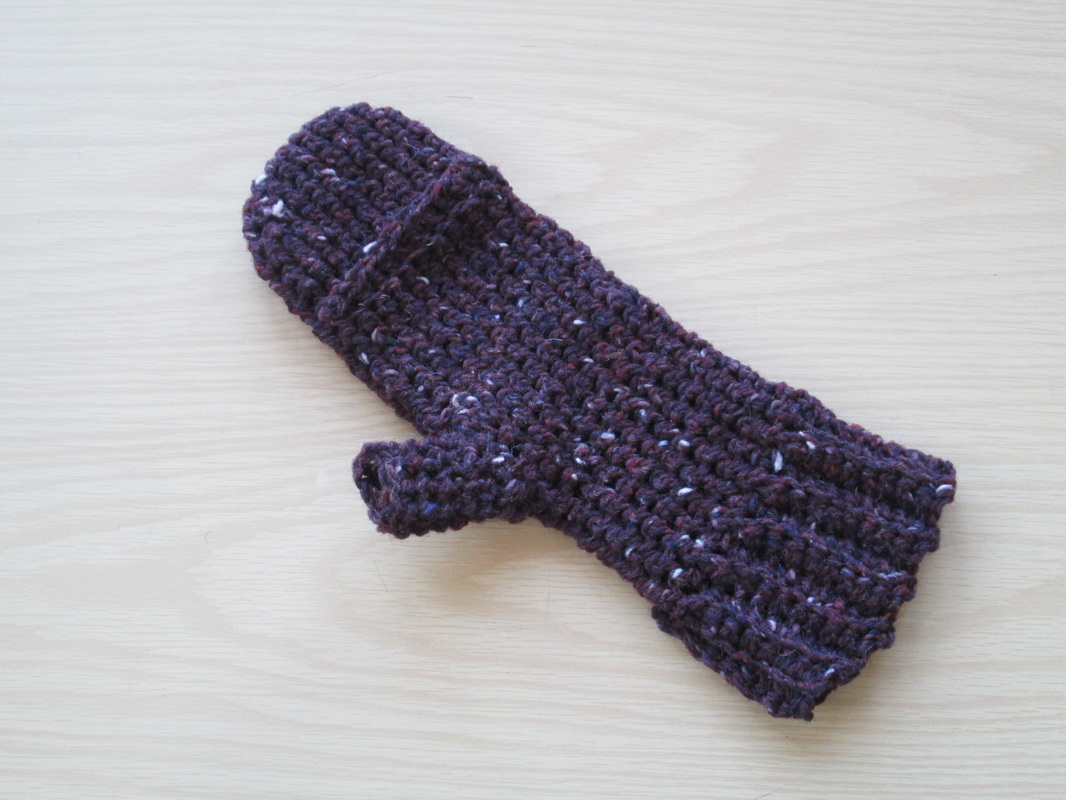
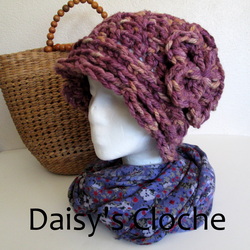
and overcoming my fear of pattern modification! 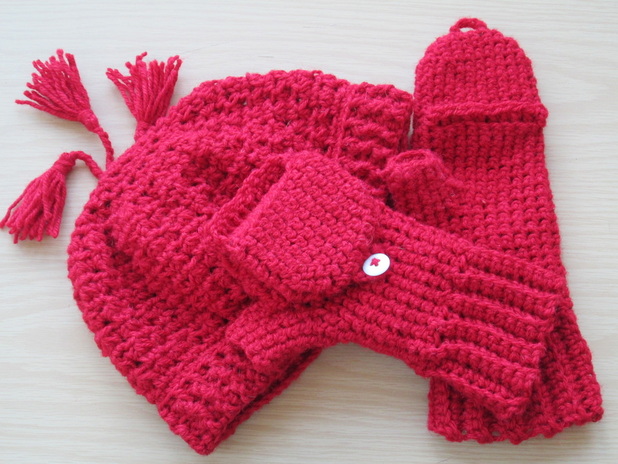 A wooly ensemble perfect on a snowy winter day!  This is one of my favorite pictures. Greetings Friends! It's snowing in Massachusetts so it seems appropriate that today's post is about things that keep you warm! Do you remember this picture from back in November? After ripping the mitten apart several times for various reasons (like: it was too small in the cuff, too wide in the palm, too spacious in the thumb, too pointy at the top, the finger opening was off center, etc, etc, etc...) I finally had a mitten that I was happy with. Well, after I took off the daisy button and replaced it with one in plain white. Of course by the time I was done I was so tired of working on the mitten that I set it aside in lieu of something different.
As the weather became consistently cooler it was time to give my mitten the mate it had patiently been waiting for. I found my marked up December 2012 issue of Crochet World magazine still open to the Texting Mittens. This is first time that I actually made multiple changes to a pattern to make it fit better. I've done things like add rows to make something longer, or used a magic ring instead of joining a chain into a loop. But never anything like this. I've always been afraid that making one change would through things off later in the pattern. This time though I just went for it. I figured the worst that would happen is I'd rip it out and try again. Which I did many, many times before I got it right! Thankfully I was wise enough to take ample notes of the changes. One of the most important lessons I've learned is to ALWAYS write down everything in detail. No matter how much I like to think that I'll remember what I did, the truth is I have no hope whatsoever of that happening. I can't even remember what hook I used, let alone how many stitches I deleted or added! I was able to decipher my scribbles and diagrams and in relative short order I had a (matching) pair of mitts! I was so excited to wear them for the first time along with my coordinating Tassel Hat (from Voie de Vie's Accessories: Autumne 2012 Collection).
Does this sound familiar? If it does, I really encourage you to step outside your comfort zone and just go for it. Eventually you're sure to come up with changes that suit your needs. And even if you don't imagine all that you'll learn about what not to do!! Did you notice that there is only one purple mitten in the picture? Are you wondering where the other one is? It's the same old story. I spent so much time finishing the red one and then on the pattern mods and making sure it works that by the time I finished testing it out I was tired of making these mittens and moved onto something new!! Of course now it is in the basket next to the chair taunting me. Telling me I have no excuse and that I really should be able to whip it out in an evening or two. Will I listen and finally get it done, I'm sure I will. I just don't guarantee that there will still be snow on the ground when I do!!
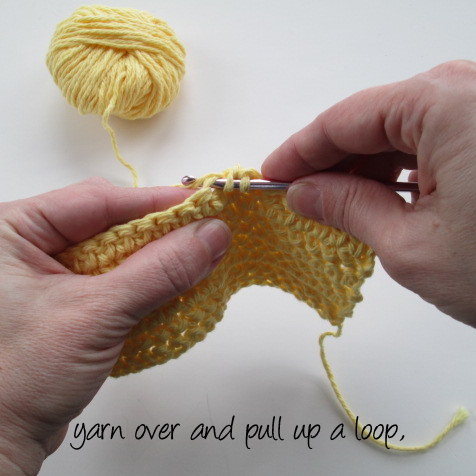
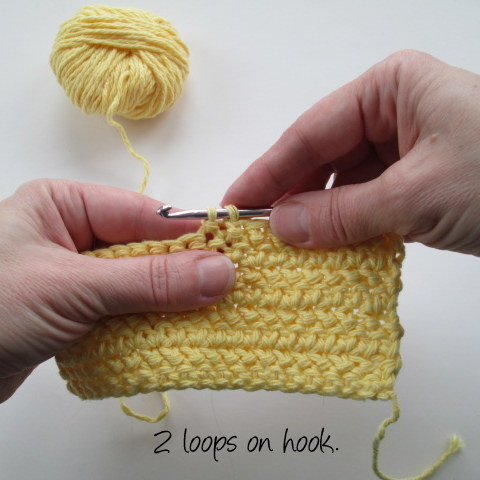
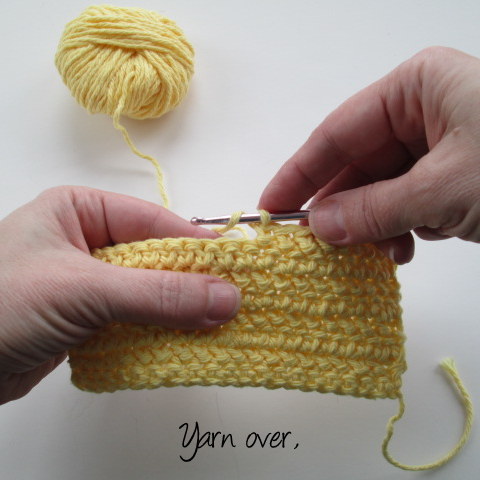
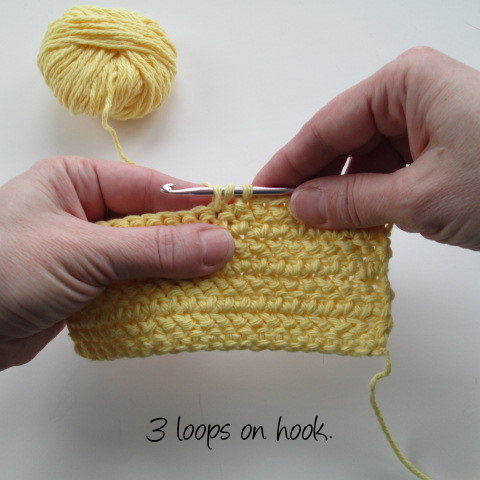
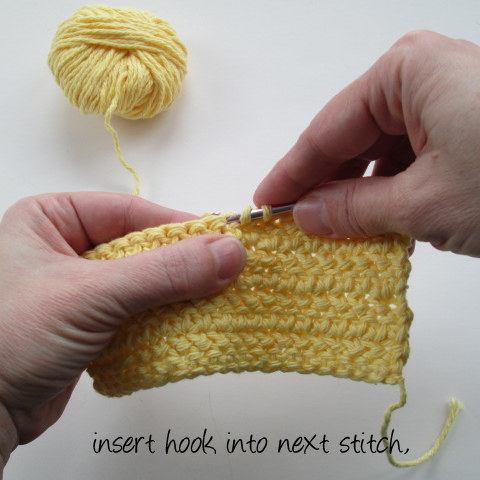
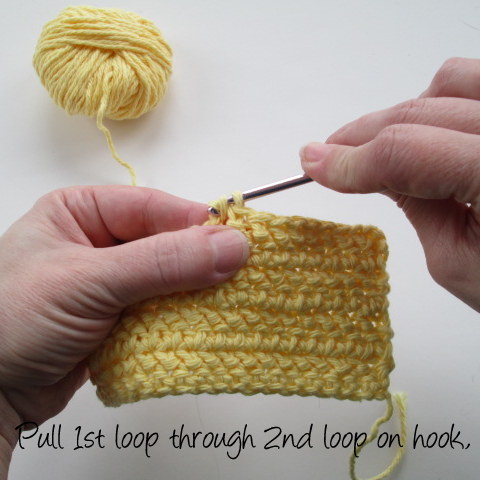
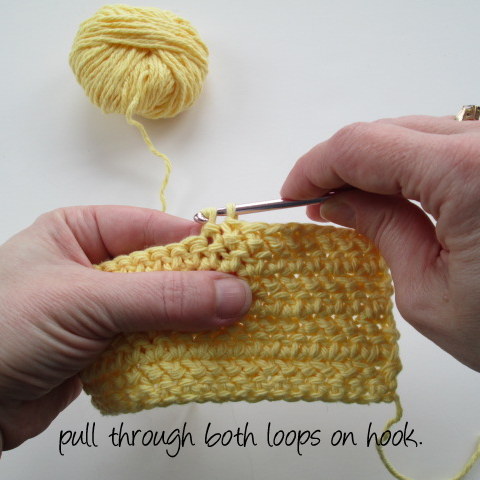
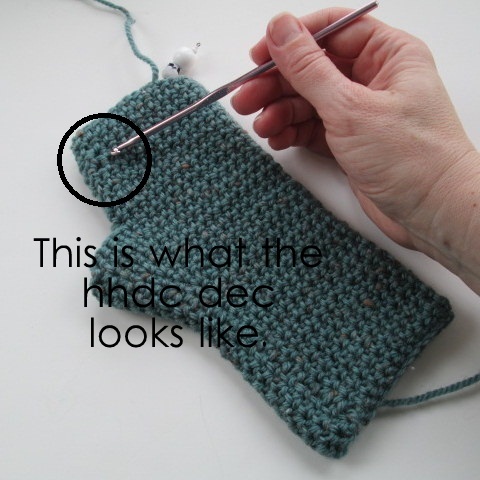
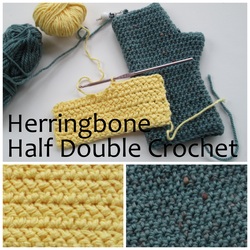
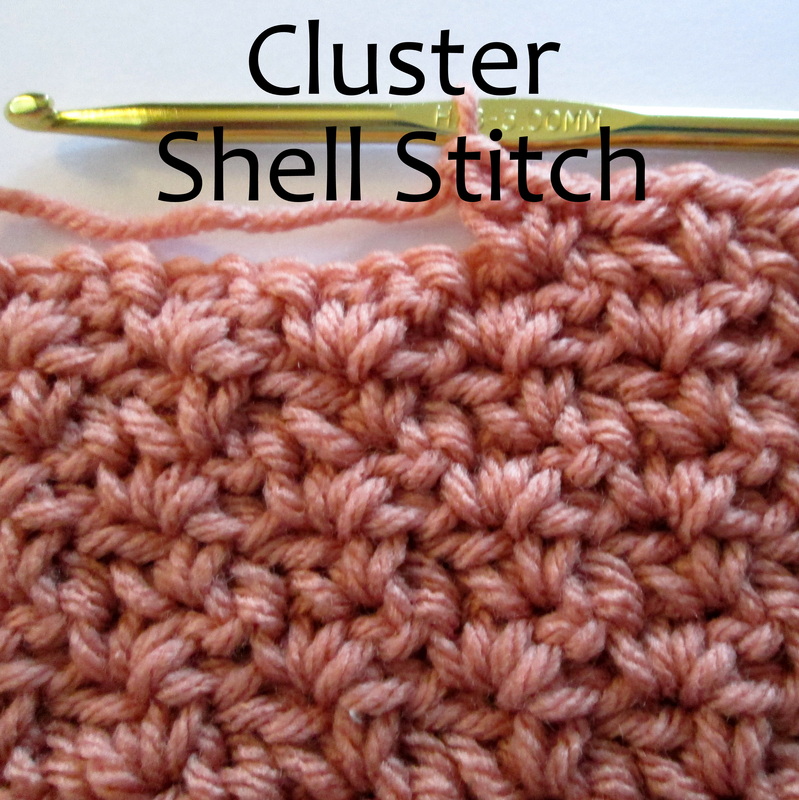
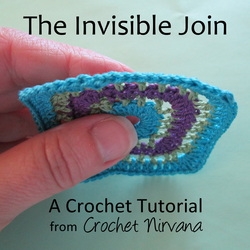
Well my friends, that's all for now. Thanks so much for stopping by and spending a bit of your day with me. Until next time, Be blessed and stitch & read with love! By the way, just in case you're interested here is a downloadable PDF file detailing my modifications. If you happen to give it a try please let me know. I'd love to hear how it goes. I'd also like to hear about how you handle modifications. Do you stick to the pattern or do you try different things and make it custom? Were you always brave or were you a fraidy cat like me? 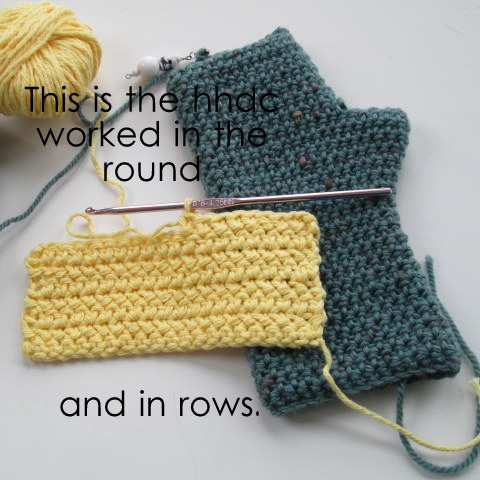 Greetings Friends! Today I want to tell you about an awesome crochet stitch called the Herringbone Half Double. I was introduced to it a while ago in a pattern for fingerless mitts (Firecracker Gloves). Truthfully at the time I was new to crochet and found the stitch awkward. I never finished the gloves, and the pattern was forgotten. Earlier this week a series of unrelated events led me to discover the pattern stashed in a pile of old papers. It was crochet serendipity since I wanted make a pair of fingerless gloves to help combat the cold at work. I got started and discovered the stitch that once seemed difficult was now fun and interesting. After a few rows I found my rhythm and the yarn was gliding off my hook. The fabric that it produces is smooth and dense, perfect for gloves. Worked in the round it reminds me a bit of the fabric that the basic Tunisian stitch produces. Worked in rows it creates the herringbone design. I think that it would look lovely in a cardigan and it can probably be used in any pattern that calls for a standard half double crochet without much (if any) adjustment. Learning new stitches is one of the things that keeps me interested in crochet. For anyone who might be new to this one, or in case you need a refresher I put together this picture tutorial to encourage you to give it a try. At the end of the post are links to PDF files that you can download demonstrating the basic stitch as well as the increase and decrease. Working the Herringbone Step-by-Step
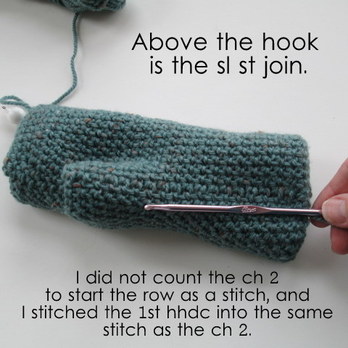
 I also want to show you how nicely this stitch seams together when working in the round. Typically I prefer working in a spiral to avoid the gaping, obvious seam that you get when joining rounds with a slip stitch.
The join blends in so well that it's hard to tell where it is unless you're looking for it. I've found that most patterns tell you to count the starting chain as a stitch. By working the first hhdc into the same stitch as the ch 2, and then joining the last stitch with a sl st to the first hhdc there's no gap. I will definitely try this technique on other patterns. There you have it! I sure hope that you give this versatile stitch a try. If you're a beginner, be patient and give yourself time to get used to the movement. It's not hard, it just feels different than what you might be used to. Let me know if you've ever made anything using this stitch. I'd also love to hear about other stitches that you think I should try.
Thanks so much for stopping by and spending a bit of your day with me.
Until next time friends, Be blessed and stitch & read with love! or why I found it necessary to relax, regroup and refocus for the new year...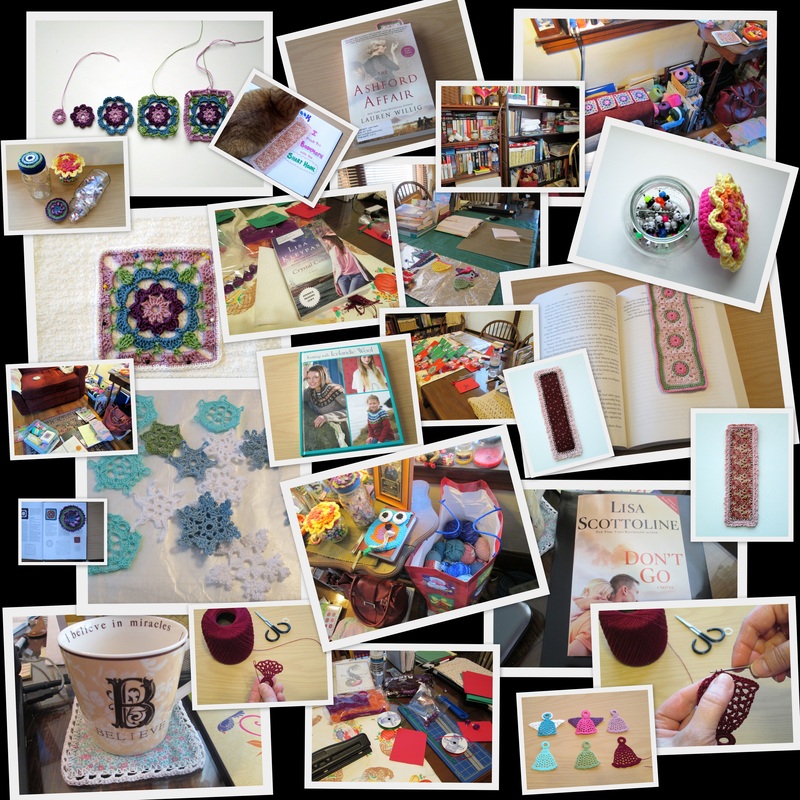
Here's a sneak peek at some of the projects I've got in store for you!!
Greetings Friends!
How are you?! I've missed you all so much! I trust that you glided smoothly through the holidays enjoying all the good things and letting the rest slide? Things at our house were low-key and pleasant. I made a point of focusing on what's really important (like family and the true meaning of Christmas) instead of getting tricked into thinking I somehow had to create the perfect "TV Christmas" with tons of gifts, over the top decorations, mountains of food and a houseful of jovial guests. That we were all sick with the worst cold/flu/bug we've had in years made it even easier to adjust expectations! Happily we have all recovered and it feels terrific to be getting back into the blogging zone. My self imposed hiatus from blogging and computer use in general has allowed me to evaluate my goals for 2013. This is really important because as the title of the post indicates, by the end of the year I was feeling woefully unable to successfully navigate my world of crochet, books, family, and work. I was trying to do so many things it was inevitable that they would all suffer and so would I. Giving myself time to simply relax and enjoy the activities that fill my world turned out to be the best present ever. I worked on and completed all kinds of crochet projects (plus read several books!). Now I have lots great material for blogging. That was one of my biggest worries - that I was running out of interesting things to write about. I mean really, how many Wednesdays do you want to see the cardigan that I'm still working on?? The other significant change was the creation of my new book blog - Robin Reads and Writes. (RR&W) If you're a regular you know that I've been including book reviews (mainly fiction) in with my crochet posts for some time. When the library where I work approached me about making my reviews available on their website I knew that a change of format was in order. After trying several layouts the new blog was born. Having everything live together under one roof works well for me as far as maintenance goes. When I started Crochet Nirvana I knew that books would always be part of my site. Now I'm happy that they have their own special place where they can really shine. Of course a second blog means more work. But it's work that I love, and the response has been amazing. In fact, I have been approached by two different publishers and asked if I would like to be an "early" reviewer. You know that I said yes!! I mean honestly, how cool is that? (I'll tell you all about in an upcoming RR&W post!) Now that I've given myself time to regroup I feel energized and focused. Knowing that I have interesting projects, patterns and tutorials to share makes me feel confident about the future. I also am thrilled about the direction the book blog is headed. In addition to fiction I'll be reviewing new crochet/knitting (and other yarn/fiber/craft) books. With so many exciting things on tap the future looks bright indeed. Thanks so much for stopping by and spending a bit of your day with me. Until next time friends, Be blessed and stitch & read with love! One down, One to go... 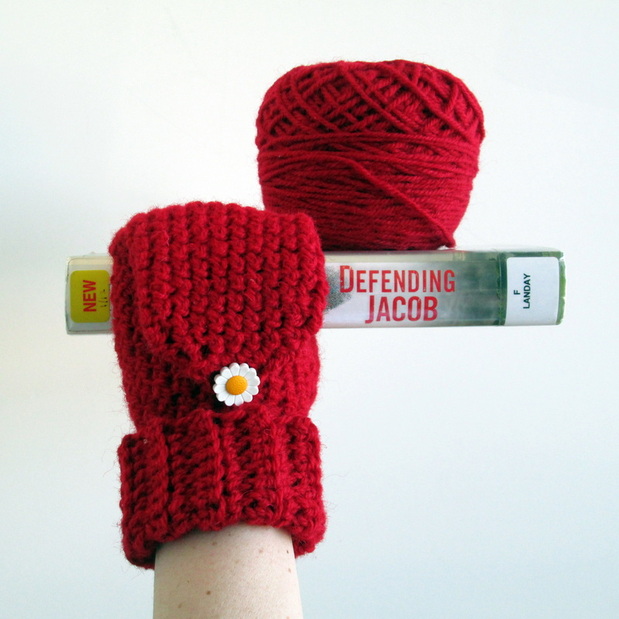
Greetings friends! Snow is in the forecast on the east coast. Six to twelve inches here in central Mass. There's something magical about the first snow of the season. Memories of hot chocolate and gathering around the radio waiting for the local station to tell us that school was cancelled. I suppose that should motivate me to get to work on the second fingerless mitt, but if I'm honest I'll tell you that for the moment I'm out of mitten mojo. It's not that I don't like it. In fact, I'm pretty darn happy with the way this one came out. It's just that for the amount of work that went into it I should have finished 3 pairs! Allow me to explain... I decided that I needed a pair of fingerless mitts to go along with my Slouchy Tassel Cap. In this month's issue of Crochet World magazine I found the pattern for their Texting Mittens. Perfect! I typically have to go down a hook size or two. So I started out with my H hook and whipped up the cuff. It was too small. I don't want to start over so I just add a few rows. No problem. Now I'm working on the palm/body. It's snug, but I soldier on. It was time for the thumb. I followed the pattern adding a few stitches to accommodate the changes to the cuff. After a few more rounds I tried it on. Great. I can't move my thumb. After a fair amount of grumbling I acknowledged that the only was it was going to fit would be for me to rip it all out and start again with a bigger hook. The hook size the pattern indicates. The one I would have known to use if I had made a gauge swatch. This time (of course) the cuff fits. And so does the body. Imagine that. It seems however that I must have gargantuan thumbs, because I need to add several stitches in order to make it fit. Naturally this means several attempts and ripped stitches. Moving on. I was confused by the instructions for making the finger hood (you know that piece that keeps your fingers warm when you're not sending urgent messages or getting the keys out of your purse). After looking at a pair that my mother-in-law gave me I figured out what to do. Again this meant several tries before I got it right (rip, stitch, rip, stitch). I stuck to the pattern and made the hood as indicated. It looked funny, like I had pointy witch hands. I'd come so far that giving up was not an option. Maybe I made a mistake? I ripped back and tried again. Nope, still pointy. OK. I can do this. I know what I want it to look like, and I know that I can figure it out. What I didn't know was it would take 12 tries to get it right! So you can see, while I'm pleased with the way my texting mitt finally looks, I think that I need a bit of a respite before I begin it's mate. I did try to write down the changes that I made, but when I looked at my notes this morning it appears that I was utilizing a form of hieroglyphics in an attempt to make things more clear. Hmmm... How about a little book chat? If you've been to visit before you know how much I love books, and if you haven't had a chance I hope you'll take a look at yesterday's post. I'm so excited to have a new venue to share my book reviews. Of course I'll still be talking about them here, I have too they're so much a part of me. But by creating Robin Reads & Writes I can really delve into my reviews without worrying that I'm turning away those of you who come for the crafting. If you enjoy my reviews, I hope that you'll subscribe to the new blog, or at least click on the link in the header or on the sidebar once in a while to see what's new. I have reviews for two books in the works right now, and I'll tell you both of these had a big impact on me. I'll let you know when they're ready. Now I'm reading Defending Jacob by William Landay which has been on the NY Times best seller list since it came out in January. While that's not my reason for choosing it, I do like to keep current with what the masses are reading. It's been a while since I've read a crime/court drama so I decided I'd give this one a go. Stay tuned and I'll let you know how it rates! Today I'll be sharing the saga of the single mitt with these ladies and their link parties. There are always so many fun and interesting projects to see, that I hope you'll spend a few minutes visiting them. I always find inspiration, and it's a great way to meet new people.
That does it for me. I'm off to work and then to hunker down with my hook and yarn and wait for the snow. My prayers are with anyone who was effected or knows anyone who was effected by Sandy. Let's hope that Athena (yep, the latest storm has a name already) follows gently in her wake.
Thanks so much for stopping by and spending a bit of your day with me. Until next time friends, Be blessed and stitch & read with love! 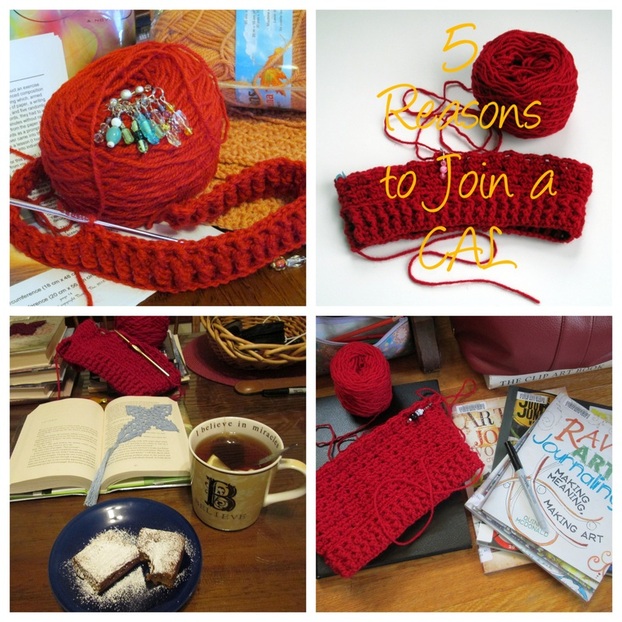
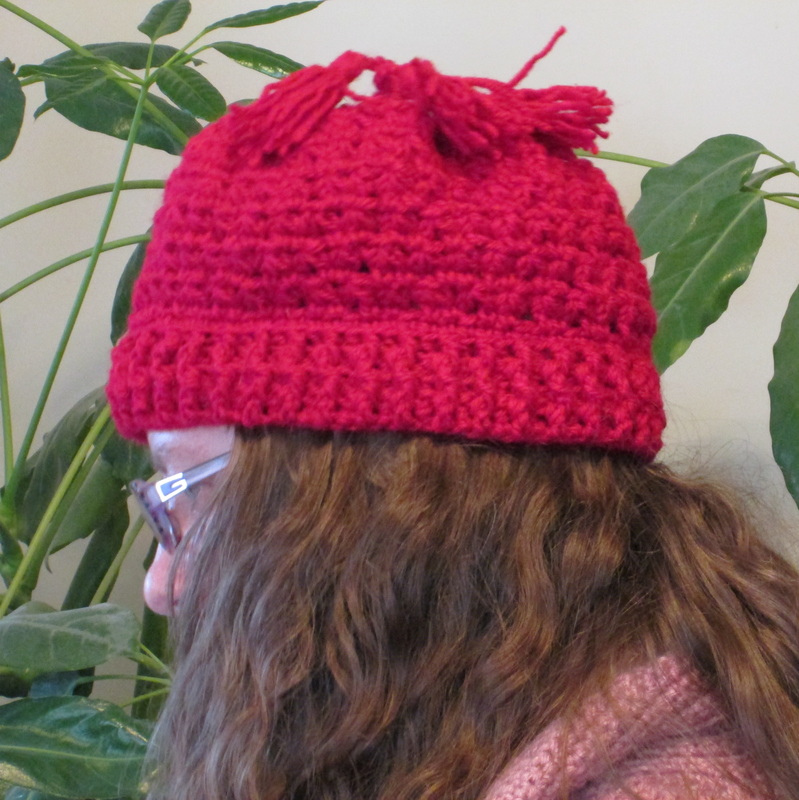
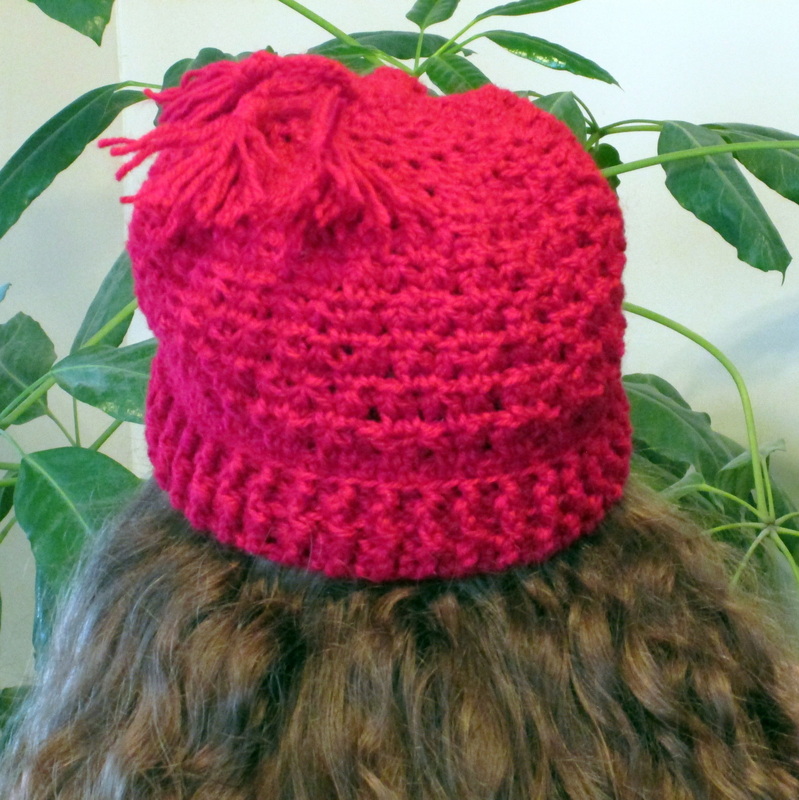
Greetings and Salutations Friends! This week has been all about my awesome Slouching Towards Tassels Cap by Denise at Voie de Vie. It seems that it was with me no matter what I was doing: making stitch markers with John; participating in the JAL for Accessories: Autumne 2012 (Denise's new ebook where you'll find this pattern); hunkered down to wait out hurricane Sandy (with a good book, homemade spicy Hermits and a cup of chamomile); or looking for journaling inspiration. We were inseparable, and even though I only worked on it a little bit each evening it took less than a week to finish. I wish that the lighting had been better for my ta-dah pictures so you could see just how great it looks. Red is difficult to photograph, and these shots don't show you how rich the color is. 2 big "cakes" of this mystery wool were given to me last year, and I've been waiting to find a project for them. I think this one is perfect. I'm drawn to the tassels which I think give the cap a playful look that is fun in a grown up sort of way. Don't get me wrong, I love pom-poms, but sometimes you need something that you can wear with your "good" coat on those cold winter days!
I always like to make coordinating pieces when I can, and since I have plenty of yarn left I set to work on a pair of mitts. The fingerless kind that have the little hood attached so you can keep warm while you're walking, but still grab your keys or use your phone when you need to. I've tried to explain them to my husband, but he remains convinced that topless mittens are just plain silly! It must just be a guy thing, because all my girlfriends love them!  In addition to my fiber offerings, I like to participate in Five Minute Friday over at Lisa-Jo Baker's place. It's writing in the raw and if you've never done it, why don't you give it a try? It's really easy - you just: 1. Write for 5 minutes flat on this week's prompt with no editing, no over thinking, no backtracking - then post it just as it is! 2. Link back here and invite others to join in. 3. And then absolutely, no ifs, ands or buts about it, you need to visit the person who linked up before you & encourage them in their comments. Seriously. That is, like, the rule. And the fun. And the heart of this community. Here's what happened when I spent five minutes writing on the prompt "Roots" I once had a very wise teacher. She would talk and tell me things that at the time didn't seem to have much to do with the subject at hand. But later, when I was alone doing the dishes, or talking with my husband I would remember what she had said. And I would think about it. And then I would ponder some more. And without even realizing it an idea had formed, a problem was solved, a decision was made. And when I share my revelation with her she tells me that she is a gardener. With the land and with the mind she plants seeds. Small and seeming insignificant. And then it is up to me to grow them. I nurture them and they grown. They strengthen and develop roots. And they will reach deeply into the core. To provide me with sustenance. For the body and for the spirit. My wise teacher never pushed anything on me. She offered me seeds, and left the rest up to me. Today I'll be sharing my post with this lovely group of ladies. Each has a terrific link party that will surely introduce you to all kinds of creative goodness! Please stop by, and feel free to add your latest project.
Thanks so much for stopping by and spending a bit of your day with me!
Until next time friends, Be blessed and stitch & read with love! 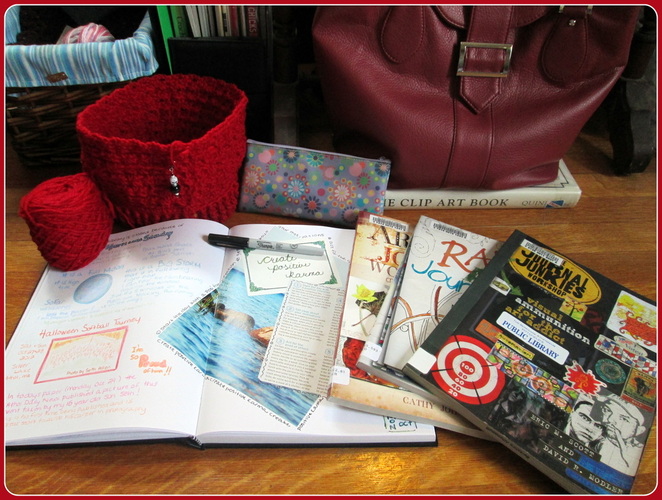
Greetings Friends and Welcome! I hope this Halloween finds all of you enjoying more treats than tricks! Mother Nature is doing her best to keep us on our toes. We were fortunate here in north central Massachusetts to be spared from the brutality of hurricane Sandy. It was wet and windy, but nothing like our neighbors to the south had to endure. Our wishes and prayers for all of you who were affected for a quick and safe recovery. Do any of you journal? I've kept a journal of some sort since I was a teenager. Over the years I've used all kinds: spiral notebooks, composition books (a fave), special books with fancy covers and decorated paper, day planners and even locking diaries. The content has changed as often as the books. It's been poetry and short stories, ramblings of the unrequited love every young girl feels, a record of my pregnancy, and often just a catch all for how my day has been. Recently my journals are including more crafting and art leading me towards mixed media journaling. I've never been able to get into scrap booking, but the idea of including tactile bits and pieces of my day along with words and drawings (or doodling!) is really appealing. My new interest is reflected in my reading materials this week. Raw Art Journaling, The Journal Junkies Workshop, Artist's Journal Workshop and the Sketchbook Challenge all have something to offer. Lessons on technique and suggestions for entries are the most helpful as I find new ways to express the creative spirit inside me. I'm also using my journal to plan and record the progress of my projects. It's really different from the things I write here or the information on a Rav project page. It's less formal and gives me the opportunity to be messy and make mistakes! It can also be very solitary and private. Quite the opposite of what you'll find should you decide to join a CAL! 5 Reasons to Join a CAL (or the a-long of your choice!)
There are other reasons too. They are great for blogging about. Sometimes there are prizes. If you loose your motivation you can always count on the group to get you going again. Timelines (if there are any) help keep you focused. Did I mention all the friends you'll make? If you don't have a crochet or knitting club in your area, joining an a-long is like being a member of a virtual club. Currently I'm participating in two CALs. Both are being hosted by talented, creative women who I've come to know through their blogs. Denise from Voie de Vie has recently published her first ebook of patterns titled Accessories: Autumne 2012. I was lucky enough to win a copy, so of course when Denise announced a JAL (join-a-long) I had to jump right in! Her Ravelry group is here, and you'll find all the information to get a copy of her book or to join us making one of the lovely projects she's designed. I'm making the Slouching Towards Tassels hat in a rich red wool (that's it in the picture with my journal and books). Marie from Underground Crafter is not only a great writer (she is the queen of interviews and (craft) book reviews), she is also an experienced teacher. Her talents shine in The Ripple Mania CAL which actually feels more like a (free!) class than a CAL. Each week Marie is providing us with a detailed lesson. What's great is how much information there is, and how easy it is to use. So far we've learned about choosing colors and the basics of the ripple. The flexibility of this CAL is fantastic, because we get to pick what we want to make and what technique we want to use. If your interested in this crochet technique you definitely should come over and take a look. You'll find everything right here at her Ravelry group. When I decided to join Marie's CAL I didn't know what I was going to make, I only knew that I wanted to use the yarn that I had leftover from the Granny Square Project. Searching patterns on Ravelry I found this - Inspiration for my Ripple Mania Project - The Groovyghan!
Is this totally awesome? I think that this might be the perfect use for all of those squares that I made while I was learning about granny, don't you? I've been struggling to come up with something to do with them, and the Groovyghan seems to be ideal! I haven't got it all figured out yet, but I'm on my way! Wednesday is a busy day and there's always lots to see. I'm joining these lovely ladies and all the other talented crafters who share their projects. Stop by for a dose of inspiration, you won't be disappointed!
 Thanks so much for stopping by and spending a bit of your day with me! Until next time friends, Be blessed and stitch & read with love!  Today's post is the final for Blogtoberfest 2012. Wow!! It's not too late to visit other participating bloggers. Click the graphic and see what you've been missing! Also, keep watch for my summary of the event - coming soon!! And just because... 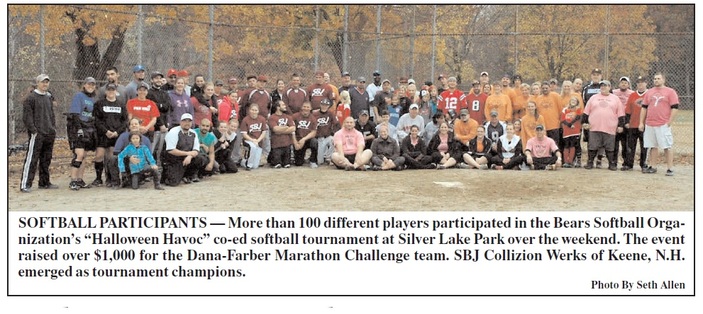
This picture was taken by our 16 year old son Seth. Why am I including it? Because he loves photography, this is the first picture that he's ever had published, and most importantly because I'm a proud momma! Yes, it's only our local paper, but everyone has to start somewhere!! No man has the right to dictate what other men should perceive, create or produce, but all should be encouraged to reveal themselves, their perceptions and emotions, and to build confidence in the creative spirit.
Ansel Adams |
I'm Robin and this is  
Click to see what's new on the Craftsy Crochet Blog!
Follow Along
 Tutorials and Patterns


On Instagram 
Look for me, I'm RobinBrz


Places I Post
 Archives
July 2015
Categories
All
 
Thank you for visiting!
My name is Robin. I am a wife, mother and strong believer in the power of faith. I'm a maker, a crafter and an artist. I love exploring new mediums and sharing my adventures with you. Did you enjoy your visit? Let me know by leaving a comment. I love knowing you dropped by, and hope to see you again soon! Be Blessed and Stitch & Read with Love! 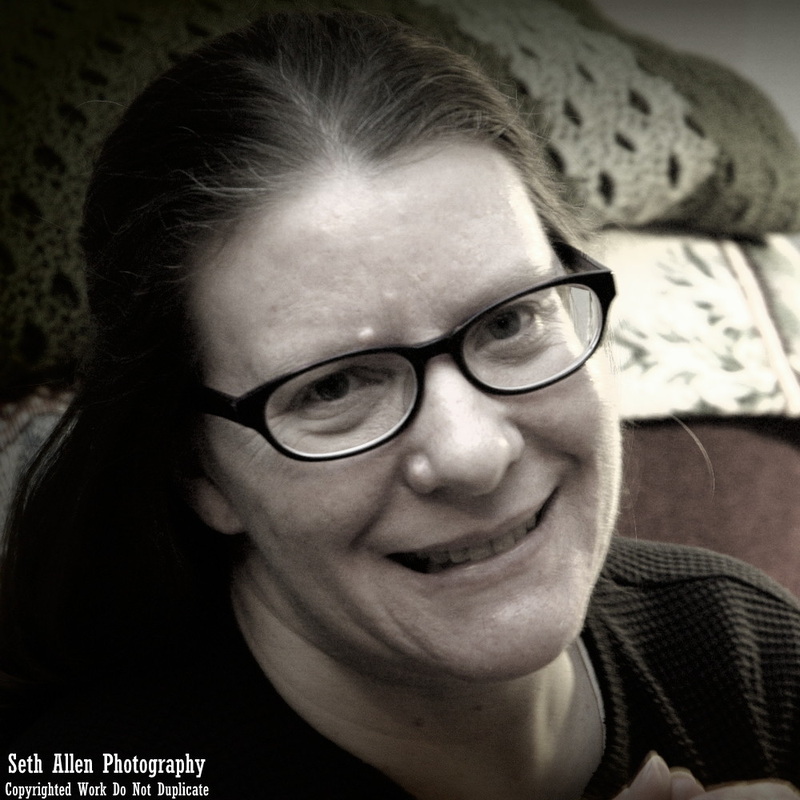
|
|||||||||||||||||||||||||||||||||||||||||||||||||||||||||||||||||